


Thanks for the comments. Here are some more pictures people have asked about.
Also, yes, the guide lines are software adjustable on the Kenwood, unlike most 3rd party cameras. You can turn them on or off with a long press of the control button, and the setup screen for the camera (accessed by pressing the selection button and "+" button on the controller I mounted to the cubby) allows you to set the camera for front or rear (mirrored) view. You can then adjust the lens shift and top-down viewing angle, the width of the parking lines, their angle and as well the "red zone". My redzone puts me about 4.5" away from the obstacle seen in the video. The bottom of the nosecone mounting position is a little lower (~ 16.25") than the camera install spec (18" or more), thus the guide lines don't slant away at the proper angle -- I wish this were more configurable, but I was able to set the WIDTH of the lines to match the Model S's width.
Similar to the rearview camera, the wide angle of the Kenwood camera makes distances look way farther than they are, but in my use, it's really meant for that last 5-12 inches away from the nose.
In brighter light, the camera image is harder to see than at night (obviously), and the reflections of the mirror interfere with the image, but that's the tradeoff I guess for this kind of integration. A dedicated LCD would take care of this but I didn't find a nice spot to hide that. I'm considering putting an LCD in the driver's side sun visor, hidden until I pull it down, but that involves a lot more work to fabricate (I have never done anything like that but suspect I'd oder another visor and find matching fabric to the headliner, then strip down and shape the internals of the visor for an LCD).
1. External view of the camera


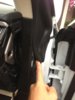
2. Routing of wires into the cabin without drilling the firewall. If you are careful, you can route the wires under the rubber cover and between 2 clips holding the rubber seal on the driver's A pillar/door jamb. These little "T" shaped retainers hold the rubber to the car frame, and if you pull on the free edge of the rubber you can stretch the hole out to free the T clip, then slip the wire(s) underneath, then around and into the cabin. I ran 2 wires: 1 for the video camera and the other is a permanent on 12V for my dashcam (my MS doesn't have that handy connector in the microphone grille).


Also, yes, the guide lines are software adjustable on the Kenwood, unlike most 3rd party cameras. You can turn them on or off with a long press of the control button, and the setup screen for the camera (accessed by pressing the selection button and "+" button on the controller I mounted to the cubby) allows you to set the camera for front or rear (mirrored) view. You can then adjust the lens shift and top-down viewing angle, the width of the parking lines, their angle and as well the "red zone". My redzone puts me about 4.5" away from the obstacle seen in the video. The bottom of the nosecone mounting position is a little lower (~ 16.25") than the camera install spec (18" or more), thus the guide lines don't slant away at the proper angle -- I wish this were more configurable, but I was able to set the WIDTH of the lines to match the Model S's width.
Similar to the rearview camera, the wide angle of the Kenwood camera makes distances look way farther than they are, but in my use, it's really meant for that last 5-12 inches away from the nose.
In brighter light, the camera image is harder to see than at night (obviously), and the reflections of the mirror interfere with the image, but that's the tradeoff I guess for this kind of integration. A dedicated LCD would take care of this but I didn't find a nice spot to hide that. I'm considering putting an LCD in the driver's side sun visor, hidden until I pull it down, but that involves a lot more work to fabricate (I have never done anything like that but suspect I'd oder another visor and find matching fabric to the headliner, then strip down and shape the internals of the visor for an LCD).
1. External view of the camera
2. Routing of wires into the cabin without drilling the firewall. If you are careful, you can route the wires under the rubber cover and between 2 clips holding the rubber seal on the driver's A pillar/door jamb. These little "T" shaped retainers hold the rubber to the car frame, and if you pull on the free edge of the rubber you can stretch the hole out to free the T clip, then slip the wire(s) underneath, then around and into the cabin. I ran 2 wires: 1 for the video camera and the other is a permanent on 12V for my dashcam (my MS doesn't have that handy connector in the microphone grille).
Attachments
Last edited: