


Welcome to Tesla Motors Club
Discuss Tesla's Model S, Model 3, Model X, Model Y, Cybertruck, Roadster and More.
Register
Install the app
How to install the app on iOS
You can install our site as a web app on your iOS device by utilizing the Add to Home Screen feature in Safari. Please see this thread for more details on this.
Note: This feature may not be available in some browsers.
-
Want to remove ads? Register an account and login to see fewer ads, and become a Supporting Member to remove almost all ads.
You are using an out of date browser. It may not display this or other websites correctly.
You should upgrade or use an alternative browser.
You should upgrade or use an alternative browser.
2018 MX 100D......vinegar smell when starting ac
- Thread starter gazepdapi
- Start date
@cloudm Thank you so much for going the extra mile and figuring this all out! The smell returned in our car, so I'm back to buying another can of Kool-it and I can't wait to try this method!
So I tried this yesterday with the 1 can I had left and I think it went well. The biggest pain in the butt was getting the tube in between the fan blades......you have to really push I felt even when going from the top and you can't tell if it's moving toward the left to the evaporator. You have to hold the fan with one hand and push the tube with the other.
cloudm
Member
Well I wasn't even close... Good thing I bought two of those cans lol. This is great instruction thank you!!
@cloudm Thank you so much for going the extra mile and figuring this all out! The smell returned in our car, so I'm back to buying another can of Kool-it and I can't wait to try this method!
@gazepdapi @tnots -- my pleasure. cleaning our model X AC coil and ridding of this stench has been an urban myth for a while. I couldn't stand it anymore and wanted to get to to bottom of this.
Regarding the insertion of the tube, yes the fan blades keeps moving around. I was able to do it with one hand with gentle movements. If you push it too hard the fan blades can move around and change your insertion point.
Thinking of this, if I were to do it again. It might be better to insert the tip first (its the hardest part). Insert it where ever it's easiest. This can be the fan blade that is closest to you. Once the tip is in, rotate the blade so that the tip is positioned at the back. Then insert the rest down towards the left.
I had sometime this morning and found pics that break apart the AC dash assembly. I have notated the images to clearly show what we are trying to achieve. In the pics below, the AC coil has been removed so we can clearly see the inside of the chamber and how the foam should flow.
This one shows the insertion path and likely location of termination of the tip. The blue arrows show were we want to foam to go.

This shows how the foam should enter the AC coil housing chamber. In this pic, the coil was removed you no longer see the attached silver tube outlets that are directly connected to the ac coil. I just notated where the coil would be. You also clearly see the drain plug in the same chamber.
The chamford edges are designed to redirect the air from sideways from the blower to form a left turn and hit the coils perpendicularly directly.

I am sure this is the most effective way to apply the foam. If some of us are still experience the smell, it's likely because that the cleaning agent did not reach all of the coil areas or the cleaning agent did not have adequate time on the coils.
This can be remediated by
* Applying 2 cans back to back, the foam tends to climb on top of each other and expand. So we just need to increase the amount.
* Leave the foam to work longer. Increase from 15 mins to 30 mins. I think the drain tube position is very efficient meaning that we already see things dripping out after the 3-5 min mark. It's a sign that we didn't give enough time for the cleaning process.

Yep that's what I did... Inserted the tip on the side of the fan near me then just spun it around... Even then it was a bit difficult but I think I got it. No smell so far.... I wish there was a quick way to even pull the fan off but that seems involved. There is also some kind of electrical plug just downstream of the fan outlet... There some wiring connected to it. I was thinking of removing that but it's too damn deep... I'm not even sure what it's for. You can see it in your earlier photos.. It's green/blue@gazepdapi @tnots -- my pleasure. cleaning our model X AC coil and ridding of this stench has been an urban myth for a while. I couldn't stand it anymore and wanted to get to to bottom of this.
Regarding the insertion of the tube, yes the fan blades keeps moving around. I was able to do it with one hand with gentle movements. If you push it too hard the fan blades can move around and change your insertion point.
Thinking of this, if I were to do it again. It might be better to insert the tip first (its the hardest part). Insert it where ever it's easiest. This can be the fan blade that is closest to you. Once the tip is in, rotate the blade so that the tip is positioned at the back. Then insert the rest down towards the left.
I had sometime this morning and found pics that break apart the AC dash assembly. I have notated the images to clearly show what we are trying to achieve. In the pics below, the AC coil has been removed so we can clearly see the inside of the chamber and how the foam should flow.
This one shows the insertion path and likely location of termination of the tip. The blue arrows show were we want to foam to go.
This shows how the foam should enter the AC coil housing chamber. In this pic, the coil was removed you no longer see the attached silver tube outlets that are directly connected to the ac coil. I just notated where the coil would be. You also clearly see the drain plug in the same chamber.
The chamford edges are designed to redirect the air from sideways from the blower to form a left turn and hit the coils perpendicularly directly.
I am sure this is the most effective way to apply the foam. If some of us are still experience the smell, it's likely because that the cleaning agent did not reach all of the coil areas or the cleaning agent did not have adequate time on the coils.
This can be remediated by
* Applying 2 cans back to back, the foam tends to climb on top of each other and expand. So we just need to increase the amount.
* Leave the foam to work longer. Increase from 15 mins to 30 mins. I think the drain tube position is very efficient meaning that we already see things dripping out after the 3-5 min mark. It's a sign that we didn't give enough time for the cleaning process.
I like your idea of just putting two cans in there.... Can't hurt anything and let it soak for 30 min
So, @cloudm I did this earlier today and getting the tube in there and “down” to the left was not easy. However, after getting it in the right place I did a good amount of spraying but when it started to drain it didn’t drain out of a “drain tube” in the middle of the car. Rather, it drained all over the inside of the right passenger side wheel axles/shaft. I even crawled under the car from the front looking for a drain tube in the middle (like your pic) and there was nothing. It was an under plate from end to end. I’m a 2019 Raven, maybe they changed the design?! Either case the smell is gone, but my drainage location was very different than yours.
Just used these instructions to clean my 2018 facelift Model S! Thanks!Here are the pictures and instructions after you have taking out the panels, glove box and the AC filter.
You will see the fan underneath the filter chamber. Insert the tube at the further most end of the fan well.


It's easier to insert the Kool-it black tip applicator through the top of the fan blades.


Insert it all the way in, we want the tip to go down towards the left as much as we can.

Apply Kool-it, if you did it right you should start to see the mixture excess dripping. When I applied it through the foot well air-outlet, there was no mixture seen under the car.

Long post with photos.
First off, thank you everyone for all of the great pics and discussion here. It really helped me understand how the filter, fan, and enclosures are arranged back there. I've been following this thread for some time and tried the procedure outlined here to fish the tubing through the fan blades. Although somewhat difficult to get that tubing to tuck in between the blades and into the chamber, I eventually got it down there. My first attempt at this several months ago (using Kool-It) seemed to have worked initially, but the smell soon came back. It wasn't too bad so we just sort of dealt with it for the time being.
Now with the recent record breaking hot weather here (Western WA) the vinegar smell came back with a vengeance! Like really bad. I had purchased this clean and protect kit from Amazon about a month ago, but never got around to using it until today. Just another option that I wanted to try. It's made by a company called DWD2. I have no affiliation with this company/product, just something I found through research. Amazon.com
What made this promising to me was how the product would be dispensed into the HVAC system. You do have to drill a small 3/16" hole into the plastic side of the enclosure between the evaporator and fan assembly, but this provides a more direct route to the evaporator. Also, the nozzle attachment at the end of the tubing is directional, meaning you can point the stream of foam cleaner towards the evaporator. After this process, I followed up with their protection coating product (it's a 2 step kit, but I think they can be purchased separately too). The protection coating is supposed to prevent odors from coming back and resists mold, mildew, and bacteria growth for 6 months (we'll see). It's definitely more expensive than a can of Kool-It, but if it truly works, I'm willing to use it in the future if needed. Plus, I now have a hole that can be used to dispense foam cleaner next to the evaporator.
This is just another option if anyone else wants to try it. I figured I would take some pics along the way in case it's helpful to others. It's too early to tell how well this worked, but I'm sure my wife will tell me right away if that awful smell comes back anytime soon (she drives the X more than I do)! Now for some pictures!
Location towards the back left of the fan/filter assembly. This is where we want to drill our small hole, as close as possible to the evaporator.

I didn't go too far to the left since I was concerned about wires and tubing in the way. The location I chose here was in a more "open" area. I used a wood screw to make an indentation to get the hole started and to help the drill bit stay in place.

Using a 3/16" drill bit and some extensions, I was able to reach in there and drill the hole. I would recommend vacuuming up as much of the debris as possible so the shavings don't fall into the enclosure.

This is the tip adapter that goes into the tubing. You can see the little part that bumps out on the circular section of the adapter, indicating the direction of the stream.

The tip fits snuggly into the 3/16" hole. Ensure the direction indicator is pointing towards the evaporator (pointing to the left).

And away we go.

Following their instructions, I let the foam cleaner sit for at least 15 minutes. Then I turned on the AC/fan for at least 5 minutes to clear out the system. I kept an eye under the car to make sure the drain hose was doing it's job (confirmed there were no clogs in the drain), and that there was a good amount of liquid coming out. At this point, I did move on and performed basically the same steps for their 'protection coating' solution. Once everything was done, I used their supplied plug to close up the hole. Pretty clean look in the end. I will say, the plug fits pretty tightly in there so you may have to pry at it a bit to get it out.

Packaging for the kit.


I hope this is helpful for others or at least just provides another option. Let me know if anyone else has tried this. Just curious how it went for you...I'll also try to provide an update in the future with how well this worked. Really hoping this works better for the strong vinegar smell, gets pretty annoying and embarrassing especially if you're giving rides to friends/family..."what's that smell?!?!".

First off, thank you everyone for all of the great pics and discussion here. It really helped me understand how the filter, fan, and enclosures are arranged back there. I've been following this thread for some time and tried the procedure outlined here to fish the tubing through the fan blades. Although somewhat difficult to get that tubing to tuck in between the blades and into the chamber, I eventually got it down there. My first attempt at this several months ago (using Kool-It) seemed to have worked initially, but the smell soon came back. It wasn't too bad so we just sort of dealt with it for the time being.
Now with the recent record breaking hot weather here (Western WA) the vinegar smell came back with a vengeance! Like really bad. I had purchased this clean and protect kit from Amazon about a month ago, but never got around to using it until today. Just another option that I wanted to try. It's made by a company called DWD2. I have no affiliation with this company/product, just something I found through research. Amazon.com
What made this promising to me was how the product would be dispensed into the HVAC system. You do have to drill a small 3/16" hole into the plastic side of the enclosure between the evaporator and fan assembly, but this provides a more direct route to the evaporator. Also, the nozzle attachment at the end of the tubing is directional, meaning you can point the stream of foam cleaner towards the evaporator. After this process, I followed up with their protection coating product (it's a 2 step kit, but I think they can be purchased separately too). The protection coating is supposed to prevent odors from coming back and resists mold, mildew, and bacteria growth for 6 months (we'll see). It's definitely more expensive than a can of Kool-It, but if it truly works, I'm willing to use it in the future if needed. Plus, I now have a hole that can be used to dispense foam cleaner next to the evaporator.
This is just another option if anyone else wants to try it. I figured I would take some pics along the way in case it's helpful to others. It's too early to tell how well this worked, but I'm sure my wife will tell me right away if that awful smell comes back anytime soon (she drives the X more than I do)! Now for some pictures!
Location towards the back left of the fan/filter assembly. This is where we want to drill our small hole, as close as possible to the evaporator.
I didn't go too far to the left since I was concerned about wires and tubing in the way. The location I chose here was in a more "open" area. I used a wood screw to make an indentation to get the hole started and to help the drill bit stay in place.
Using a 3/16" drill bit and some extensions, I was able to reach in there and drill the hole. I would recommend vacuuming up as much of the debris as possible so the shavings don't fall into the enclosure.
This is the tip adapter that goes into the tubing. You can see the little part that bumps out on the circular section of the adapter, indicating the direction of the stream.
The tip fits snuggly into the 3/16" hole. Ensure the direction indicator is pointing towards the evaporator (pointing to the left).
And away we go.
Following their instructions, I let the foam cleaner sit for at least 15 minutes. Then I turned on the AC/fan for at least 5 minutes to clear out the system. I kept an eye under the car to make sure the drain hose was doing it's job (confirmed there were no clogs in the drain), and that there was a good amount of liquid coming out. At this point, I did move on and performed basically the same steps for their 'protection coating' solution. Once everything was done, I used their supplied plug to close up the hole. Pretty clean look in the end. I will say, the plug fits pretty tightly in there so you may have to pry at it a bit to get it out.
Packaging for the kit.
I hope this is helpful for others or at least just provides another option. Let me know if anyone else has tried this. Just curious how it went for you...I'll also try to provide an update in the future with how well this worked. Really hoping this works better for the strong vinegar smell, gets pretty annoying and embarrassing especially if you're giving rides to friends/family..."what's that smell?!?!".
Attachments
Smoot
Member
Why is it impossible for Tesla to get this right. I always thought this was just an issue with the 3, now I see it's on the S and X. I've never had a car that smells like my model 3 does when it's humid out and I've lived in Florida almost all my life.
mxnym
Active Member
I see this asked a lot in Tesla forums, but really, Tesla buys their A/C units from some 3rd party manufacturer, so I don't understand why everyone thinks this is a Tesla specific issue. As if the point that Tesla technically only resells the A/C system and interfaces with it wouldn't be enough, why would multiple solutions for this problem exist and none of them specifically mention Tesla if this was a Tesla specific problem? I'm know I had this problem in a 2006 vehicle that definitely wasn't a Tesla, and I know that forums at the time had other people who had similar issues and workarounds that they also used for makes other than the one I had (it was probably an excessive option, one guy dropped his windows and ran his heat on high for the last few minutes of every drive where he had used A/C in order to dry out the evaporator before parking). Even back when I had this issue before there was any Tesla other than maybe a Roadster on the road, some mechanic shops had services available to rectify the issue (I think one of the products done by one of the mechanic shops was called FrigiFresh). The best explanation I saw for the issue was that a change in refrigerant requirements lead to the issue due to the necessary design for the new refrigerant. If that explanation is accurate, then there certainly was a time when this wasn't normal, but it was a long time ago.Why is it impossible for Tesla to get this right. I always thought this was just an issue with the 3, now I see it's on the S and X. I've never had a car that smells like my model 3 does when it's humid out and I've lived in Florida almost all my life.
Smoot
Member
I see this asked a lot in Tesla forums, but really, Tesla buys their A/C units from some 3rd party manufacturer, so I don't understand why everyone thinks this is a Tesla specific issue. As if the point that Tesla technically only resells the A/C system and interfaces with it wouldn't be enough, why would multiple solutions for this problem exist and none of them specifically mention Tesla if this was a Tesla specific problem? I'm know I had this problem in a 2006 vehicle that definitely wasn't a Tesla, and I know that forums at the time had other people who had similar issues and workarounds that they also used for makes other than the one I had (it was probably an excessive option, one guy dropped his windows and ran his heat on high for the last few minutes of every drive where he had used A/C in order to dry out the evaporator before parking). Even back when I had this issue before there was any Tesla other than maybe a Roadster on the road, some mechanic shops had services available to rectify the issue (I think one of the products done by one of the mechanic shops was called FrigiFresh). The best explanation I saw for the issue was that a change in refrigerant requirements lead to the issue due to the necessary design for the new refrigerant. If that explanation is accurate, then there certainly was a time when this wasn't normal, but it was a long time ago.
I respect that the parts may be manufactured elsewhere, but it's still within their control to either make changes to the design or find a manufacturer that will. From my own experience, the filter material sits directly against the evaporator. In Florida, that evaporator will always be wet when running and this leads to the introduction of water directly to the filter material, creating a suitable environment for bacteria, mold, and whatever else to grow.
Tesla has had years to fix or attempt to fix this issue.
In fact, their "fix" was to run the fan after shutdown. The problem with this is it delivers all the remaining moisture on the evaporator and within the HVAC system directly into the cabin. If it's raining outside or is significantly humid (like after a rain storm), when this program runs (say during a grocery shopping run), my entire cabin gets coated in a very thick layer of moisture by the time I return. I leave my windows down in my garage to let the moisture escape when the program runs if I drive through rain. You can literally draw faces on the leather armrest in the moisture on it. The attached picture is of moisture on the inside of the car, not on the outside of the windshield. Every surface is slick and wet. And yet, the stink still exists and now all my *sugar* is wet inside the car.
Attachments

BM3B
“beaver”
Just started to get the stank in my Sep 2020 X. I had it in my 3 before, very bummed that it is present in the new X. Have X owners had luck getting Tesla to fix it under warranty?
mxnym
Active Member
That looks like a nightmare, and I hard it find to believe that it's "normal" based solely on your climate. In the interest of avoiding this issue (before anyone was even complaining about it because the 3 wasn't out yet, and while people were blaming COP, which I've never disabled), I've been trying to remember to turn off the A/C and keep the fan running for the last few minutes of my drive during the 3 seasons when A/C runs most of the time so that the air coming out isn't frigid anymore by the time I park. So far, I've had no smell issues, and Indiana is pretty humid in the summer. Additionally, in the interest of not having the HVAC run all night if a door randomly opens (which was firmware a problem in late 2017), I used to be in the habit of turning off HVAC completely every time I parked. FWIW, based on observation and intermittent failures in those practices, I don't think the fan blasts if you turn off the A/C and keep the fan running before stopping the vehicle, so turning off A/C off and keeping the fan running or fully turning off HVAC may help with your issue. That having been said, I still don't think your issue is being caused solely by Tesla's change to mitigate the issue combined with your climate. Do you know anyone else in FL with a Tesla and similar experience and/or have you brought your Tesla to service for this issue? If you don't know anyone and don't want to mess with service, you should at least make sure your condenser drain isn't plugged, because the amount of moisture necessary to do that may well imply that you're not getting any drainage at all.I respect that the parts may be manufactured elsewhere, but it's still within their control to either make changes to the design or find a manufacturer that will. From my own experience, the filter material sits directly against the evaporator. In Florida, that evaporator will always be wet when running and this leads to the introduction of water directly to the filter material, creating a suitable environment for bacteria, mold, and whatever else to grow.
Tesla has had years to fix or attempt to fix this issue.
In fact, their "fix" was to run the fan after shutdown. The problem with this is it delivers all the remaining moisture on the evaporator and within the HVAC system directly into the cabin. If it's raining outside or is significantly humid (like after a rain storm), when this program runs (say during a grocery shopping run), my entire cabin gets coated in a very thick layer of moisture by the time I return. I leave my windows down in my garage to let the moisture escape when the program runs if I drive through rain. You can literally draw faces on the leather armrest in the moisture on it. The attached picture is of moisture on the inside of the car, not on the outside of the windshield. Every surface is slick and wet. And yet, the stink still exists and now all my *sugar* is wet inside the car.
Smoot
Member
That looks like a nightmare, and I hard it find to believe that it's "normal" based solely on your climate. In the interest of avoiding this issue (before anyone was even complaining about it because the 3 wasn't out yet, and while people were blaming COP, which I've never disabled), I've been trying to remember to turn off the A/C and keep the fan running for the last few minutes of my drive during the 3 seasons when A/C runs most of the time so that the air coming out isn't frigid anymore by the time I park. So far, I've had no smell issues, and Indiana is pretty humid in the summer. Additionally, in the interest of not having the HVAC run all night if a door randomly opens (which was firmware a problem in late 2017), I used to be in the habit of turning off HVAC completely every time I parked. FWIW, based on observation and intermittent failures in those practices, I don't think the fan blasts if you turn off the A/C and keep the fan running before stopping the vehicle, so turning off A/C off and keeping the fan running or fully turning off HVAC may help with your issue. That having been said, I still don't think your issue is being caused solely by Tesla's change to mitigate the issue combined with your climate. Do you know anyone else in FL with a Tesla and similar experience and/or have you brought your Tesla to service for this issue? If you don't know anyone and don't want to mess with service, you should at least make sure your condenser drain isn't plugged, because the amount of moisture necessary to do that may well imply that you're not getting any drainage at all.
I have brought it for service and past the first "free" cleaning of the system Tesla has told me I will be paying for filter changes moving forward. I do the kool-it cleaning myself now and I know the drain tube is free of blockage as of the last time I did the cleaning.
Running the fan manually before getting to my destination can help, but I use auto mode almost 100%, so this routine is difficult to follow and I always forget. It also dumps the humidity into the cabin and makes it uncomfortably sticky and gross in about a minute flat. I shouldn't have to do this anyways.
Anyways, I hope the refresh Model X I have on order solves this issue somehow.
Long post with photos.
First off, thank you everyone for all of the great pics and discussion here. It really helped me understand how the filter, fan, and enclosures are arranged back there. I've been following this thread for some time and tried the procedure outlined here to fish the tubing through the fan blades. Although somewhat difficult to get that tubing to tuck in between the blades and into the chamber, I eventually got it down there. My first attempt at this several months ago (using Kool-It) seemed to have worked initially, but the smell soon came back. It wasn't too bad so we just sort of dealt with it for the time being.
Now with the recent record breaking hot weather here (Western WA) the vinegar smell came back with a vengeance! Like really bad. I had purchased this clean and protect kit from Amazon about a month ago, but never got around to using it until today. Just another option that I wanted to try. It's made by a company called DWD2. I have no affiliation with this company/product, just something I found through research. Amazon.com
What made this promising to me was how the product would be dispensed into the HVAC system. You do have to drill a small 3/16" hole into the plastic side of the enclosure between the evaporator and fan assembly, but this provides a more direct route to the evaporator. Also, the nozzle attachment at the end of the tubing is directional, meaning you can point the stream of foam cleaner towards the evaporator. After this process, I followed up with their protection coating product (it's a 2 step kit, but I think they can be purchased separately too). The protection coating is supposed to prevent odors from coming back and resists mold, mildew, and bacteria growth for 6 months (we'll see). It's definitely more expensive than a can of Kool-It, but if it truly works, I'm willing to use it in the future if needed. Plus, I now have a hole that can be used to dispense foam cleaner next to the evaporator.
This is just another option if anyone else wants to try it. I figured I would take some pics along the way in case it's helpful to others. It's too early to tell how well this worked, but I'm sure my wife will tell me right away if that awful smell comes back anytime soon (she drives the X more than I do)! Now for some pictures!
Location towards the back left of the fan/filter assembly. This is where we want to drill our small hole, as close as possible to the evaporator.
View attachment 679954
I didn't go too far to the left since I was concerned about wires and tubing in the way. The location I chose here was in a more "open" area. I used a wood screw to make an indentation to get the hole started and to help the drill bit stay in place.
View attachment 679955
Using a 3/16" drill bit and some extensions, I was able to reach in there and drill the hole. I would recommend vacuuming up as much of the debris as possible so the shavings don't fall into the enclosure.
View attachment 679958
This is the tip adapter that goes into the tubing. You can see the little part that bumps out on the circular section of the adapter, indicating the direction of the stream.
View attachment 679960
The tip fits snuggly into the 3/16" hole. Ensure the direction indicator is pointing towards the evaporator (pointing to the left).
View attachment 679961
And away we go.
View attachment 679963
Following their instructions, I let the foam cleaner sit for at least 15 minutes. Then I turned on the AC/fan for at least 5 minutes to clear out the system. I kept an eye under the car to make sure the drain hose was doing it's job (confirmed there were no clogs in the drain), and that there was a good amount of liquid coming out. At this point, I did move on and performed basically the same steps for their 'protection coating' solution. Once everything was done, I used their supplied plug to close up the hole. Pretty clean look in the end. I will say, the plug fits pretty tightly in there so you may have to pry at it a bit to get it out.
View attachment 679964
Packaging for the kit.
View attachment 679965View attachment 679966
I hope this is helpful for others or at least just provides another option. Let me know if anyone else has tried this. Just curious how it went for you...I'll also try to provide an update in the future with how well this worked. Really hoping this works better for the strong vinegar smell, gets pretty annoying and embarrassing especially if you're giving rides to friends/family..."what's that smell?!?!".
It's easier just take out the FET and use that opening, I think this is also the method service center uses. Ideally you want to take out the PTC heater, but that would make things more complicated (you need to remove knee airbag and do the proper electrical isolation on 12V and HV).
can you explain how to do your method. I would like to try to clean mine for the first time as this smell occasionally occurs in my model x.It's easier just take out the FET and use that opening, I think this is also the method service center uses. Ideally you want to take out the PTC heater, but that would make things more complicated (you need to remove knee airbag and do the proper electrical isolation on 12V and HV).
View attachment 833139
Sure, but a couple of things you should take note first:can you explain how to do your method. I would like to try to clean mine for the first time as this smell occasionally occurs in my model x.
1. This is not a simple task, you can look at the model X service manual first to get a sense of what needs to be done (procedure code 18201028, Title: Use Evaporator Foam Cleaner, Replace Cabin Filters, I am mostly following this). Tesla Service quote us 300USD+ for a reason.
2. Know how to safely isolate/disable the high voltage system, use proper protections, 120V household AC might zap you, 380V DC WILL KILL YOU.
3. Know how to safely handle airbag/passenger restraint components, they might inadvertently detonate.
4. To keep the smell away, you generally should try to keep your car's HV battery SoC above 20% when possible, the car will run the HVAC and dry the evaporator after you lock the car at the end of your drive, I would assume this won't happen if SoC is too low. My car was left in the service center with low SoC for 3 weeks, then I got the very nasty smell from the mold build up in the evaporator that won't go away. This is just my experience, please correct me if I am wrong about the HVAC drying logic in the car, it seems the car even uses the PTC heater for drying in the summer.
-------------------------------------------
So here is how I did this, proceed at your own risk :
1. Make sure to keep doors open and windows down, alarm disarmed, so you don't get locked out when there is no 12V powered.
2. Remove passenger side interior trims and glove box (same as you are going to replace the interior air filter), until you can see the passenger side knee airbag.
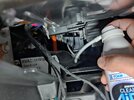
3. At this point the FET is visible and accessible (see pic), if you don't want to take out the PTC (which requires messing with airbag and HV component), you can remove the two screws holding the FET and disconnect the connector, but be careful as the fins might be very hot. You can get to the evaporator from the FET opening fairly easily. Personally, I would take out the PTC, as the final result for me is way better, depending on how bad the mold situation is in your car, especially where the mold is located, you might or might not need to take out the PTC heater. If you are not taking out PTC, skip to step 10.
4. If you are going to take out the PTC, then take out the front trunk tub and HEPA filter, which let you access the 12V battery and HV interlock loop (first responder loop).
5. Do a MCU power off, then disable 12V by removing the battery negative terminal and make sure they don't touch, pull the HV interlock loop to prevent DC-DC from supplying power to 12V, and wait for like 3 mins just in case there are residuals charges (12V first, then HV loop, otherwise you will set some fault codes). Note that even if you killed 12V and pulled the interlock loop, you should always assume the HV circuit is still live and the airbag/srs component might inadvertently detonate, be very careful when handling/working around these components.
6. Remove the screws and 4 bolts holding the passenger knee airbag bracket, and the wiring clip on the back side that's attached to the knee airbag bracket. Tesla procedure call for disconnecting the knee airbag, but I was able to just set it aside w/o disconnecting it.
7. Take out the floor vent, the screw is inside the vent opening (see pic).
8. At this point you should be able to have unrestricted access to the PTC assembly, take out the 3 screws holding it, and pull out the data connection, don't touch the orange HV cable. Carefully pull out the PTC and set it aside.
9. Cover the openings with some tape, I used the pouches for packaging slips.
10.
Take out the FET, stick the Kool-it hose all the way into the FET opening and discharge the whole can, the evaporator is just on the left side. After emptying the whole can, put the FET back in and connect it back (I am assuming this FET is the blower motor driver, so the blower won't work w/o it, please correct me if I am wrong). Reusing the photo from the previous post, but do note that when every the blower motor is running, there should be an air filter, unlike what's shown in the photo.
11. Stay clear of the airbag and PTC heater. Assume they can detonate anytime. At this point you can power the car backup, HV loop first, then 12V.
12. Follow the kool-it instruction (wait for 15 mins, run AC on low for 5 mins, low fan for a few mins, then crank up the fan so that the compressor runs at a higher duty cycle). You should see the foams coming out of the evaporator drain.
13. Then power down the car again via MCU, kill 12V, pull HV interlock loop, wait a few mins. Remove covering, reinstall PTC (don't forget the data connector), remount knee airbag (make sure to torque it down properly).
14. Once all HV and SRS components are secured, you can power the car back up and enjoy some AC, but before you put everything back together, set the HVAC to HI and make sure the PTC works, this will also dry out the vents.
15. Put everything back together, and make sure everything is secured. Recalibrate all doors.
I hope this help.
Last edited:
SUP THO
Member
The instructions on this thread worked like a charm in terms of getting the Kool It into the right place. I replaced the cabin and HEPA filter in less than an hour. The AC smelled nice and minty fresh for about a day. However, I had lunch and had the car sit outside in the sun for about 2 hours. When I turned on the AC, the smell came back for the first few minutes. I noticed when I turn on the AC in my garage after sitting for a few hours there's never any issues. There may be something related to having it sit out in the sun. Or maybe it's just me...
Similar threads
- Replies
- 34
- Views
- 6K
- Replies
- 0
- Views
- 803