Welcome to Tesla Motors Club
Discuss Tesla's Model S, Model 3, Model X, Model Y, Cybertruck, Roadster and More.
Register

Air Compressor Replacement + Air Line & Air Shocks inspection DIY

This site may earn commission on affiliate links.
Thought I'd post this as it may be helpful for others. Especially if you can DIY and don't want to pay Tesla many £1000's to fix these air compressor/suspension-related issues.

I started to hear my air compressor turning on a lot more than it used to and it was getting a lot noisier than it used to be. At the same time, I started getting 'Air Compressor Disabled, Car Cannot Raise' messages, these increased as the temperature dropped to 0c and below.

The other issue I noticed was that the front left suspension was losing pressure and making the car sag on that front side. Clearly, this air shock or the lines to it were leaking and in turn making the compressor run a huge amount more than it was designed for.

To test the lines and suspension I got some leak detection spray and covered all the lines, connections, pumps and tank with it to see if anything was leaking. It wasn't. On to the shocks and the suspect shock created a nice foam party :) The other front one is fine as were both the back ones.

Good one:

IMG_3005.jpg


Bad one:

IMG_3008.jpg


Next thing to tackle was the Air Compressor itself. I would have loved to rebuild this but I can't find the parts, unfortunately. I found that this pump is used in the Audi Q5, Lamborghini Huracan, Porshe Panamera and probably others. It's made by Wabco with the motor by Lucas. I took it all apart and it was full of rust and most probably the press-fit piston ring shot. I have pics of this dismantled if anyone wants me to post them. I ordered a 3rd party part for £300. It has arrived and I fitted it today. It works well and is super quiet! The replacement air shock won't be with me for another 10 days so it will have to handle being used a little bit more than usual for a few days.

While changing the compressor I found another issue. One of the lines from the pump had been rubbed away by its surroundings. It's probably 0.1mm away from a pinhole! I'll order a new piece of line for this and move it away from the rubbing parts near it.

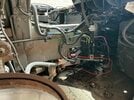
Compressor location (after I removed it) and 2nd pic circled where the black line had been rubbing against the electrical connector:

IMG_3027.jpg


IMG_3028.jpg


IMG_3030.jpg


You need a few hours to troubleshoot, take things apart, and remove and reinstall the air compressor but it's an easy job. You do have to jack up the car (put it in jack mode) and remove the FR wheel so for anyone attempting this, make sure you use the right safety measures, Jack stands etc.
 

Attachments

  • IMG_3027.jpg
    IMG_3027.jpg
    560.2 KB · Views: 776
I’m
Thought I'd post this as it may be helpful for others. Especially if you can DIY and don't want to pay Tesla many £1000's to fix these air compressor/suspension-related issues.

I started to hear my air compressor turning on a lot more than it used to and it was getting a lot noisier than it used to be. At the same time, I started getting 'Air Compressor Disabled, Car Cannot Raise' messages, these increased as the temperature dropped to 0c and below.

The other issue I noticed was that the front left suspension was losing pressure and making the car sag on that front side. Clearly, this air shock or the lines to it were leaking and in turn making the compressor run a huge amount more than it was designed for.

To test the lines and suspension I got some leak detection spray and covered all the lines, connections, pumps and tank with it to see if anything was leaking. It wasn't. On to the shocks and the suspect shock created a nice foam party :) The other front one is fine as were both the back ones.

Good one:

View attachment 900696

Bad one:

View attachment 900697

Next thing to tackle was the Air Compressor itself. I would have loved to rebuild this but I can't find the parts, unfortunately. I found that this pump is used in the Audi Q5, Lamborghini Huracan, Porshe Panamera and probably others. It's made by Wabco with the motor by Lucas. I took it all apart and it was full of rust and most probably the press-fit piston ring shot. I have pics of this dismantled if anyone wants me to post them. I ordered a 3rd party part for £300. It has arrived and I fitted it today. It works well and is super quiet! The replacement air shock won't be with me for another 10 days so it will have to handle being used a little bit more than usual for a few days.

While changing the compressor I found another issue. One of the lines from the pump had been rubbed away by its surroundings. It's probably 0.1mm away from a pinhole! I'll order a new piece of line for this and move it away from the rubbing parts near it.

Compressor location (after I removed it) and 2nd pic circled where the black line had been rubbing against the electrical connector:

View attachment 900700

View attachment 900701

View attachment 900702


You need a few hours to troubleshoot, take things apart, and remove and reinstall the air compressor but it's an easy job. You do have to jack up the car (put it in jack mode) and remove the FR wheel so for anyone attempting this, make sure you use the right safety measures, Jack stands etc.
Also that black hose being chaffed like that would cause high compressor amps because that would be a restriction on that small hose when it goes to fill the reservoir..there’s is 20 bar on that line when it goes to fill which like 290 psi for that small line..service manual states that after 50 mph the resvoir refills below 15 bar …so thats where all the rated range has been going ..lol
 

Attachments

  • AIR.jpg
    AIR.jpg
    40.3 KB · Views: 1,394
Last edited:
Thought I'd post this as it may be helpful for others. Especially if you can DIY and don't want to pay Tesla many £1000's to fix these air compressor/suspension-related issues.

I started to hear my air compressor turning on a lot more than it used to and it was getting a lot noisier than it used to be. At the same time, I started getting 'Air Compressor Disabled, Car Cannot Raise' messages, these increased as the temperature dropped to 0c and below.

The other issue I noticed was that the front left suspension was losing pressure and making the car sag on that front side. Clearly, this air shock or the lines to it were leaking and in turn making the compressor run a huge amount more than it was designed for.

To test the lines and suspension I got some leak detection spray and covered all the lines, connections, pumps and tank with it to see if anything was leaking. It wasn't. On to the shocks and the suspect shock created a nice foam party :) The other front one is fine as were both the back ones.

Good one:

View attachment 900696

Bad one:

View attachment 900697

Next thing to tackle was the Air Compressor itself. I would have loved to rebuild this but I can't find the parts, unfortunately. I found that this pump is used in the Audi Q5, Lamborghini Huracan, Porshe Panamera and probably others. It's made by Wabco with the motor by Lucas. I took it all apart and it was full of rust and most probably the press-fit piston ring shot. I have pics of this dismantled if anyone wants me to post them. I ordered a 3rd party part for £300. It has arrived and I fitted it today. It works well and is super quiet! The replacement air shock won't be with me for another 10 days so it will have to handle being used a little bit more than usual for a few days.

While changing the compressor I found another issue. One of the lines from the pump had been rubbed away by its surroundings. It's probably 0.1mm away from a pinhole! I'll order a new piece of line for this and move it away from the rubbing parts near it.

Compressor location (after I removed it) and 2nd pic circled where the black line had been rubbing against the electrical connector:

View attachment 900700

View attachment 900701

View attachment 900702


You need a few hours to troubleshoot, take things apart, and remove and reinstall the air compressor but it's an easy job. You do have to jack up the car (put it in jack mode) and remove the FR wheel so for anyone attempting this, make sure you use the right safety measures, Jack stands etc.
Thanks for the write and sharing. I assume you did not have the Tesla software tool kit to depressurize the system when replacing these parts. Did you just loosen the air fittings and let the system depressurize while supporting the car? When refilling the system did you use Nitrogen or just let the new compressor do the work? thanks
 
Is the dryer available separately? Or is it possible to open and replace the "beans"?

My compressor works otherwise but still blows a fuse whenever it's cold enough (-20C or so.... )..

Last time I did not have a 40A fuse so I "temporarily" used a 50A fuse and obviously forgot about it. :) Yesterday it was -22C and again I got the "air suspension compressor disabled" warning. However this time it did NOT blow a fuse. The warning went away when weather got warmer, and compressor still works.

So apparently there is some water somewhere that freezes, and that causes compressor current to raise above 40A (but below 50A!).

I know it's dangerous to use "over-sized" fuse. Now I got more 40A fuses so I can replace it back, but I assume it will blow again if it's cold enough...
 
My MX has blown the 40A compressor fuse twice this winter.. It then shows the "air suspension compressor disabled" message. Seems to happen after warm period when it suddenly gets much colder. Must be water somehow freezing in the compressor!

If I change the fuse right away, it will blow instantly again. But if I drive the car to some warm garage and try again after a while, fuse doesn't blow and compressor starts! For me it's not necessary to power off/on, just sit in driver's seat and press the brake pedal.

I don't seem to have any leaks in the struts. I can ignore the blown fuse for days and drive height doesn't change, car looks normal.

But OP thanks for these pictures and write-up! I'll check the compressor to see if there's anything wrong there. I assume a small leak could allow water to get in..

and Tesla is unwilling to admit there is a problem? I asked them point blank multiple times in 3 service center tickets and they won’t answer. We all know replacing 2 compressors within 3 months is not normal.
 
Did the warning “air suspension compressor unavailable” reset itself once the new pump was in?
I Had The Same Issue And I Someone Online Mention Changing The Fuse. I Have A Model X N I Removed The Panel At The Top Of The Frunk. Removed the Cover Of The Battery Then I Checked Fuse F154 Which Is Listed As The Air Suspension Compressor. The Fuse Had Blown So I Went To Auto Zone Bought The Same Style 40A Fuse. Once I Replaced The Fuse I Did The Hard Reboot In The Car Via Wheel Configuration In The Service Tab On The Touchscreen. I Changed The Tire Size To 19 Since It’s Smaller Then The 22 I Have. I Pressed Confirmed Then Once The Car Turned Back On I Went To The Suspension Tab And Changed It To High And I Could See It Raising Off The Ground To The Selected Height. Also The Light Went Off As Well. B4 I Drove Off I Changed The Wheel Configuration Back To My Correct Size Of 22. It’s Been Driving Fine Since The Fuse Change. The SC Wanted 3,000.00 To Replace The Parts When It Cost Me 6.10 to Replace The Fuse. It’s Worth A Try To Check N C If That Fuse Is Blown B4 Spending Unnecessary Money To A Minor Fix. Good Luck
 

Attachments

  • image.jpg
    image.jpg
    694.1 KB · Views: 64
Can anyone help please? I just got this message up today “Air Suspension Compressor Disabled - unable to raise suspension” — wanted to try replacing the fuse first, but not sure where to find it…..can someone please let me know where to find it Without having to wade throught he online user manual which is like an encyclopaedia with no index!

if no joy there, I’ll get it up on stands and start the tedious process of leak testing, checking the hoses and potentially replacing the compressor if it’s faulty. Thanks so much for the ton of very useful info in this thread…..absolutely spot on!

cheers to all of you,
 
I was able to determine that my compressor tank can fill up with air and it does raise my car. So there is definitely a leak somewhere. Tesla just wants to make $5,000 on unnecessary repair sales/service/parts costs, whenever someone has a suspension issue. What a hassle.
 

There's all fuses listed in easy format.

It's F154 in the frunk. Super easy to check in MX.
Thanks a lot for that - and it was spot on - I had found it via Google beforehand, but your assistance is appreciated.

when checked, 40A fuse at F154 was blown….reason believed to be ice formation inside the compressor during a recent cold snap.

Once replaced, the suspension refilled, and the compressor then cut out again and the warning returned….checked fuse again, it was fine. No idea what was the new issue and was waiting to check it in the morning, but had to go a 15 mile drive in the car. During that drive, I managed to hit a deep pothole and with the suspension almost empty of air again, it hit it with a real bang…..and instantly the warning went out and the suspension refilled!!!

Can only surmise that the few days of not being working and in very cold conditions had ‘upset’ it and the jolt form the pothole was enough to kick it back into action….3 days on and it’s still fine and no more errors have come up.

pleased to avoid another huge theft of my cash by Tesla!
 

EAS = CONTI SYSTEM​

[EAS] Air suspension compressor purging air while running​

Description

Firmware Details
Steps To Test
Steps To Fix


Effects
Causes

DESCRIPTION​


During normal driving a burst of pressurized air can be heard venting into atmosphere.

The Electronic Air Suspension (EAS) system is filled with nitrogen and if a leak is present, the system will compensate by drawing in normal air from outside. Ambient air expands more than nitrogen and may cause the system to go over the expected maximum system pressure.

FIRMWARE DETAILS​


None

STEPS TO TEST​


  1. Test drive the vehicle and listen for air venting to atmosphere.
  2. If air is heard venting into the atmosphere, then this is the issue.

STEPS TO FIX​


  1. Test the air suspension system for leaks.
  2. Deflate the complete system and refill with nitrogen according to the appropriate Service Manual procedure:
  3. Confirm the air suspension system no longer vents to atmosphere.
 
Last edited:

TAS air compressor internally frozen due to moisture / water present in system​

Description

Firmware Details
Steps To Test
Steps To Fix


Effects
Causes

DESCRIPTION​


The Tesla Air Suspension (TAS) air compressor blows the 40A fuse because it is internally frozen due to excessive moisture and freezing ambient temperatures which causes excessive current draw.

FIRMWARE DETAILS​


None

STEPS TO TEST​


  1. If the compressor is not operating, consult the relevant Electrical Information for the vehicle to locate the positive and negative motor connector on the compressor:
  2. Check for a direct short between B+ and B- or the motor body.
    • The pump should read a resistance of 0.3 to 0.5 Ohms across B+ and B-.
  3. Remove the pipework from the compressor and valve block to identify any signs of water ingress.
    • If water ingress is found, then inspect the whole system for an air leak.
  4. Inspect the pipework and air struts for any signs of leakage.
    • An air leak in the system will cause high moisture content to enter the system which will freeze in low temperatures, so although replacing the compressor will resolve the issue temporarily, this is not the actual cause of the issue. Rather, the source of the liquid ingress is the root of the issue and should be located and addressed.
    • Note: There is no need to disassemble the compressor to prove an internal issue.
If moisture is present in the system and the air compressor is frozen, then this is the issue.

STEPS TO FIX​


  1. Disconnect all the air line connections from the air springs and reservoir.
  2. Blow compressed air through the pipework to flush / remove any excessive moisture.
  3. Inspect and dry the air suspension reservoir. If moisture or rust is found to be excessive, replace the reservoir according to Service Manual procedure:
  4. Replace the air suspension compressor according to Service Manual Procedure:
    • Note: It may be recommended to also replace the valve block.
    • Model S (2012 - 2020):
    • Model X (2015 - 2020): Compressor - Air Suspension (Remove and Replace) - Correction code 31102002
    • Model S (2021+): Compressor - Air Suspension (Remove and Replace) - Correction code 31102002
    • Model X (2021+): Compressor - Air Suspension (Remove and Replace) - Correction code 31102002
    • If the compressor has been running with excessive current draw over a longer period of time due to air leakage, it is recommended to also replace the relevant relay and fuse. Refer to the relevant Electrical Information:
 
  • Like
Reactions: TsKarma and hydro

Air suspension valve(s) do not actuate​

Description

Firmware Details
Steps To Test
Steps To Fix


Effects
Causes

DESCRIPTION​


On both Conti Air Suspension (EAS) and Tesla Air Suspension (TAS), the valve block holds electronic solenoid valves that are closed by default. When energized, they open and allow air to flow into the air circuit. The valve block also holds the pressure sensor for both systems.
  • For TAS, the valve block holds the air spring valves and the reservoir valve. The exhaust and boost valves are within the compressor assembly.
  • For EAS, the valve block holds the air spring valves and the exhaust valve. Reversing valves within the compressor act as the reservoir valve.

FIRMWARE DETAILS​


None

STEPS TO TEST​


  1. Check for wiring issues between the Electronic Control Unit (ECU) and the valve block. Ensure that the valves are being powered and grounded when appropriate.
  2. Blow compressed air to test for suspected clogged lines.
  3. Hold a piece of paper at the exit side of the line to verify whether debris is present.
  4. Disconnect the airline from the air suspension valve in question.
  5. Using Toolbox, command the suspension to fill that corner.

If no air comes out, then this is the issue.

STEPS TO FIX​


  1. Replace the valve block assembly according to the relevant Service Manual procedure:
  2. Test installed lines and air spring modules for leaks.
  3. Cycle air suspension to ensure proper operation.
 
  • Like
Reactions: hydro