Can anyone recommend a shop in the Inland Empire, Southern California for a clean installation of the BlackVue 2channel Dash Cam. All shops claim they do it but I am sure they just trying to get the business. I prefer to use a shop that has tackled a Tesla Model S. I live in the Corona Area. Thanks


Welcome to Tesla Motors Club
Discuss Tesla's Model S, Model 3, Model X, Model Y, Cybertruck, Roadster and More.
Register
Install the app
How to install the app on iOS
You can install our site as a web app on your iOS device by utilizing the Add to Home Screen feature in Safari. Please see this thread for more details on this.
Note: This feature may not be available in some browsers.
-
Want to remove ads? Register an account and login to see fewer ads, and become a Supporting Member to remove almost all ads.
You are using an out of date browser. It may not display this or other websites correctly.
You should upgrade or use an alternative browser.
You should upgrade or use an alternative browser.
BlackVue DS650-S 2 Channel Tesla Model S Install Walkthrough Video
- Thread starter BigTonyTones
- Start date
No2DinosaurFuel
Active Member
Can anyone recommend a shop in the Inland Empire, Southern California for a clean installation of the BlackVue 2channel Dash Cam. All shops claim they do it but I am sure they just trying to get the business. I prefer to use a shop that has tackled a Tesla Model S. I live in the Corona Area. Thanks
I say just do it yourself. Took me about 2 hours and another 1 hour fussing with the blackvue software itself. Overall happy. There is some wires in the trunk, but it's hidden in the trunk. No need to cut the RF wire and resolder if you are OK with a few exposed wires in the trunk area. BigTonyTones initial video does help a lot.
I will soon have a more detailed video install for my tesla. I just need to edit it and show the tools needed.
Thanks No2DinosaurFuel, I think I will wait to see your video. Personally I am unfortunately mechanically incompetent. So I don't have all that confidenceI say just do it yourself. Took me about 2 hours and another 1 hour fussing with the blackvue software itself. Overall happy. There is some wires in the trunk, but it's hidden in the trunk. No need to cut the RF wire and resolder if you are OK with a few exposed wires in the trunk area. BigTonyTones initial video does help a lot.
I will soon have a more detailed video install for my tesla. I just need to edit it and show the tools needed.
I just did the install on my 2017 Model S. Here are a few notes and pictures from my install.
PLEASE NOTE: Watch the video that was posted by BigTonyTones first or else this wont make any sense to you.
1. I used the "fan cable" and plugged right into the unused connector in the microphone grill. I then ran the cable out from the corner of the grill before snapping the grill back in. I did not want to mess with the 3 forward facing camera housing so I just used the small little sticky cable holder and stuck it on the right side of the camera housing and then ran the cable to there and then to the blackvue. It sits nice and flush and you can hardly tell its there.
2. I ran the cable for the rear camera up and along the headliner and windshield. I used the blue pry tool that came with the camera to pull the headliner down from the windshield as I pushed the cable up into it. Very easy to do. Don't forget to route the cable on top of the air bag once you come to the door molding. I then did as instructed in the video and ran it under the molding.
3. Once you get to the rear hatch seam right behind the little window in the backseat passenger side window area, you can pry off that panel but do it AFTER you remove the Shelf bracket in the trunk. I then brought the cable back on top of the rear airbag and used a long zip tie to fish the wire from where the boot was removed that holds all the existing wiring.
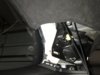
Below you can see how I removed the shelf and the side panel. The panel and shelf both pull straight out and away from the body. Not up.

I removed this panel while I was sitting in the back seat of the car(on top of the folded down seat). You can see how the clips are on the panel - pull it straight out towards you.
 You can see part of the airbag in the picture below. I made sure the cable was routed on top of the airbag.

This is a picture of the zip tie that I pushed through the bottom boot into the cabin

Picture of the zip tie poking through to the cabin.

I then routed the wire through the rubber boots and then fished the zip tie from the top boot and it popped out where you can see the wire hanging on the top left of this picture. I did cut off the plastic tip of the wire, but after further inspection, I think I could have tried fishing the wire through with the tip on. If that doesn't work, you could take a razor and then just cut straight down the plastic covering on the gold connector then try fishing it through. I regret cutting the wire before I even tried fishing it through the metal window hatch.

Now i'm waiting on the new connector to put on the wire before connecting it to the camera. All in all, it was a pretty straightforward install. I hope the pictures help someone in the future.
PLEASE NOTE: Watch the video that was posted by BigTonyTones first or else this wont make any sense to you.
1. I used the "fan cable" and plugged right into the unused connector in the microphone grill. I then ran the cable out from the corner of the grill before snapping the grill back in. I did not want to mess with the 3 forward facing camera housing so I just used the small little sticky cable holder and stuck it on the right side of the camera housing and then ran the cable to there and then to the blackvue. It sits nice and flush and you can hardly tell its there.
2. I ran the cable for the rear camera up and along the headliner and windshield. I used the blue pry tool that came with the camera to pull the headliner down from the windshield as I pushed the cable up into it. Very easy to do. Don't forget to route the cable on top of the air bag once you come to the door molding. I then did as instructed in the video and ran it under the molding.
3. Once you get to the rear hatch seam right behind the little window in the backseat passenger side window area, you can pry off that panel but do it AFTER you remove the Shelf bracket in the trunk. I then brought the cable back on top of the rear airbag and used a long zip tie to fish the wire from where the boot was removed that holds all the existing wiring.
Below you can see how I removed the shelf and the side panel. The panel and shelf both pull straight out and away from the body. Not up.
I removed this panel while I was sitting in the back seat of the car(on top of the folded down seat). You can see how the clips are on the panel - pull it straight out towards you.
This is a picture of the zip tie that I pushed through the bottom boot into the cabin
Picture of the zip tie poking through to the cabin.
I then routed the wire through the rubber boots and then fished the zip tie from the top boot and it popped out where you can see the wire hanging on the top left of this picture. I did cut off the plastic tip of the wire, but after further inspection, I think I could have tried fishing the wire through with the tip on. If that doesn't work, you could take a razor and then just cut straight down the plastic covering on the gold connector then try fishing it through. I regret cutting the wire before I even tried fishing it through the metal window hatch.
Now i'm waiting on the new connector to put on the wire before connecting it to the camera. All in all, it was a pretty straightforward install. I hope the pictures help someone in the future.
Attachments
I just did the install on my 2017 Model S. Here are a few notes and pictures from my install....
Nice write up. Are you just going to jump the gap to the rear window or run it down to the tail lights and then back up for a clean install?
It's a clean install just like the video posted, running directly to the top of the rear window hatch. No wires are visible anywhere other than the small portion coming out of the microphone grill area to the front camera. I will post a picture of the final install once I get the adapter in.Nice write up. Are you just going to jump the gap to the rear window or run it down to the tail lights and then back up for a clean install?
No2DinosaurFuel
Active Member

EVCarGUy
Member
I installed mine earlier this week on a March 2015 S 85D. I cut the camera cable as there was no way the right angle was going to make it from the center of the rear glass over to the hole in the hatchback with the rubber boot. That was the hardest for me to thread - I pushed an electrical fish tape from the window towards the hole, and I used a finger in the hole to catch part of the tape and redirect it.
I also had to remove the trim from the left side parcel shelf - I tried fishing directly from the rubber boot hole on the car body into the interior but ultimately had to do it in two steps once the interior trim was removed.
The worst part for me was the plastic cover above the rear view mirror over the front camera. This has changed in various models. The cover on mine has a curved forward section; I see videos of folks who have a straight front (lower) edge. So, maybe things are different.
In retrospect, there was no need to remove the camera cover. But, I did. Bigly, huuuge mistake. It came straight off. But, I couldn't get it to snap back in later. I finally realized that the metal clips on top of the four posts in the cover that snap up into the frame on the windshield had remained above/behind/inside the mounting bracket when I removed the cover. I had to remove 6 torqx bolts holding the camera assembly to the windshield to retrieve the four loose metal clips. I put them back on the four posts in the cover, and it snapped back into place no problem.. I routed both the power and rear camera cable from the overhead speaker area to just outside/left of the frame on the windshield around the whole camera assembly. There was no need to remove that cover at all. I had seen photos of folks running cables from the speaker opening inside the camera area and bringing the wires out of the cover near the camera itself for a cleaner look, but on my car, it didn't seem possible to get the wires inside that area from the speaker anyway.
I cut the Blackvue power cord and attached a 4-pin connector to plug into the existing connector in the overhead speaker area. It works OK.
But, as expected, no GPS signal. My car is old enough that it doesn't have the magic little area intended for toll transponders.
Edit front camera:

Rear camera. I notched the plastic cover for the cable:

I also had to remove the trim from the left side parcel shelf - I tried fishing directly from the rubber boot hole on the car body into the interior but ultimately had to do it in two steps once the interior trim was removed.
The worst part for me was the plastic cover above the rear view mirror over the front camera. This has changed in various models. The cover on mine has a curved forward section; I see videos of folks who have a straight front (lower) edge. So, maybe things are different.
In retrospect, there was no need to remove the camera cover. But, I did. Bigly, huuuge mistake. It came straight off. But, I couldn't get it to snap back in later. I finally realized that the metal clips on top of the four posts in the cover that snap up into the frame on the windshield had remained above/behind/inside the mounting bracket when I removed the cover. I had to remove 6 torqx bolts holding the camera assembly to the windshield to retrieve the four loose metal clips. I put them back on the four posts in the cover, and it snapped back into place no problem.. I routed both the power and rear camera cable from the overhead speaker area to just outside/left of the frame on the windshield around the whole camera assembly. There was no need to remove that cover at all. I had seen photos of folks running cables from the speaker opening inside the camera area and bringing the wires out of the cover near the camera itself for a cleaner look, but on my car, it didn't seem possible to get the wires inside that area from the speaker anyway.
I cut the Blackvue power cord and attached a 4-pin connector to plug into the existing connector in the overhead speaker area. It works OK.
But, as expected, no GPS signal. My car is old enough that it doesn't have the magic little area intended for toll transponders.
Edit front camera:
Rear camera. I notched the plastic cover for the cable:
Last edited:
Reekdog
Member
I noticed you have a radar detector. Where did you get the switched power from.Quick video I put together on how I ran my camera.
Questions or comments please let me know
Hope its of some help
Thank you
Thanks
My car was picked up end of 2016. Your wires may be differentI noticed you have a radar detector. Where did you get the switched power from.
Thanks
I popped out the center panel from the passenger side. You'll see 2 black wires that are for the usb. To the left of the wires behind another panel is a white tipped plug cable. Its clipped in. I popped it out and unplugged it. After I unplugged it, I found the cigarette lighter plug doesnt turn on anymore. I figured one of the wires is for the lighter.
From memory, the plug had about 9-12 wires coming out of it. There were 3 red wires on one side and 2 black wires on the other end. I tested all 5 wires and found the 3 red wires were all switched 12v. The 2 black wires were ground
I used this posi-tap to tap anyone of the red wires for switched 12v and used another posi-tap for the ground
Amazon.com: Posi-Tap Red (10) Inline Wire Connectors 18-24, GA, AWG, Electrical Fastener, WIRE NOT INCLUDED: Automotive
Hey Bigtony. Thanks for the write-up. Probably gonna attack this next weekend. On using the 5 amp fuse, you just connect that inline to the 14v wire?My car was picked up end of 2016. Your wires may be different
I popped out the center panel from the passenger side. You'll see 2 black wires that are for the usb. To the left of the wires behind another panel is a white tipped plug cable. Its clipped in. I popped it out and unplugged it. After I unplugged it, I found the cigarette lighter plug doesnt turn on anymore. I figured one of the wires is for the lighter.
From memory, the plug had about 9-12 wires coming out of it. There were 3 red wires on one side and 2 black wires on the other end. I tested all 5 wires and found the 3 red wires were all switched 12v. The 2 black wires were ground
I used this posi-tap to tap anyone of the red wires for switched 12v and used another posi-tap for the ground
Amazon.com: Posi-Tap Red (10) Inline Wire Connectors 18-24, GA, AWG, Electrical Fastener, WIRE NOT INCLUDED: Automotive
Yes correctHey Bigtony. Thanks for the write-up. Probably gonna attack this next weekend. On using the 5 amp fuse, you just connect that inline to the 14v wire?
Your very welcome
Similar threads
- Replies
- 8
- Views
- 362
- Replies
- 3
- Views
- 725
- Replies
- 6
- Views
- 294
- Replies
- 24
- Views
- 3K