zkmusa
Member
Hopefully you will make a YouTube video of the install. It would be very helpful!I am having a pro-install done on Wednesday...will keep you posted on what we find.


You can install our site as a web app on your iOS device by utilizing the Add to Home Screen feature in Safari. Please see this thread for more details on this.
Note: This feature may not be available in some browsers.
Hopefully you will make a YouTube video of the install. It would be very helpful!I am having a pro-install done on Wednesday...will keep you posted on what we find.
Is this a change of heart, or were you always planning on having a professional do it?
Dear K, (I'm lazy). One of the most asked Dash cam in an X questions is where to get the windshield channel/what was used to hide the wires. Please and and report what/where your pro got that stuff. Best to you.I am having a pro-install done on Wednesday...will keep you posted on what we find.
Dear K, (I'm lazy). One of the most asked Dash cam in an X questions is where to get the windshield channel/what was used to hide the wires. Please and and report what/where your pro got that stuff. Best to you.


Did my front dash cam today. I don't have a lot of electrical knowledge, so I am waiting to hear what the solution for continuous power is. But, here are some panel removals I did for my routing to the center console 12V socket.
To see if we would get lucky again with an extra connector, I pulled down the hazard/dome lights housing. Its held up with 2 clips. No joy for any extra connectors there.
View attachment 271681 View attachment 271682
So, then I just did a route to my center console. I started at the center console end by taking off the trim piece on the passenger side of the console:
View attachment 271683
It is just attached with clips and wasn't hard to unpin. There are screws underneath for the center console assembly itself. They are a specialty bolt, but a T20 worked in them. So I took a few out to gain access under the silver trim piece.
View attachment 271684
You can see how I routed the 12V adapter by the little rubber pad, then under the trim piece. I then fed it up along the center console side, and around to the base of the glove box.
View attachment 271685
I originally left it like shown, but once the glovebox is closed, the wire kept falling out. So I used a panel tool to shove it under that bit of trim right below the glovebox hinge. Then I removed the small bit of trim next to the glove box
View attachment 271686
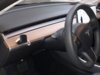
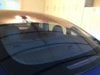
And routed the wire up into the A-Pillar. I pulled the A-pillar panel loose so that I could route the wires around the airbag. Used some teflon tape I had to secure the dash cam wire to the bundle already in the A-pillar and keep it clear of the airbag.
View attachment 271687 View attachment 271689
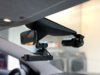
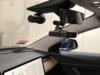
I then routed it across the headliner (big gap - easy), and to the dash cam mount which I have placed next to the AP housing.
Bah, I ended up mounting the camera upside down because I wanted it on the passenger side of the AP housing and still have access to the power cord (I have to unplug it where I work). Found there is no option to flip the video 180 on the front camera, so will just live with upside down video and will fix in post if I need.
Did my front dash cam today. I don't have a lot of electrical knowledge, so I am waiting to hear what the solution for continuous power is. But, here are some panel removals I did for my routing to the center console 12V socket.
To see if we would get lucky again with an extra connector, I pulled down the hazard/dome lights housing. Its held up with 2 clips. No joy for any extra connectors there.
View attachment 271681 View attachment 271682
So, then I just did a route to my center console. I started at the center console end by taking off the trim piece on the passenger side of the console:
View attachment 271683
It is just attached with clips and wasn't hard to unpin. There are screws underneath for the center console assembly itself. They are a specialty bolt, but a T20 worked in them. So I took a few out to gain access under the silver trim piece.
View attachment 271684
You can see how I routed the 12V adapter by the little rubber pad, then under the trim piece. I then fed it up along the center console side, and around to the base of the glove box.
View attachment 271685
I originally left it like shown, but once the glovebox is closed, the wire kept falling out. So I used a panel tool to shove it under that bit of trim right below the glovebox hinge. Then I removed the small bit of trim next to the glove box
View attachment 271686
And routed the wire up into the A-Pillar. I pulled the A-pillar panel loose so that I could route the wires around the airbag. Used some teflon tape I had to secure the dash cam wire to the bundle already in the A-pillar and keep it clear of the airbag.
View attachment 271687 View attachment 271689
I then routed it across the headliner (big gap - easy), and to the dash cam mount which I have placed next to the AP housing.
Bah, I ended up mounting the camera upside down because I wanted it on the passenger side of the AP housing and still have access to the power cord (I have to unplug it where I work). Found there is no option to flip the video 180 on the front camera, so will just live with upside down video and will fix in post if I need.
So the 12v adapter does not offer continuous power?
Are the hazard lights not supposed to work even when the car is powered off?
Could be a good place to look for always on current, no? Even if there seems to be a lot of wires to check...
Did my front dash cam today. I don't have a lot of electrical knowledge, so I am waiting to hear what the solution for continuous power is. But, here are some panel removals I did for my routing to the center console 12V socket.
To see if we would get lucky again with an extra connector, I pulled down the hazard/dome lights housing. Its held up with 2 clips. No joy for any extra connectors there.
View attachment 271681 View attachment 271682
So, then I just did a route to my center console. I started at the center console end by taking off the trim piece on the passenger side of the console:
View attachment 271683
It is just attached with clips and wasn't hard to unpin. There are screws underneath for the center console assembly itself. They are a specialty bolt, but a T20 worked in them. So I took a few out to gain access under the silver trim piece.
View attachment 271684
You can see how I routed the 12V adapter by the little rubber pad, then under the trim piece. I then fed it up along the center console side, and around to the base of the glove box.
View attachment 271685
I originally left it like shown, but once the glovebox is closed, the wire kept falling out. So I used a panel tool to shove it under that bit of trim right below the glovebox hinge. Then I removed the small bit of trim next to the glove box
View attachment 271686
And routed the wire up into the A-Pillar. I pulled the A-pillar panel loose so that I could route the wires around the airbag. Used some teflon tape I had to secure the dash cam wire to the bundle already in the A-pillar and keep it clear of the airbag.
View attachment 271687 View attachment 271689
I then routed it across the headliner (big gap - easy), and to the dash cam mount which I have placed next to the AP housing.
Bah, I ended up mounting the camera upside down because I wanted it on the passenger side of the AP housing and still have access to the power cord (I have to unplug it where I work). Found there is no option to flip the video 180 on the front camera, so will just live with upside down video and will fix in post if I need.
Was it fairly easy to pop out the trim and center console? No special tools required?
Thanks for this. If they aren't too expensive, I may have them do mine when I get the 3. They should have down pat after yours.Created a video showcasing the dashcam install and the source of constant power.
Are these the same people who did the install?Created a video showcasing the dashcam install and the source of constant power.
Are these the same people who did the install?
Installing a Tesla Model 3 dashcam solution from BlackVue Installing a Tesla Model 3 dashcam solution from BlackVue
")