acarney
Active Member
Please someone just make a version that can be sold for $20 or something. I love the DIY and sharing the fixes… but also at times in life I just want to click “buy now” and have a 30 second perfect fit fix, lol


You can install our site as a web app on your iOS device by utilizing the Add to Home Screen feature in Safari. Please see this thread for more details on this.
Note: This feature may not be available in some browsers.
Can you share that? I didn’t find it from amazon or ebay…. Do you mean the 3D printed version?Please someone just make a version that can be sold for $20 or something. I love the DIY and sharing the fixes… but also at times in life I just want to click “buy now” and have a 30 second perfect fit fix, lol
Once someone makes one and sells it, we’ll be golden.Can you share that? I didn’t find it from amazon or ebay…. Do you mean the 3D printed version?
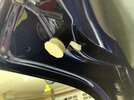
I have solved the low frequency issue with my car. I had a 41 Hz standing wave that would come and go. It wasn't good. If the hatch bumpers are loose, a crazy subsonic buffeting occurs. I'm talking about the annoying rumble that is still there when the bumpers are properly adjusted.
To keep it brief, I placed my phone running the "spectroid" spectrum analyzer on my dash. I then went aound my car, thumping different spots with my hand to see which area(s) caused a 41 Hz resonance. Bottom line, pretty much all of the low frequency is from the hatch. Center glass and center of the metal has resonances at 47 and 50 Hz. The corners where the upper bumpers hit are the 41 Hz culprit.
I made a temporary rigid stop from wood and Epoxy putty to verify that the harmonic could be eliminated, and it can. I then spent a whopping $1.98 on two PVC plumbing pieces, my Epoxy putty, and flat black spray paint for a permanent fix. With the temporary blocks, I knew the exact height needed. I used my sander to shorten the PVC pieces to make the original squishy rubber bumpers ridged at the right length.
You can see the 41 Hz honor- look at read peak line when I thumped the hatch above where the upper bumpers were mounted.
Bottom line... after careful analysis, I have made my car much more enjoyable for very little cost.
There's really nothing to make ahead of time. The plug needs to be sanded down to the length your particular car needs. All you need is two plugs, a sheet of sandpaper, and time for trial and erroe. If you want to get fancy like I did, you can glue the caps on and spray with a flat black spray paint that is compatible with plastic after you get the right length.Same as the above poster... really wish one of you guys would want to make a few extra bucks and make these for us. I would be willing to buy probably for $20 to $40 above cost.
Thank you so much for this specific info! I will move forward with confidence now.I'm really glad this is working for some. I spent quite a lot of time figuring this out.
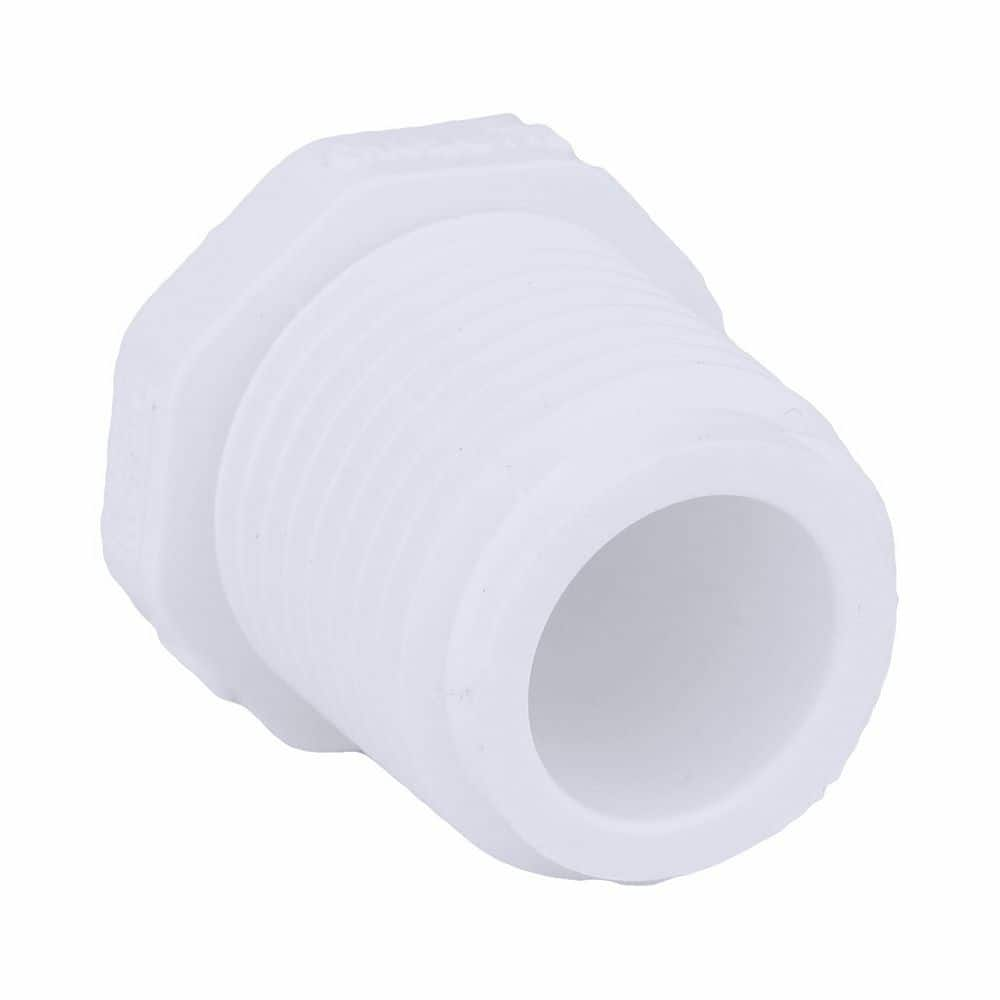
The fitting shown two posts above is a threaded fitting. It'll work, but looks ugly. I used a slip fitting. I got mine at Ace hardware. Lowes has something similar.View attachment 769123View attachment 769125
There's really nothing to make ahead of time. The plug needs to be sanded down to the length your particular car needs. All you need is two plugs, a sheet of sandpaper, and time for trial and erroe. If you want to get fancy like I did, you can glue the caps on and spray with a flat black spray paint that is compatible with plastic after you get the right length.Same as the above poster... really wish one of you guys would want to make a few extra bucks and make these for us. I would be willing to buy probably for $20 to $40 above cost.
Ah, I didn't catch that they need to be custom fitted to each vehicle. I'm not even sure this is my problem, and I just don't have the energy to trial and error it. My cabin has a lots of creaks coming from a couple different areas. I certainly think some is coming from the hatch, but they're not "booming," they actually seem a little more mid to high pitch... almost sounds like the glass isn't secured down and is creaking over bumps, but the glass is nice and tight... I think it's the hatch lid, but who knows.There's really nothing to make ahead of time. The plug needs to be sanded down to the length your particular car needs. All you need is two plugs, a sheet of sandpaper, and time for trial and erroe. If you want to get fancy like I did, you can glue the caps on and spray with a flat black spray paint that is compatible with plastic after you get the right length.
The trial and error is actually quite quick. Start with your factory stops set to the lowest they'll go. Slip a cap on (I had to sand the inside of the PVC cap some to make slip over the OEM rubber.) Close the hatch and note how it won't latch. Pull off the cap, sand 1/16" off and repeat. With a sheet of 100 grit sandpaper sitting on a flat surface, you can just hold the cap in your hand and sand it 1/16" shorter in a few seconds.Ah, I didn't catch that they need to be custom fitted to each vehicle. I'm not even sure this is my problem, and I just don't have the energy to trial and error it. My cabin has a lots of creaks coming from a couple different areas. I certainly think some is coming from the hatch, but they're not "booming," they actually seem a little more mid to high pitch... almost sounds like the glass isn't secured down and is creaking over bumps, but the glass is nice and tight... I think it's the hatch lid, but who knows.
Perhaps you need to visit the optometrist? This thread is about low frequency soundsMaybe visit Doctor about high frequency Sensitivity? Just a thought.
 .
.True that! Hahah never the less.Perhaps you need to visit the optometrist? This thread is about low frequency sounds