Welcome to Tesla Motors Club
Discuss Tesla's Model S, Model 3, Model X, Model Y, Cybertruck, Roadster and More.
Register

Ground light on bottom of door

This site may earn commission on affiliate links.
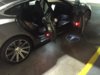
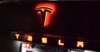
I just got mine in the mail today -- I hooked them up to an outlet with a 12v power adapter to see how they looked, and I have to say: they are pretty damn cool looking. I wasnt sure what I was going to do with them.... if they looked too cheesy, I thought frunk/trunk might be the way to go...if they looked cool, then do the door. Think I am going to do the door, especially since there is a drain plug and it all appears fairly straight forward in terms of install.
I do hope someone else posts step by step instructions while I am wait for me pry tools to come in the mail in the next day or so and decide to tackle it on my own. Anyone have instructions on how to remove the door panel??

An owner on TM (dleidy@spectrum) came up with an improvement in the idea of the logo light installation. Here’s a note of how he did it. He has pictures on his post on TM. (I too followed his lead. Works great.)

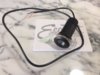
"I just popped out the stock puddle lights, pried out the black LED insert from the clear plastic housing, broke off the side wings from the clear housing, then used the hole saw supplied with the puddle lights to drill a hole in the factory clear plastic housing. Just put it on a board and drill slowly, I was able to just hold it with my fingers. The concentric circles in the plastic perfectly centered the drill bit.

You also have to slightly enlarge the hole in the door with a Dremel in order for the projector housing nut to fit up into the door. Connect the wires and snap back into place. "

Its great that we have so many people that can take someone's idea and move it along, often making the idea better each time. For those coming after:

After removing the existing plastic puddle light from the car, you must be careful drilling out the the hole. You wind up with about 1/16 or so of plastic on the sides. Once you slide the new lamp in and run the nut down it helps strengthen the plastic light. And you want it that way.

Enlarge the hole to allow the nut to pass through and it easily snaps in place. Say again, if you don't enlarge the hole for the nut, the lamp and plastic light will not fit gracefully.

You don’t have to cut the existing connector. Just add a clip it connector to connect the Logo light wires to the existing and you can undo all this if necessary.
 
Just received my custom projector lights. I'll wait to post the image until they're installed. I can guarantee they look amazing. My rear doors do not have factory puddle lights. The recess is there, just no lights. Does anyone know if there is power directly under the recess? If not, I think I'll have to pop the door panels and tap into the red lights on the side.
 
Got my puddle lights. .looks like the batman call
06e81b8170234873b57f32d7aef78ca7.jpg
 
Installed my custom puddle lights last week. Thank you Great Dane for the help. We didn't use the mounting tape as we felt we needed a more permanent hold. We used two little screws to hold the projector light in place. There was just enough meat (hard plastic) for the screws to grab hold. The light is completely flush with the bottom of the door. Once I get more time I'll install the other three doors. The driver door is done and thats the one that matters the most.
IMG_2922.JPG
 
Last edited:
Installed my custom puddle lights last week. Thank you Great Dane for the help. We didn't use the mounting tape as I felt I needed a more permanent hold. We used two little screws to hold the projector light in place. There was just enough meat (hard plastic) for the screws to grab hold. The light is completely flush with the bottom of the door. Once I get more time I'll install the other three doors. The driver door is done and thats the one that matters the most. View attachment 59644
This light looks more standard than the big logo puddle lights.
 
FlDarren; Very nice mod. I have two questions: any chanche I could get the same logo that you have made, and did you ever find out about if there where wires in the backdoors? I to have the reccess but no light. The car was built November 4 th. I put in the red logo lights, but I am not shore if it is too much ot not
 
I had to replace mine.. they were 4X which is the really big diameter.. the driver side was fading/burning through the film, so it was looking very washed out after a year. I purchased the 2x size.. smaller diameter, but cleaner/sharper image. The red looks really red versus the pinkish red I had before with the extra magnification. Ease to do...
 
We all have power to the bottom of the door panel. Top picture- The connector on the far left leads to the red light on the outside of the door panel. The connector in the middle of the picture is for the accent lighting? It doubles back over the other wires. Bottom picture- The unused connector in my hand has to be for the ground light. It is folded and taped onto the group of wires exiting the door. Seems like the right area. Haven't tested them for power, will do soon.
IMG_3647.JPG
IMG_3649.jpg
 
I have these red logo lights on my S too. I didn't cut the small factory connectors off my harness. I used 3M quick connectors to add the logo lights. But I dislike not being able to gracefully remove something later. Its taken a while since I installed mine (Oct '13) but I found the factory male and female connectors that Tesla uses. I ordered some spares and recently removed my logo light and added the same female connector to my logo lights as the back side of the original logo lights used. Now my logo light plug in just like the Tesla original logo lights. I admit its a bit anal to do this when you don't really need to, but I like the satisfaction that comes with not hacking the wires to get something done.

Here's the description and link to where I found mine.
Here’s Manf part numbers and the links to Mouser. Just in case you ever need them for something.
(The harness side connector is two parts that slide together once the female pins are inside.)

Puddle light connectors and mating harness connectors with connecting pins.
Male Connector (Top) 1-1534112-1
http://www.mouser.com/ProductDetail/TE-Connectivity/1534112-1/?qs=%2fha2pyFadujUHUopPMK5nWARk5bbuzB%2fwe31PypQhjo%3d
Male Receptacle Housing (Bottom) 1-1534113-1
http://www.mouser.com/ProductDetail/TE-Connectivity/1-1534113-1/?qs=%2fha2pyFadug0soEhongk8o3oO0prmAU0y4%252bex053A7A5LjwBlaUWlw%3d%3d
Tab Housing Pin end Female 1-1534155-1
http://www.mouser.com/ProductDetail/TE-Connectivity/1-1534155-1/?qs=%2fha2pyFaduhw1MuI4Lm6qxISzcDq2A9NbAo74UVyC%2fp%252bPY7fpt2CPw%3d%3d
Terminal Female Crimp type 963715-5
http://www.mouser.com/Search/ProductDetail.aspx?qs=Ykyshr6pipKiBxpjZXfuRg%3d%3d
Terminal Male Crimp type 1-928918-1
http://www.mouser.com/Search/ProductDetail.aspx?qs=oXydCMRm13w97AQD5QmOww%3d%3d
Alightings T type 2pin Wire Connector
Alightings T type 2pin Wire Connector with no wire-stripping required for Mid-span Branching in Wires Connection, Main Cable 22-20 AWG, branch 22-20AWG (pack of 10) - - Amazon.com

Parts.JPG


If your S did not include the premium upgrade package or the puddle lights in the trunk, you can add them. You can repurpose or buy brighter ones from Abstract Ocean. These connectors above are the same connectors used on Pete's Abstract Ocean brighter lights.

I like the brightness of Pete's lights. I've decided to add another set of the puddle lights to the fuzzy wall on the inside of my trunk higher and on the sides under my parcel shelf. To keep that factory affect, I will need a harness.

The harness needs to plug into the car's factory harness that is either currently connected to one of the trunk's puddle lights or hidden behind the fuzzy where the puddle lights would be. (If you don't have the trunk puddle lights, you can feel around in that corner and you will notice there's a perforated cutout ready where the lights would go.) I unplug the harness from the existing lights and plug my harness in. Then plug the short wire's connector back into the light. Now, I have 18" of extra extension wire with the same connector that I can run up above the lip of the trunk to a location near the parcel shelf. I will mark and cut the fuzzy wall and plug the extended harness in to power the new light. Here's my harness.

Harness.JPG


I like that I can daisy chain a couple of these harness together to add more lights. And if I want to also add a strip of LED lights, I can add one of these female connectors (like on the back of the lights), to the LED strip and simply plug it into this harness. Everything looks more factory, will except for the color or the wire and the Alightings T type 2 pin wire connectors.
 
Last edited:
I have these red logo lights on my S too. I didn't cut the small factory connectors off my harness. I used 3M quick connectors to add the logo lights. But I dislike not being able to gracefully remove something later. Its taken a while since I installed mine (Oct '13) but I found the factory male and female connectors that Tesla uses. I ordered some spares and recently removed my logo light and added the same female connector to my logo lights as the back side of the original logo lights used. Now my logo light plug in just like the Tesla original logo lights. I admit its a bit anal to do this when you don't really need to, but I like the satisfaction that comes with not hacking the wires to get something done.

Here's the description and link to where I found mine.
Here’s Manf part numbers and the links to Mouser. Just in case you ever need them for something.
(The harness side connector is two parts that slide together once the female pins are inside.)

Puddle light connectors and mating harness connectors with connecting pins.
Male Connector (Top) 1-1534112-1
http://www.mouser.com/ProductDetail/TE-Connectivity/1534112-1/?qs=%2fha2pyFadujUHUopPMK5nWARk5bbuzB%2fwe31PypQhjo%3d
Male Receptacle Housing (Bottom) 1-1534113-1
http://www.mouser.com/ProductDetail/TE-Connectivity/1-1534113-1/?qs=%2fha2pyFadug0soEhongk8o3oO0prmAU0y4%252bex053A7A5LjwBlaUWlw%3d%3d
Tab Housing Pin end Female 1-1534155-1
http://www.mouser.com/ProductDetail/TE-Connectivity/1-1534155-1/?qs=%2fha2pyFaduhw1MuI4Lm6qxISzcDq2A9NbAo74UVyC%2fp%252bPY7fpt2CPw%3d%3d
Terminal Female Crimp type 963715-5
http://www.mouser.com/Search/ProductDetail.aspx?qs=Ykyshr6pipKiBxpjZXfuRg%3d%3d
Terminal Male Crimp type 1-928918-1
http://www.mouser.com/Search/ProductDetail.aspx?qs=oXydCMRm13w97AQD5QmOww%3d%3d
Alightings T type 2pin Wire Connector
Alightings T type 2pin Wire Connector with no wire-stripping required for Mid-span Branching in Wires Connection, Main Cable 22-20 AWG, branch 22-20AWG (pack of 10) - - Amazon.com

View attachment 212858

If your S did not include the premium upgrade package or the puddle lights in the trunk, you can add them. You can repurpose or buy brighter ones from Abstract Ocean. These connectors above are the same connectors used on Pete's Abstract Ocean brighter lights.

I like the brightness of Pete's lights. I've decided to add another set of the puddle lights to the fuzzy wall on the inside of my trunk higher and on the sides under my parcel shelf. To keep that factory affect, I will need a harness.

The harness needs to plug into the car's factory harness that is either currently connected to one of the trunk's puddle lights or hidden behind the fuzzy where the puddle lights would be. (If you don't have the trunk puddle lights, you can feel around in that corner and you will notice there's a perforated cutout ready where the lights would go.) I unplug the harness from the existing lights and plug my harness in. Then plug the short wire's connector back into the light. Now, I have 18" of extra extension wire with the same connector that I can run up above the lip of the trunk to a location near the parcel shelf. I will mark and cut the fuzzy wall and plug the extended harness in to power the new light. Here's my harness.

View attachment 212860

I like that I can daisy chain a couple of these harness together to add more lights. And if I want to also add a strip of LED lights, I can add one of these female connectors (like on the back of the lights), to the LED strip and simply plug it into this harness. Everything looks more factory, will except for the color or the wire and the Alightings T type 2 pin wire connectors.
Outstanding information it is amazing how much research you did in order for us to benefit from your efforts. I will be using this data to install my puddle lights. Highly appreciated!!
 
  • Like
Reactions: Akikiki
Outstanding information it is amazing how much research you did in order for us to benefit from your efforts. I will be using this data to install my puddle lights. Highly appreciated!!
Thank you. Most kind of you. I was just giving back for so much great help and information that I have received from TMC members. No where else can an owner get help for any project. The forum members here are great and a valuable asset.
 
  • Like
Reactions: Yarder
Thanks from here as well. I finally got the puddle lamps via eBay today & started to see what would be involved. I really like the idea of using the existing rectangular clear lenses rather than having to remove the door panel to drill the new round hole, etc. So I used my left-over door lights from the Abstract Ocean update & gave it a try. First of all, the hole saw they provide may be OK for cutting the door panel but it's not so good for cutting the clear lenses. After removing the black light housing from the clear lens, I dremel'd the stand-ups flush to the back of the lens then drilled the hole using the hole saw. If you do this, be sure to drill a small pilot hole in the middle to start because the hole saw they provide stinks (relatively). There is very little room on the sides of the lens; if you are off-center, the lens will probably crack. The puddles are installed into the lenses; now I am waiting for the connectors to arrive to finish it off!

IMG_0230.JPGIMG_0229.JPGIMG_0228.JPG
 
  • Like
Reactions: Akikiki
Here is my logo/puddle/welcome lights + lighted rear T and appliqué. Please note the brighter interior red lighting from Abstract Ocean....
 

Attachments

  • IMG_0480.JPG
    IMG_0480.JPG
    328.2 KB · Views: 93
  • Tezzla_1010.jpg
    Tezzla_1010.jpg
    327.4 KB · Views: 86
  • DSC_1095.jpg
    DSC_1095.jpg
    169.9 KB · Views: 87
Last edited:
I received all the hardware from Mouser Electronics this morning & off to the garage I went! I used the Dremel with a small sandpaper drum to enlarge the opening on the bottom of the door panel and boner! I have a lot of the male pins left over from Mouser (the min buy is 100) so if someone wants a few, let me know.
IMG_0243.JPG
 
Last edited:
I received all the hardware from Mouser Electronics this morning & off to the garage I went! I used the Dremel with a small sandpaper drum to enlarge the opening on the bottom of the door panel and boner! I have a lot of the male pins left over from Mouser (the min buy is 100) so if someone wants a few, let me know.
View attachment 217054
I know the situation exactly. I wish they sold those pins in lots less than 100.
 
MODEL X PUDDLE LIGHTS: I used my leftover replaced lights from Abstract Ocean & drilled hole through the lens. Everything was going fine until I discovered The FRONT door storage compartment in the 2017 Model X is so low in the door-well there is not enough clearance for these 2.25" tall puddle lights. Has Anyone installed them in front doors of Model X, I am thinking it could be done but need advice on where to drill hole along bottom of door. Keep in mind driver's front door is "self presenting" and has sensors. Thanks in advance.
 

Attachments

  • unnamed-5.jpg
    unnamed-5.jpg
    27.4 KB · Views: 57
  • Like
Reactions: Akikiki