It is a given in Hawaii and similar climates that the dash instrument display glue will begin to melt, bubble and drip onto the floor (dealer was aware of the problem and told me it is fixed under warranty but costly if you are no longer covered). This is a shame but making an innovative car with tech is an adventure in failure and success. I was going to recycle the component and consider a new replacement but was told the part is the same and that I could expect the same problem eventually (maybe cabin overheat protection would help - but my car is in the shade at work and garaged at home, so possibly equivocal). Given my environmental tendencies I instead endeavored to solve the problem and salvage the part.
Forum thread of others with this problem: Bubble on instrument cluster
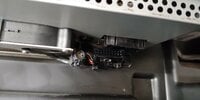
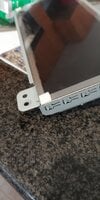
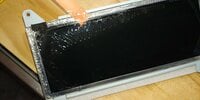
Below are my before and after photos, and a photo of the gluey mess to expect (courtesy of scottjenney@gmai, Apr 4, 2018)
You will need about three hours and:
T20 torx driver (preferably <7.75" in length)
Plastic squeegees (like for window tint)
Vaseline
Stainless Steel Cleaner
Alcohol Swabs
Microfiber cloth
Paper Towel Roll
Nitrile Gloves
Glass Cleaner
(LCD Cleaner)
Lens Cloth
High Heat Hot Glue Gun with High Heat Stick
Duck/Duct Tape
(Gojo Hand Cleaner)
*Perform this task at your own risk and take whatever precautions you feel necessary (e.g. disconnect 12 volt battery). Note the cluster cover is made of glass and there is a risk of breaking.
1. Here is a link to dismantling the dash:
note: set the steering will to the outmost and lowest position
note: you do not need a screw gun or special tools, all you need is the driver above and some patience
note: you do not need the fillable bladder, some mild pressure on the dash will pop it off the clips
note: all the screws are the same except for the two silver screws that are perpendicular to the dash in front of the cluster
note: the wire harness is a cantilever type, and the speedo line has a push clip (you may need to depress the clip on the cluster side of the clip in order to free it)
note: be mindful of where you put the dash parts, they may be covered in glue
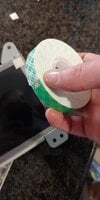
note: mind where the felt tape is on the glass and peel it off to be replaced later
2. This will be a miserable mess, be mindful of the glass on the display when maneuvering, as well as the glue that will be everywhere. I used a hot glue gun (at a great distance) to help loosen the glue (monitor glass temp frequently so as not to fry the LCD) and then squeegees at the for corners to slooowly pry the GLASS display cover off.
3. Coat glass and display liberally with vaseline and use squeegees to scrape the excess glue off (be sure vaseline does not drip into instrument cluster vents). Keep paper towels handy to wipe off your tools, fingers, dash etc.
4. Use stainless steel cleaner sprayed on to a wadded paper towel to wipe off the remainder of the glue, but make sure the display and glass are wet with cleaner so the paper towels don't micro-scratch the surface. When it is markedly reduced, then use alcohol swabs to wipe remaining residue (the cloth swabs will gather up remaining glue). Use LCD cleaner and microfiber towel to clean the LCD. Use the glass cleaner on the glass only. Finish all surfaces with the lens cloth.
5. Make sure one side of your glass and the LCD is spotless (last chance as you will be sealing the display) then dab the four corners of the cluster with a small drop of hot glue and push the glass into the surface. This will not hold the glass so be careful - this is only a buffer between the glass and the cluster. Then split a ~5" length of duct tape (I used the brand name in black) and press one strip along the right and left sides of the glass (overlapping ~3/4") and then wrap the remainder around the side onto the metal of the cluster, press it on well. Replace the two felt tape strips.
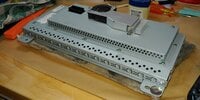
6. Clean up the glue remaining on the dash/parts/floor, then reinstall cluster. You will then need to reset the dash (press the two scroll wheels simultaneously until the dash resets).
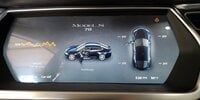
Enjoy again, your dash as it should be!


Forum thread of others with this problem: Bubble on instrument cluster
Below are my before and after photos, and a photo of the gluey mess to expect (courtesy of scottjenney@gmai, Apr 4, 2018)
You will need about three hours and:
T20 torx driver (preferably <7.75" in length)
Plastic squeegees (like for window tint)
Vaseline
Stainless Steel Cleaner
Alcohol Swabs
Microfiber cloth
Paper Towel Roll
Nitrile Gloves
Glass Cleaner
(LCD Cleaner)
Lens Cloth
High Heat Hot Glue Gun with High Heat Stick
Duck/Duct Tape
(Gojo Hand Cleaner)
*Perform this task at your own risk and take whatever precautions you feel necessary (e.g. disconnect 12 volt battery). Note the cluster cover is made of glass and there is a risk of breaking.
1. Here is a link to dismantling the dash:
note: set the steering will to the outmost and lowest position
note: you do not need a screw gun or special tools, all you need is the driver above and some patience
note: you do not need the fillable bladder, some mild pressure on the dash will pop it off the clips
note: all the screws are the same except for the two silver screws that are perpendicular to the dash in front of the cluster
note: the wire harness is a cantilever type, and the speedo line has a push clip (you may need to depress the clip on the cluster side of the clip in order to free it)
note: be mindful of where you put the dash parts, they may be covered in glue
note: mind where the felt tape is on the glass and peel it off to be replaced later
2. This will be a miserable mess, be mindful of the glass on the display when maneuvering, as well as the glue that will be everywhere. I used a hot glue gun (at a great distance) to help loosen the glue (monitor glass temp frequently so as not to fry the LCD) and then squeegees at the for corners to slooowly pry the GLASS display cover off.
3. Coat glass and display liberally with vaseline and use squeegees to scrape the excess glue off (be sure vaseline does not drip into instrument cluster vents). Keep paper towels handy to wipe off your tools, fingers, dash etc.
4. Use stainless steel cleaner sprayed on to a wadded paper towel to wipe off the remainder of the glue, but make sure the display and glass are wet with cleaner so the paper towels don't micro-scratch the surface. When it is markedly reduced, then use alcohol swabs to wipe remaining residue (the cloth swabs will gather up remaining glue). Use LCD cleaner and microfiber towel to clean the LCD. Use the glass cleaner on the glass only. Finish all surfaces with the lens cloth.
5. Make sure one side of your glass and the LCD is spotless (last chance as you will be sealing the display) then dab the four corners of the cluster with a small drop of hot glue and push the glass into the surface. This will not hold the glass so be careful - this is only a buffer between the glass and the cluster. Then split a ~5" length of duct tape (I used the brand name in black) and press one strip along the right and left sides of the glass (overlapping ~3/4") and then wrap the remainder around the side onto the metal of the cluster, press it on well. Replace the two felt tape strips.
6. Clean up the glue remaining on the dash/parts/floor, then reinstall cluster. You will then need to reset the dash (press the two scroll wheels simultaneously until the dash resets).
Enjoy again, your dash as it should be!