Quick summary for those that dont know about the rear door damage caused by the front wheel kickback.
Everything that your front wheels drive over have this kind of trajectory:
This means little tiny rocks are damaging your paint:
A really bad example (from a post here on TMC), all the white spots are chipped off paint:
I live in Southern California, Ive had my Model Y for a bit over a year (June 2020), we've had rain less than 5 times in the entire time Ive owned the car, our roads see so much traffic that all of the debris, rocks, sand is pushed off the road. Where I live roads are excellent (seems like they repave instead of trying to cover cracks). That is all to say that under my driving conditions I dont have any visible/audible rocks/sand etc... yet my experience in a year is about the same as the blue Model Y (I do have ceramic coat too, so that wont save you). Its equal on both sides. Luckily its light enough to where some buffing compound and a rotary buffing tool got most of it out (with a bit of Dr Colorchip).
The issue is bad enough that Tesla started to offer a PPF kit for that area ($50 but seems to be out stock most of the time), and in some regions they even install it at factory before shipping. - Model Y Paint Protection Film
So then, what is the solution? I see this as a 2 step thing. You can do the PPF, either at any reputable shop, shouldnt be expensive, Tesla's price + labor. You can get Tesla's kit and DIY it, or get a kit from some other 3rd party, RPM Tesla, Abstract Ocean etc...
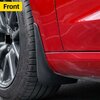
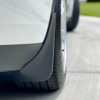
But while this will protect the door paint (hopefully), it wont protect the plastic right under the door. That thing is actually pretty rough (if you run your hand along it). So for that you would get mud flaps. Tesla offers a set for the front only. Or you can go 3rd party and usually for the same price as Tesla's get a set for all 4 wheels. Do your own research but Tesla's mud flaps are skinny and long, they wont clear some speed bumps and after using them for a few months you will notice that they wont be straight down anymore. In my opinion not great. But do your own research.
Mud flaps should protect the plastic and the door, but for extra safety you can also do PPF on that spot. (I am doing both). Mud flaps will stop most things, and if anything makes through the PPF hopefully will absorb.
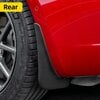
Now, lets talk about the rear mud flaps. This is not something you need to worry about with Tesla's mud flaps, since they only give you the two front ones so you wont be installing anything on the back. Of course you can just do the front install on 3rd party ones as well and not worry about the back, this also means you dont need to worry about it.
But if you do back mud flaps install, a lot of the 3rd party ones utilize a 10mm bolt behind the rear wheel to attach one of the 3 points (front mud flaps only use the plastic clips and back use 2 plastic clips plus the bolt).
The issue is that some Teslas (from what I understand early ones) have an issue with that bolt. The nut that the bolt screws into is (was?) spot welded poorly. In a lot of cases in an attempt to get this bolt loose or tighten the weld breaks and now you have a spinny bolt you cant remove. In my case the weld was actually broken AT factory when they tightened it, it was tight but spun without unscrewing (Rear Left). I removed surrounding clips and used a flat head screwdriver to apply pressure against the nut in order to prevent it from spinning while using 10mm ratchet to remove the bolt. No problem. Here is what they look like (bolt and the broken off nut):
Now what? Well, two ways to go from here.
One - Attach it: disassemble the whole back to get to the metal frame and spot weld it back. OR if you dont have a means to weld you could use something like a 2 part epoxy that is labeled for Metal. This doesnt need to be an insane bond, and in all honesty 2 part epoxy after curing will probably be stronger than the factory weld as it will snap off with slightest bump, you just need the weld to be strong enough to tighten the screw back in.
Two - Use a clip. This is the route I went, from my perspective the weld was broken before my car left the factory, so all that screw/nut were doing was a compression hold against each other, something a clip does just as well. Additionally the mud flap "hug" around gives more structure to that piece of the car as it now supports it from the bottom. AND most importantly its not clear to me if Tesla started with clips and then went to bolts, or started with bolts then went with clips for that location (I am leaning for the latter since I have one of the first ones and it has bolts). But if its the latter that means most Y's out there have a clip in that spot anyways. There are bolts next to that spot (and more clips).
The clip goes perfectly into that spot, the slot where weld was is round, so its perfect. Here is comparison Tesla's clip and 3rd party clip, in this case Abstract Ocean (where I got the mud flaps and PPF from). They are longer and hold on just as well as a bolt.
So, what is the conclusion. Lets do it as a TLDR:
TLDR: Get mud flaps or rear door PPF or both (see pics above why). Dont be afraid of the bolt on the mud flaps. Chances are it will unscrew just fine. And if not, dont hacksaw it, use flathead screwdriver to apply pressure and undo it. Then use a clip in it's place. My mud flaps came with 2 extra clips just for these spots (probably because newer models have clips there anyways?).

 imgur.com
PS - I guess there is the other option, to not give a heck and just drive the car. We are lucky that the body is aluminum and wont rust.
Everything that your front wheels drive over have this kind of trajectory:
This means little tiny rocks are damaging your paint:
A really bad example (from a post here on TMC), all the white spots are chipped off paint:
I live in Southern California, Ive had my Model Y for a bit over a year (June 2020), we've had rain less than 5 times in the entire time Ive owned the car, our roads see so much traffic that all of the debris, rocks, sand is pushed off the road. Where I live roads are excellent (seems like they repave instead of trying to cover cracks). That is all to say that under my driving conditions I dont have any visible/audible rocks/sand etc... yet my experience in a year is about the same as the blue Model Y (I do have ceramic coat too, so that wont save you). Its equal on both sides. Luckily its light enough to where some buffing compound and a rotary buffing tool got most of it out (with a bit of Dr Colorchip).
The issue is bad enough that Tesla started to offer a PPF kit for that area ($50 but seems to be out stock most of the time), and in some regions they even install it at factory before shipping. - Model Y Paint Protection Film
So then, what is the solution? I see this as a 2 step thing. You can do the PPF, either at any reputable shop, shouldnt be expensive, Tesla's price + labor. You can get Tesla's kit and DIY it, or get a kit from some other 3rd party, RPM Tesla, Abstract Ocean etc...
But while this will protect the door paint (hopefully), it wont protect the plastic right under the door. That thing is actually pretty rough (if you run your hand along it). So for that you would get mud flaps. Tesla offers a set for the front only. Or you can go 3rd party and usually for the same price as Tesla's get a set for all 4 wheels. Do your own research but Tesla's mud flaps are skinny and long, they wont clear some speed bumps and after using them for a few months you will notice that they wont be straight down anymore. In my opinion not great. But do your own research.
Mud flaps should protect the plastic and the door, but for extra safety you can also do PPF on that spot. (I am doing both). Mud flaps will stop most things, and if anything makes through the PPF hopefully will absorb.
Now, lets talk about the rear mud flaps. This is not something you need to worry about with Tesla's mud flaps, since they only give you the two front ones so you wont be installing anything on the back. Of course you can just do the front install on 3rd party ones as well and not worry about the back, this also means you dont need to worry about it.
But if you do back mud flaps install, a lot of the 3rd party ones utilize a 10mm bolt behind the rear wheel to attach one of the 3 points (front mud flaps only use the plastic clips and back use 2 plastic clips plus the bolt).
The issue is that some Teslas (from what I understand early ones) have an issue with that bolt. The nut that the bolt screws into is (was?) spot welded poorly. In a lot of cases in an attempt to get this bolt loose or tighten the weld breaks and now you have a spinny bolt you cant remove. In my case the weld was actually broken AT factory when they tightened it, it was tight but spun without unscrewing (Rear Left). I removed surrounding clips and used a flat head screwdriver to apply pressure against the nut in order to prevent it from spinning while using 10mm ratchet to remove the bolt. No problem. Here is what they look like (bolt and the broken off nut):
Now what? Well, two ways to go from here.
One - Attach it: disassemble the whole back to get to the metal frame and spot weld it back. OR if you dont have a means to weld you could use something like a 2 part epoxy that is labeled for Metal. This doesnt need to be an insane bond, and in all honesty 2 part epoxy after curing will probably be stronger than the factory weld as it will snap off with slightest bump, you just need the weld to be strong enough to tighten the screw back in.
Two - Use a clip. This is the route I went, from my perspective the weld was broken before my car left the factory, so all that screw/nut were doing was a compression hold against each other, something a clip does just as well. Additionally the mud flap "hug" around gives more structure to that piece of the car as it now supports it from the bottom. AND most importantly its not clear to me if Tesla started with clips and then went to bolts, or started with bolts then went with clips for that location (I am leaning for the latter since I have one of the first ones and it has bolts). But if its the latter that means most Y's out there have a clip in that spot anyways. There are bolts next to that spot (and more clips).
The clip goes perfectly into that spot, the slot where weld was is round, so its perfect. Here is comparison Tesla's clip and 3rd party clip, in this case Abstract Ocean (where I got the mud flaps and PPF from). They are longer and hold on just as well as a bolt.
So, what is the conclusion. Lets do it as a TLDR:
TLDR: Get mud flaps or rear door PPF or both (see pics above why). Dont be afraid of the bolt on the mud flaps. Chances are it will unscrew just fine. And if not, dont hacksaw it, use flathead screwdriver to apply pressure and undo it. Then use a clip in it's place. My mud flaps came with 2 extra clips just for these spots (probably because newer models have clips there anyways?).
imgur.com
Discover the magic of the internet at Imgur, a community powered entertainment destination. Lift your spirits with funny jokes, trending memes, entertaining gifs, inspiring stories, viral videos, and so much more from users.
imgur.com
PS - I guess there is the other option, to not give a heck and just drive the car. We are lucky that the body is aluminum and wont rust.
Attachments
Last edited: