Welcome to Tesla Motors Club
Discuss Tesla's Model S, Model 3, Model X, Model Y, Cybertruck, Roadster and More.
Register

Vendor Lighted Rear Applique for the Model X -- wiring completed today

This site may earn commission on affiliate links.
Front "T" for the face lift model "S" in current in the design stage. Actual development/production should start July, with a little luck we may see a working model by the end of September.

Also in a month or so an updated web sight will come up with video's on the Model "X" kit (appliqué) and install of the front "T" and rear appliqué. I'll post the name of the sight hopefully next month.
 
@ Jürgen: yes, in Europe (not only Switzerland) front and back blinkers are orange
@ Saghost: legal ? Well, Swiss police will not like to see the the flashing tesla in the back
-> a remote "panic button" would be handy in the app to disable all lightening of the appliqué
-> can this be programmed in the app (right now you have to disable the blinker individually which takes time) ?
@ HankLloydRight: can the V2 firmware be upgrade to already installed appliques and controllers, respectively ?
Thanks for your replies and help
Beat
 
-> a remote "panic button" would be handy in the app to disable all lightening of the appliqué

There already is an "ALL OFF" button in the app, but it's one level down under "Immediate Commands".

> can this be programmed in the app (right now you have to disable the blinker individually which takes time) ?

You can also entirely disable the turn and tail signaling of the applique. you only need to do this once.

upload_2017-6-21_8-11-18.png


@ HankLloydRight: can the V2 firmware be upgrade to already installed appliques and controllers, respectively ?

We don't know that yet. Jurgen is working with some folks to redesign the module and the firmware, so I'm going to guess that most likely the next version of the firmware won't be backwards compatible with the older modules but Jurgen would know more at this point.

But I do suspect that the V1 and V2 modules should be interchangeable, so all you'd need to do is buy a new control module and swap them out. That is, if the new module is not a CAN-BUS based module, then all bets are off.
 
Tx for your quick reply
I have not set the jumper so the 12V cigarette plug is off when the car is off. Does the controller remember the "disabled" setting when it's powered on again upon starting the car or does it reboot to the default on switch ?

And, if it only stays disabled the the jumper set in the fuse box how much current draws the controller when idle ? Do I risk (e.g. in winter) that the 12V NiCd Battery runs dead ??
 
I do not know if the module saves settings between power downs. Mine (and I think most peoples') are wired in to always-on 12v.

The module pulls very very little current, and the 12v battery never runs dead because it's constantly recharged by the traction battery as needed. Between both the 12v battery and a fully charged traction pack, they could probably power the applique module for 4000 years (YMMV :)).
 
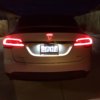
MY BACK LIGHTED "T" INSTALLATION ON THE X.

Looks like the last few threads moved away from the OPs original post, so here is my contribution to get back on the lighted "T" logo mod. Sorry for the long bathroom reading. The goal is to give detail info.

This is my version of the rear T installation on my X. I’m not disputing the Evannex suggested process, yet there are things I did differently. They STRONGLY advise using a pro shop, and I agree if you have little experience or any hesitation. I’m not comfortable with a pro shop by having experiences with poor installs of equipment. I like being involved in mods to my cars (or aircraft especially) so I know exactly what is being done. And I don’t want to insult Evannex. Just my opinion what I did on my car.

Things I did differently: (in no particular order)

I do all wiring first, before removing the T, arch, or drilling holes. This is to ensure all electrical connections will be found and easily connected before modifying the external appearance. Once I get all wires connected and routed to the rear center, then I drill and install parts.

As for finding and connecting the running lights wire, I prefer to not open the main routing wire bundle as there are too many wires and can get confusing. Also too tight to work with. It's easier to locate the small bundle going directly to the tail light assembly with only 5 wires (running light, brake, backup, signal & return).

Although Evannex mentions to check voltages on wires because Tesla changes wire colors, this is not as common as believed. Yes, colors can change, but rarely do. STILL, follow Evannex advice and check voltages before making connections. I do this by using a tiny tip sewing needle to puncture a small hole into the wire (not your finger ) and connecting a volt meter to the needle and car frame while someone turns on the lights and presses the brake pedal. If you get the wrong wire, you won’t cause any problems and can cover with tape if preferred.

What might be confusing people about possible changing wire colors is depending where you tap into the running lights, the wire color is different. Not necessarily meaning the wire color changes from production runs. Example, there are separate wires going to the license plate light and side running lights and they are different colors to aid in repair or troubleshooting, yet all those lights work together either on or off. Thus, if you tap into the 5-wire bundle going to the tail light assembly, the running light wire will almost always be gray, not blue as it is elsewhere in the bundle near the rear center. Ok, I admit I cheat on this information as I have access to the assembly and repair manuals and I am fairly familiar with wiring on the Tesla and other cars.

I don’t bother with all the alignment tape or grease pencil marks before removing the logos. It’s easier to just make 3 tiny marks at the 3 points of the T for later alignment.

The video shows leaving adhesive felt debris on the car. I guess you can do that, but that creates possible water gaps and doesn’t allow all new adhesive foam to seal against the car body. I use goo-gone and my thumb to remove all old felt from the T, arch, and car, then alcohol to clean the pieces and car area. Wipe clean with micro-fiber towel, not paper towel. You get a better water seal and likely to last a lot longer without the T and arch coming loose in the future.

Where the T and arch wires enter the hole, I put a short ¼” to ½” piece of shrink tubing on the wires at the base of the T and arch. This is extra protection to prevent sharp edges around the hole from possibly scraping off insulation and causing the positive red wire to short against the body. If that were to occur, you lose your rear running lights and tail light. A safety issue. Same reason to be careful making connections.

When placing silicone around the hole, I don’t put it on the hole because pushing in the wires afterward will just push the silicone inside the hole and not make a good seal. You can even see that occur in the video. I place a SMALL amount of silicone at the base of the T and arch so when they are placed on the car, it seals better around the hole and wires. Remove excess with a cotton swab before it dries.

Just as a side note, a picky point to me is there is no such thing as “ground” on a car It is the body negative connection. Most people refer to it as ground because it is similar to a ground connection in home electrical wiring which really is connected to earth ground. In a car it is simply the negative DC to the battery (at least in USA cars). There are still cars with a “positive” frame. Further, refer to the right side of the car as the passenger side. Depending on the point of view, the right side of the car can be either side. Instructions refer to the wire bundle on the passenger side as being the "left side" of the car. Technically incorrect. Manufacturers, insurance agencies and police refer to the passenger side of the car as the RIGHT side (as you sit in the car and face forward), not the left. Don’t get confused by that.

Again, thanks to Evannex for a nice video and a nice-looking product. Great design. Artsci did a fabulous job in my opinion. I just tweaked the process to my own liking. 40 years of engineering makes me anal picky
 
Very helpful but you should post up some pics :)

OK, here are 4 night time photos and 2 day time. NOTES:
The T looks great on every Tesla car color. The color and brightness of the T closely matches other rear lights, so it blends in nicely. The designer did a great job to get the right intensity and color temperature.

The 1st night time photo is actually 20 feet behind the car, yet since I cropped it, the photo looks closer.
The night "closeup" is a distance that a driver behind you sees before brake lights are on.
3rd one is with brake lights and you see it is much brighter. Cool
4th is a close view of the T with no brake lights on.
5th image is obviously daytime with running lights and no brakes. Even in medium daylight, the T can be seen, but doesn't show well in the photo.
Last one is daytime brake lights with running lights to see the relative comparison of brightness. Several feet behind the car, the T can still be seen somewhat even in day time if the sun is not too bright. I have no idea why my spoiler light and brake light looks orange in the iphone photo. It is actually red as it should be.

The T and Tesla nameplate have red decals on the letters, so that is why they don't appear as a chrome look.
I hope these photos upload as high res so you can zoom in closer on the T.

My total installation time (by myself, no helper) was 1 hour 45 minutes start to finish. Let me reiterate again, don't get too excited doing this yourself unless you have knowledge about this stuff and feel comfortable. Hire a shop to do it. I had access to factory wiring manuals, assembly manuals, familiar with this stuff. and been designing electronics products for over 30 years. That doesn't mean you have to be an engineer, but do need general layman electrical knowledge and some appreciation for how car finishing parts are installed. This is especially true of the Tesla because in my opinion, the rear plastic parts are MUCH TOO THIN and flimpsy (to reduce weight) and are easy to break the plastic attachment supports or crack the edges if you are not careful and don't understand how they are mounted. The lift gate upper trim assembling can be easy to break the supports during removal and is the most sensitive part to damage.

I give you a hint for you or your installer. No one ever takes the time to do this as they get in a hurry, yet I recommend if the car has been sitting in the cold for several hours, then either put it out in the sun for an hour or use a hair dryer to warm up the trim for a few minutes before you remove them. This reduces (but not eliminate) the probably of cracking the plastic supports on the trim during removal. Cold plastic parts are slightly more brittle. I also suggest using a hair dryer to warm up the T and arch and metal on the car around the T (after installed) for just a couple minutes if you are installing in the cold. This allows the adhesive foam to bond to the metal better. Don't use a heat gun on any of the above. A mild hair dryer heat is good enough. Again, just my experience based on years of experience. Some folks may disagree or have additional ideas.
 

Attachments

  • night running lights.jpg
    night running lights.jpg
    271.5 KB · Views: 76
  • night closeup running lights.jpg
    night closeup running lights.jpg
    325.4 KB · Views: 73
  • night brake lights.jpg
    night brake lights.jpg
    166.9 KB · Views: 78
  • night closeup T.jpg
    night closeup T.jpg
    300.2 KB · Views: 72
  • day running lights.jpg
    day running lights.jpg
    347.3 KB · Views: 82
  • day brake lights.jpg
    day brake lights.jpg
    349.9 KB · Views: 75
You make a good point about the cold, We do our install inside whenever we can. More important then the cold is to check and test all wires before reinstalling the molding, and whatever you do DO NOT cut the wires so short that you can not remove the controller
from the trunk after all the molding has been reinstalled.

For anyone who has tried to get on the web site. The site is up and running again and the order part of the site is working again.
Yes still have a few errors that have to be corrected, everything should be back to normal late next week.
 
  • Informative
Reactions: FlyF4
The controller is in the trunk and runs the applique lights. If your installing a lighted rear "T" you'll tap into the controller wires.

I'm still a bit confused. Are you talking about the controller that comes with the Tesla-Lights product? I don't have that product. I have the Evannex lighted "T" which doesn't use a controller. I don't have applique lights and not my preference. Perhaps I am misunderstanding your statement.

If you are referring to some sort of Tesla controller that allows the rear lights, signals, etc to function, then I don't see that in the repair manual. It shows wires going to a switch-box away from the trunk. Perhaps a recent change. I haven't looked at manuals for cars before March 2017, but I can if desired.