Very helpful but you should post up some pics
")
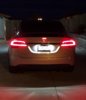
OK, here are 4 night time photos and 2 day time. NOTES:
The T looks great on every Tesla car color. The color and brightness of the T closely matches other rear lights, so it blends in nicely. The designer did a great job to get the right intensity and color temperature.
The 1st night time photo is actually 20 feet behind the car, yet since I cropped it, the photo looks closer.
The night "closeup" is a distance that a driver behind you sees before brake lights are on.
3rd one is with brake lights and you see it is much brighter. Cool
4th is a close view of the T with no brake lights on.
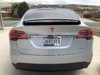
5th image is obviously daytime with running lights and no brakes. Even in medium daylight, the T can be seen, but doesn't show well in the photo.
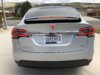
Last one is daytime brake lights with running lights to see the relative comparison of brightness. Several feet behind the car, the T can still be seen somewhat even in day time if the sun is not too bright. I have no idea why my spoiler light and brake light looks orange in the iphone photo. It is actually red as it should be.
The T and Tesla nameplate have red decals on the letters, so that is why they don't appear as a chrome look.
I hope these photos upload as high res so you can zoom in closer on the T.
My total installation time (by myself, no helper) was 1 hour 45 minutes start to finish. Let me reiterate again, don't get too excited doing this yourself unless you have knowledge about this stuff and feel comfortable. Hire a shop to do it. I had access to factory wiring manuals, assembly manuals, familiar with this stuff. and been designing electronics products for over 30 years. That doesn't mean you have to be an engineer, but do need general layman electrical knowledge and some appreciation for how car finishing parts are installed. This is especially true of the Tesla because in my opinion, the rear plastic parts are MUCH TOO THIN and flimpsy (to reduce weight) and are easy to break the plastic attachment supports or crack the edges if you are not careful and don't understand how they are mounted. The lift gate upper trim assembling can be easy to break the supports during removal and is the most sensitive part to damage.
I give you a hint for you or your installer. No one ever takes the time to do this as they get in a hurry, yet I recommend if the car has been sitting in the cold for several hours, then either put it out in the sun for an hour or use a hair dryer to warm up the trim for a few minutes before you remove them. This reduces (but not eliminate) the probably of cracking the plastic supports on the trim during removal. Cold plastic parts are slightly more brittle. I also suggest using a hair dryer to warm up the T and arch and metal on the car around the T (after installed) for just a couple minutes if you are installing in the cold. This allows the adhesive foam to bond to the metal better. Don't use a heat gun on any of the above. A mild hair dryer heat is good enough. Again, just my experience based on years of experience. Some folks may disagree or have additional ideas.