Everyone -
Just completed a sub-woofer upgrade installation to my 2 week old Model 3. Yes, the premium audio system is amazing, though certainly lacks enough low-end to satisfy the discerning ear. After reviewing videos and scouring the boards for ideas, I undertook the install which only lasted a couple of hours. That said, the install is fairly simple and you'll be amazed with the end result. Here are the steps:
Purchase the following items:
- Remove plastic trunk edge strip and the 3 connectors holding the trunk carpet in place. No need to remove the carpet section entirely as you'll be able to route the power wires (amp line & 12-volt for the LOC) easily underneath the carpet and up to the 12-volt connection under the rear seat on the right side of the vehicle. BTW - You'll need to remove the rear seat bottom as well. See the video on how to remove each of these item near the top of this thread.
- Once the power is routed, cut a small hole in the lower truck section of the carpet and pull the amp power line through as well as the amp ground and amp turn-on wire from the LOC, and finally, the RCA jack line.
- Prep the PAC LOC by installing butt connectors on the wires.
- On the LOC wire harness, you'll need to cut off 1 set of RCA jacks and strip the wires back about a 1/4".
- Locate the Model 3's sub-woofer and amp in the rear right corner (again, see the aforementioned video) and unplug the wire harness going into the sub-woofer box.
- Using the Posi Taps, install one on the green wire (pos) and one on the orange wire (neg).
- install the positive & negative speaker lines off of the LOC to the Posi Taps. This will carry you signal to the LOC.
- Connect the 12-volt line to the LOC.
- Splice on a couple feet of 18 gauge wire to the 12-volt turn-on on the LOC wire harness and run that line also through the lower trunk section with the other wires.
- In the rear, under the carpet section, grind off a 1"x1" section of the Model 3 metal to situate the ground for the amp & LOC. I used a Dremel tool with a grinder bit to perform this.
- Secure the ground lines with a self-tapping screw.
- Plug the RCA jacks from the amp, into the LOC.
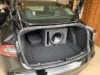
- Situate the loaded sub-woofer enclosure into the lower trunk, as well as the amp. I installed my amp on top of the enclosure, as I had plenty of room.
- Finish wiring up the amp and re-install 2 of the clips to hold the carpet section to the body of the car.
- Check and double check your work, ensuring all connections are correct and secure.
- To make the final power connection; locate the 12-volt batter source (see video) and remove the red cap to provide access to the positive post.
- Using a ring connector, secure to the stripped end of the amp power cable & LOC 12-volt cable.
- Before installing on the positive power post, make sure that the interior lights are not on and that nothing is being displayed on the dash screen.
- Make the connection and secure with a properly sized nut.
- Back in the trunk, reconnect the Model 3 sub-woofer wire harness back into the OEM sub-woofer.
- Turn the LOC adjustment down all of the way.
- Adjust the amp controls to 12 o'clock.
- Play a song with some solid bass, as well as some quiet sections of the song and adjust the LOC until you have sound at the new sub-woofer.
- Adjust further until there's some distortion and then back off slightly until the distortion is gone.
- Make final adjustments on the Rockford Fosgate amp settings to your liking.
- Button up everything (rear seat bottom, carpet, etc.).
- Enjoy!