I did the hitch installation by myself in an afternoon and the wiring another evening. Maybe 5-6 hours total. I bought the cover but never ended up using it, if you want it I'll sell it for half price plus shipping. I haven't noticed any difference in noise with the hole open and you can't even see the hole unless you get down on your knees and look.


Welcome to Tesla Motors Club
Discuss Tesla's Model S, Model 3, Model X, Model Y, Cybertruck, Roadster and More.
Register
Install the app
How to install the app on iOS
You can install our site as a web app on your iOS device by utilizing the Add to Home Screen feature in Safari. Please see this thread for more details on this.
Note: This feature may not be available in some browsers.
-
Want to remove ads? Register an account and login to see fewer ads, and become a Supporting Member to remove almost all ads.
You are using an out of date browser. It may not display this or other websites correctly.
You should upgrade or use an alternative browser.
You should upgrade or use an alternative browser.
Model S Trailer Hitch Installation
- Thread starter antdun
- Start date

Jasper7821
Member
Good to know you were able to do it by yourself, that’s reassuring. I think I have a buddy helping me this weekend so it should all go well.I did the hitch installation by myself in an afternoon and the wiring another evening. Maybe 5-6 hours total. I bought the cover but never ended up using it, if you want it I'll sell it for half price plus shipping. I haven't noticed any difference in noise with the hole open and you can't even see the hole unless you get down on your knees and look.
Did you purchase the 2” receiver, on eTrailer they lost two different cover part numbers, but in the description, they both say they fit the 2” amd 1 1/4” hitch, soni don’t know what the difference is in the part numbers.
But yes, for $60 plus shipping I’ll buy it.
I can PayPal or Venmo. I also have a FedEx and UPS account and it may be less expensive then you taking it. Or Post office is probably the least expensive if you just want to do that and I’ll pay the shipping.
Thank you
I bought it from torklift directly and went with the 2" receiver. I don't recall if the cover fits both or not, I thought it was universal but I don't recall. I'll pm you a picture and we can hash out the shipping details outside the thread.Good to know you were able to do it by yourself, that’s reassuring. I think I have a buddy helping me this weekend so it should all go well.
Did you purchase the 2” receiver, on eTrailer they lost two different cover part numbers, but in the description, they both say they fit the 2” amd 1 1/4” hitch, soni don’t know what the difference is in the part numbers.
But yes, for $60 plus shipping I’ll buy it.
I can PayPal or Venmo. I also have a FedEx and UPS account and it may be less expensive then you taking it. Or Post office is probably the least expensive if you just want to do that and I’ll pay the shipping.
Thank you
A helper would have made it much easier, the hardest part was just maneuvering the bumper once disconnected since it loses most of its rigidity once disconnected.
Where did you see the one with 400 tongue/4k total? I thought it was 300/2k for both but if I'm wrong I'd be happy for the extra capacity. The most I've pulled was my trailer with about 40 bags of soil, so guessing around 2500lb total. Next time I'll weight it. Even with that much it barely feels loaded down. I pulled out of the lot next to a similarly loaded pickup truck and got a lot of funny looks.
Jasper7821
Member
Thank you, I’m sure the cover will be fine. The instruction manual Torklift emailed me says 400 amd 4k trailer weight.I bought it from torklift directly and went with the 2" receiver. I don't recall if the cover fits both or not, I thought it was universal but I don't recall. I'll pm you a picture and we can hash out the shipping details outside the thread.
A helper would have made it much easier, the hardest part was just maneuvering the bumper once disconnected since it loses most of its rigidity once disconnected.
Where did you see the one with 400 tongue/4k total? I thought it was 300/2k for both but if I'm wrong I'd be happy for the extra capacity. The most I've pulled was my trailer with about 40 bags of soil, so guessing around 2500lb total. Next time I'll weight it. Even with that much it barely feels loaded down. I pulled out of the lot next to a similarly loaded pickup truck and got a lot of funny looks.
I wish there was some way to tell if that much weight would work. I know the Tesla manual says no towing at all.
I’m looking at small boats and it would be nice to know up to what weight I can tow safely without damage to the car’s frame.
Attachments
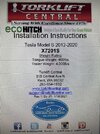
That's interesting that it shows higher weight capacities than others have. When you receive the hitch there will probably be a sticker on it (mine did) that shows the weight capacity of it there too. I'm curious to know if it's 400 and 4000 because if so I'm guessing Torklift has increased the numbers. I just checked their website and it still shows 300 lb tongue weight and 2,000 lb towing weight. See attached screen shot.Thank you, I’m sure the cover will be fine. The instruction manual Torklift emailed me says 400 amd 4k trailer weight.
I wish there was some way to tell if that much weight would work. I know the Tesla manual says no towing at all.
I’m looking at small boats and it would be nice to know up to what weight I can tow safely without damage to the car’s frame.
Attachments

Jasper7821
Member
Yes I noticed that too, and eTrailer’s site also says 300/2k. It’s arriving tomorrow and I’ll post a photo if it indeed says 400/4k.That's interesting that it shows higher weight capacities than others have. When you receive the hitch there will probably be a sticker on it (mine did) that shows the weight capacity of it there too. I'm curious to know if it's 400 and 4000 because if so I'm guessing Torklift has increased the numbers. I just checked their website and it still shows 300 lb tongue weight and 2,000 lb towing weight. See attached screen shot.
And thank you again for the videos and my questions you’ve answered. Looking forward to to towing.
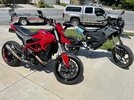
And on a side note, I love electric so much I sold my Ducati and bought a Zero to commute and weekend playing.
It’s so awesome riding silently without a loud exhaust ringing in my ears.
So happy to riding a electric motorcycle.

Attachments
FlatSix911
Porsche 918 Hybrid
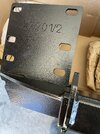
See this article for additional details on galvanic corrosion with dissimilar metals on the Tesla hitch.In the first picture in my original post if you look closely at the bolts you'll see white discs around each of them. These are plastic vinyl washers that separate the aluminum bumper from the steel hitch and is what is used to isolate the metals from each other to avoid galvanic corrosion.

Tesla Model S hitch by Torklift (3 year update): Eaten alive
While it remains the best option for adding a hitch to a Model S, make sure you understand the implications of "just following the instructions."
 www.teslarati.com
Last edited:
FlatSix911
Porsche 918 Hybrid
Here is the original response from Torklift... I don't see any additional comments in the article.Do you have a link to the comments where they apparently changed their product to improve? The link didn't work for me
"I did reach out to Torklift to see if there was any response or interest in this issue. Cochran had graciously waived most of the charges because my car was already apart for the collision repair, but it seemed reasonable to see if Torklift was willing to help out with what was left. They eventually responded it was their opinion that, essentially, “these things happen.” I was given a one-time offer to remove my hitch, ship it to Washington state (where Torklift is based) and they would repaint it and send it back for me to reinstall, with return shipping at my expense as well.
The initial response from Torklift was disappointing. The market rate to uninstall and reinstall the hitch would be about $300-400 each. The transit/repainting time would mean that, in addition to the $600-800 expense to mess with the hitch, I’d have to schedule two separate trips to a shop to have that work done. Add in the unknown costs to pack and ship a 40-pound chunk of steel across the country, TWICE. And for what? Based on the information I had, it seemed to be a promise of re-coating the hitch in the same finish that had failed and caused all this galvanic corrosion in the first place. Hardly a solution. They offered no alternative mounting instructions or showed any interest in further isolating their steel hitch from the aluminum structure of the Tesla, though it is possible that they did not understand the nature of the corrosion at that time.
So let this be a warning to any Tesla owner who has installed the Torklift Ecohitch. Your experience may vary, but there’s at least some chance that it is quietly eating your Tesla alive in the dark forgotten recesses of your car… completely out of your ability to casually inspect it. If you’re contemplating a Torklift for your S, you’d be wise to work above and beyond the installation instructions and find a solution with your installer that will keep the hitch isolated from the structure of the car long-term. While it remains the best option for adding a hitch to a Model S (which is why I chose to rehab mine rather than be without it), make sure you understand the implications of “just following the instructions.” Buyer beware."
Jasper7821
Member
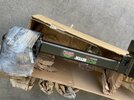
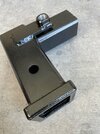
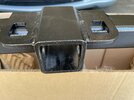
Hitch arrived today and it has the 300lb/2k sticker. I called and inquired and they talked to the engineering dept and said the manual is correct and it’s a redesigned hitch (the online manual states revised 1/18/21) and the new load rating is 400/4k. I’ve never seen one before, so here’s photos if it helps at all. The thickness of the hitch where it mounts to the car is about .275”, don’t know if prior was the same or not. The included manual still states 300/2k.That's interesting that it shows higher weight capacities than others have. When you receive the hitch there will probably be a sticker on it (mine did) that shows the weight capacity of it there too. I'm curious to know if it's 400 and 4000 because if so I'm guessing Torklift has increased the numbers. I just checked their website and it still shows 300 lb tongue weight and 2,000 lb towing weight. See attached screen shot.
This hitch was made last week since when I talked to them and ordered it, they saying no stock and some in production right now.
Attachments
-
 3DB0BCCC-5883-4BCD-A814-C455F7FA614B.jpeg560.8 KB · Views: 68
 -
 CFC0FA42-12CA-4EC9-95DB-1C7C35E85667.jpeg578.3 KB · Views: 71
 -
 7A248DA5-7E4A-4F4D-A1A6-B38AB94655D0.jpeg387.8 KB · Views: 72
 -
 109A1DD7-7DDF-4B86-8B61-7C7D33A9ECC9.jpeg600.5 KB · Views: 86
 -
 CA9BDA1E-BAE1-4E8D-B0D1-36C68118CF35.jpeg595.8 KB · Views: 71
 -
 369CE147-1BB9-4418-8E91-59C7475D6BB3.jpeg336.6 KB · Views: 70
 -
 3AEDDC8E-32BC-4CB9-BF3F-1B722B7D0920.jpeg535.3 KB · Views: 69
 -
 E9B20CA2-22B2-45BA-8143-BE75A43A6B7D.jpeg732.4 KB · Views: 67
 -
 225A6F51-BE31-4FD9-880A-37D687566ABE.jpeg476.4 KB · Views: 68
 -
 16E9180D-667D-472A-B824-94ACC7C978CB.jpeg397 KB · Views: 74
Last edited:
Interesting.... I ordered mine end of June last year so I'm guessing it's the redesigned one. They were talking about high volume then too so I doubt it was 6 months old.Hitch arrived today and it has the 300lb/2k sticker. I called and inquired and they talked to the engineering dept and said the manual is correct and it’s a redesigned hitch (the online manual states revised 1/18/21) and the new load rating is 400/4k. I’ve never seen one before, so here’s photos if it helps at all. The thickness of the hitch where it mounts to the car is about .275”, don’t know if prior was the same or not. The included manual still states 300/2k.
This hitch was made last week since when I talked to them and ordered it, they saying no stock and some in production right now.
Jasper7821
Member
The customer service guy I talked to today put me on hold and talked to Engineering and said indeed it is 400/4k now and he said it probably changed a few months ago. But then I noticed the revision was from January last year so I’m not sure. They said they’d send me a New rating sticker with the updated weights, I guess I’ll just put that on the receiver.Interesting.... I ordered mine end of June last year so I'm guessing it's the redesigned one. They were talking about high volume then too so I doubt it was 6 months old.
But I honestly wonder if the frame of the car would even handle 400 pounds of tongue weight. Was just curious about putting my motorcycle on a motorcycle carrier and that would be about 325lbs. The last thing I would want to do is damage the frame of the car by putting too much tongue weight on it.
Last edited:
Jasper7821
Member
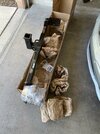
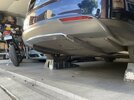
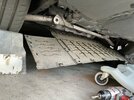
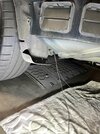
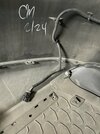
I am attempting to install now, I started about an hour ago and I am have everything removed and ready to take the bumper off now. I didn’t have any help so I am doing this by myself. I had to put my motorcycle inside the house because I don’t think I’m gonna be able to finish this tonight and I need a spot to put the bumper in front of my other car.
Now this is the scary part of pulling the bumper off of the car.
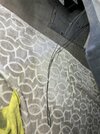
Bumper is off and uploading a quick video of pulling it off. I didn’t have the sticky tape covering the two bolt holes.
And someone said their impact bar nuts weren’t that tight. Mine were pretty tight.
Now this is the scary part of pulling the bumper off of the car.
Bumper is off and uploading a quick video of pulling it off. I didn’t have the sticky tape covering the two bolt holes.
And someone said their impact bar nuts weren’t that tight. Mine were pretty tight.
Attachments
-
 C3B6DABC-CCCF-44B6-8852-823658944477.jpeg445.6 KB · Views: 72
 -
 7DC385E7-2962-4B6A-A5D3-17FAD3C580B9.jpeg550.9 KB · Views: 69
 -
 DECF1F78-A1DC-452E-A0FD-B9DEBB37103A.jpeg448.3 KB · Views: 66
 -
 DAA4C48C-88EB-4E5E-AC8E-2C75FDC8D83E.jpeg347.9 KB · Views: 68
 -
 EDB8CD12-4483-4F52-ABC8-54DC90B563D4.jpeg664.5 KB · Views: 74
 -
 4377A01E-4B2C-4211-96B0-14D0C6CA97D4.jpeg550.9 KB · Views: 75
 -
 E3E73F15-ED31-402C-B746-6A78B2F9A84C.jpeg586.4 KB · Views: 73
 -
 69CD6EF5-2ED5-481F-9F38-B1A23C65CCB8.jpeg597.1 KB · Views: 70
Last edited:
Jasper7821
Member
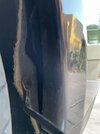
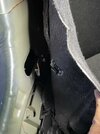
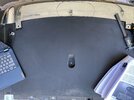
I just noticed that there’s two wires hanging down by the rear of the driver fender with electrical tape on the ends and they must have been lying in the bumper. Have no clue what they are for.
Quick video of removing the bumper.

Quick video of removing the bumper.
Attachments
Last edited:
So if all the bolts and screws are off from underneath then it only needs to be pulled off? How are the parking sensors attached, is there sufficient length of wire on them? Is there additional screws at the rear wheel liner to remove?Now this is the scary part of pulling the bumper off of the car.
Jasper7821
Member
Yes, after all the bolts, screws, nuts, push pins are removed the bumper just pops off.So if all the bolts and screws are off from underneath then it only needs to be pulled off? How are the parking sensors attached, is there sufficient length of wire on them? Is there additional screws at the rear wheel liner to remove?
In the bumper liners, you remove the two bottom push pins and one in the wheel well, then after you peel some of the liner back you can see the torx bolt.
And the sensors are connected to this plug then you disconnect after the bumper comes off and there’s enough slack that the boomer will lay on the ground, then you disconnect the plug.
In antdun’s video, the only hang up is the two studs that the nuts were removed from inside the trunk. You have to use a pry tool or screwdriver to wedge between the bumper facia and car to get the studs to dislodge from the car. I only had to dislodge one and the other popped out easily.
After that the bumper will just fall down.
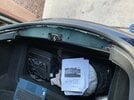
I now have to drill the cover hole and do the wiring and hopefully it all goes back together ok and it’ll be done.
Attachments
Jasper7821
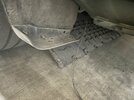
Member
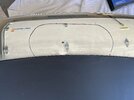
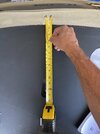
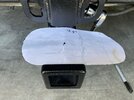
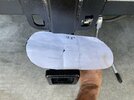
I have some concerns, the video shows center of the home cut 12” up from the center hole. My manual stated 12.5”. But also the manual pictures show the diameter almost to the chrome piece.
Also, I don’t think I need to made the 2nd hole 1/4” lower to follow the contour. I did that and drew a circle and the edge on the lower part has a greater distance than the other side. I think I’m going to go even across on the 2nd hole.
And the stud is 12.5” from the center box of the receiver hole so I think I’m ok. And looks like there’s enough room to stick a ratchet in the hole. So I think I may be ok.
I guess it’s time to start drilling
Attachments
-
 DAED6257-9B29-4C5D-9A45-C93068BE0AAE.jpeg309.8 KB · Views: 71
 -
 758D3030-E7AD-4EFA-98D7-E70017CEC2B4.jpeg577.6 KB · Views: 69
 -
 B663F895-B143-4A3B-8866-45E85FF5E3DA.jpeg393 KB · Views: 66
 -
 EDB559C2-58E5-4DB3-8A0F-56251F9BA6AB.jpeg344.4 KB · Views: 64
 -
 9760A2D5-9DA7-421A-B469-97DF56DCBD25.jpeg352.4 KB · Views: 56
 -
 90DBA331-4C2D-43EE-9114-04564FFCBF97.jpeg335.4 KB · Views: 69
 -
 7420DC77-D0E3-4A48-96D5-066948F3E404.jpeg345.1 KB · Views: 66
 -
 14961300-B081-4219-8191-9D173923E6D9.jpeg402.3 KB · Views: 76
Similar threads
- Replies
- 11
- Views
- 1K
- Replies
- 4
- Views
- 502
- Replies
- 19
- Views
- 1K
- Replies
- 26
- Views
- 2K
- Replies
- 10
- Views
- 765