Welcome to Tesla Motors Club
Discuss Tesla's Model S, Model 3, Model X, Model Y, Cybertruck, Roadster and More.
Register

New house, new 14-50

Should I install my own NEMA 14-50?

  • Yes, it's easy and you only live once

    Votes: 39 56.5%
  • No, get a pro and be safe

    Votes: 30 43.5%
  • What's a 14-50?

    Votes: 0 0.0%

  • Total voters
    69
This site may earn commission on affiliate links.
Hey, answer me this, you clever folks who've done this kind of work. I'm used to using a cable clamp similar to this when passing NM-B through a metal box.
upload_2020-3-11_10-34-16.png

But the breaker panel in our new house is flush mounted in a finished drywall wall. So I will only have access to the inside of the box; the outside is hiding behind sheetrock. How the heck do I install the cable clamp? I've done some hunting, but so far I can't find an answer to this question. Is there a different style of clamp that requires access from only one side of the box? I'd prefer not to have to rip up and repair sheetrock.

Thanks for any wisdom!
 
...Thanks for any wisdom!

In my case, those thanks are in all likelihood misdirected...But since this is about a twist-on/off device, I feel totally qualified to answer your query. :D

Seriously, I just checked my breaker box (which is on an exterior wall 
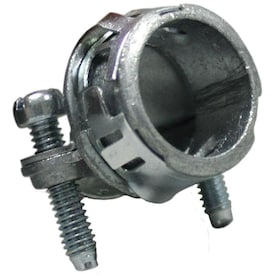
outside my house), and reminded myself that I too (rightly or wrongly) used the same kind of cable-clamp (installed from the outside of the breaker box; tightened with its circular nut from inside the breaker box) when I installed a new 240-volt circuit. (I assume that the idea of a cable clamp is to protect the wire from the sharp edges of the punched-out circular hole [into the metal breaker box], possible strain-relief [from what?], and/or to shrink the remaining opening once the wire is through it [to inhibit insect/rodent passage]?)

In my case, I have wood siding surrounding my breaker box. So I choose to wait for a siding replacement project before I installed the new circuit. Drywall repair takes work, for sure, but is normally far easier/cheaper to deal with than exterior wood siding. (Can I ask, how did you expect to fish the wire through the wall into your breaker box without removing at least some wall covering? Never mind.)

I assume that your breaker panel is in the garage? Or maybe (in a closet or elsewhere) inside the house? Is the wall finished (surfaced and painted) or unfinished? If finished, as you know a discrete hole can be made, then repaired so that it can’t be detected. Not too expensive—just takes some practice. (Maybe you already know how?)

So if you are to use a cable clamp, arguably the best solution(?) is just to carefully make a hole in the drywall, then patch/finish it as necessary.

But if you have to avoid making a hole in the drywall, here is another idea I got from looking at my breaker box just now. Not sure if it (a) possible and (b) would pass (official) muster.

First, check to see if in the bottom and/or top of your breaker box there are different sized punch-out holes (placed there by the BB manufacturer to allow the addition of new wire circuits). If so, hardware stores should offer different sized metal cable clamps and push-in insert/plug covers to fit these various standard-sized holes.
Cable Clamp.jpg Knockout Hole Plug.jpg

  1. If you do find a large knockout hole in the breaker box, purchase a push-in metal insert/plug for that size of large hole.
  2. Drill the large insert/plug out for a smaller cable clamp (smallest clamp that will accept your [#6?] wire bundle).
  3. Install the small clamp into the large insert through the bottom of the insert, with the circular nut tightening from the top side.
  4. Run your wire as planned through the wall, into the breaker box through the large hole, and through the clamp-insert assembly.
  5. Push clamp-insert assembly into the large hole from the inside of the breaker box.
Does that make sense? (See diagram, below.) Might be considered “cheating” by regulators(?), but could that solve your problem and alleviated the need to remove drywall?
Cable Clamp-Insert Trick.jpg

But as Feathermerchan suggests (saw his comment after I began this one), a simple plastic press-in bushing, or a plastic insert/plug drilled to just accept the wire, would be simpler and remove danger to the wire from the sharp hole edges. (No strain relief, though, if that is a thing, and would not stop gnawing rodents.) I am unsure whether cable clamps are required by code. If not, sounds like the bushing suggestion is the simplest solution.
 
  • Helpful
Reactions: CharleyBC
So I will only have access to the inside of the box; the outside is hiding behind sheetrock. How the heck do I install the cable clamp? I've done some hunting, but so far I can't find an answer to this question. Is there a different style of clamp that requires access from only one side of the box?
So if you look inside your box (careful taking the cover off) you'll see there are no clamps. There should be bushings though to protect the insulation on the wires from the sharp edges of the box.

The search term you are looking for is "cable gland".
 
Thanks to all for the input!

Addressing a few things:
I assume that your breaker panel is in the garage? . . . Is the wall finished (surfaced and painted)?
Yes and yes.
Can I ask, how did you expect to fish the wire through the wall into your breaker box without removing at least some wall covering?
The outlet will be in the same stud bay, a foot or so from the breaker box. Should be an easy fish to the double-gang box by dead reckoning. And now that I think about it, maybe I could reach the outside of the box that way too! :rolleyes:
The search term you are looking for is "cable gland".
I learned a new term today. Thanks! I'll check that out.

tps5352, thanks for the very detailed, inventive reply. You spent some time on that.

In other news, I found this at Lowes:
031857446659.jpg

It snaps in, so there's no nut. So you can fiddle with it from only one side.

Anyway, at this point, I'm going to wait until we move, open the panel, and do my best to match the existing work. Thanks again for all the ideas!
 
So for Charley he will be adding a flush box (not surface like the picture above) typically requiring a 4" X 4" hole. After cutting the hole reach into the bay and you should be able to find a suitable knockout in the box. Be very careful if the main breaker is still on because the bus bars that run the length of the box are always on and the knockout is metal. Then you need to put a bushing in the hole left by the knockout so the insulation is protected. Search for "Plastic Knockout Insulating Bushing." Then you can run your Romex to the hole and into the box before the box is installed in the hole.
 
  • Helpful
Reactions: CharleyBC
So for Charley he will be adding a flush box (not surface like the picture above) typically requiring a 4" X 4" hole. After cutting the hole reach into the bay and you should be able to find a suitable knockout in the box. Be very careful if the main breaker is still on because the bus bars that run the length of the box are always on and the knockout is metal. Then you need to put a bushing in the hole left by the knockout so the insulation is protected. Search for "Plastic Knockout Insulating Bushing." Then you can run your Romex to the hole and into the box before the box is installed in the hole.
Worry not! I’ll throw the main before doing any knocking out of knockouts or otherwise messing around inside the panel. And thanks!
 
Well, gang, I'm finally hoping to do this project this weekend. We moved to the new house just days before the lockdown, so we've been getting by just fine plugging in to a regular 5-15. More than enough to handle the occasional run for food.

I have all the parts (I hope). I find I'm most intimidated by simply working with the stiffness of 6 AWG wire. I imagine it'll be no fun to bend. But that sounds survivable.

If you never hear from me again, it means I electrocuted myself or burned the house to the ground. I do not expect either outcome.

I wonder if welding cable meets code spec? It is fine filament and flexible plus high temp. I use it in vehicles for aux battery and other high loads. Wait until you do solar using 8ga solid copper ground wire. Ugghh.

https://www.amazon.com/WINDYNATION-Welding-Battery-Flexible-Inverter/dp/B0161Z7VAE
 
Success!
2020-05-02 14-55-48.jpg

Note the marching green lights. It works!

As anticipated, 6 AWG is a pain. Mashing the outlet into the box was a pain. Getting a sort of S-curve in the romex from the top of the box to the bottom of the breaker panel just a few inches away was a pain. Simply cutting the wire was a pain. But pain makes us stronger, right?

If you come to this thread seeking to do it yourself, here are things I'd do differently that might make it easier for you. Get the largest volume box you can find: more room for maneuvering the wires around. Don't create for yourself the S-curve problem that I did: either put your new box maybe a foot away from the panel, allowing for more gentle curvature, or position your box laterally so that no S is even needed. And get oomphier wire cutters than the ones you probably have in your tool box.

An unexpected difficulty was cleaning up the knockout in the panel box. You know how they're attached at diametrically opposite points, and you twist the hole out? Well, the two break-off points left little stubs of rough steel sticking into the hole, and they were more than enough to keep the wire clamp from fitting in. The angles were such that filing it down to a proper circle wasn't fun. But I persevered.

The work inside the breaker panel was pretty straightforward. Getting the length of your cuts just right so that there is enough wire to route it neatly without too much to where you're having to stuff it makes the difference. Goldilocks: neither too short nor too long.

I was on the edge of my seat (well, actually standing outside, leaning over the seat) after I plugged Wattney in, and watched as it reported 239V (yay!) and then the amps gradually crept up to 32/32!
 
You are a brave man or woman. I am usually a DIY guy but not with electricity. No thank you lol. Good job
Man.

I've done lots of electrical work over the years. (Starting in high school, when I electrocuted myself right through the heart, but that's another story.) This was same old, except bigger and heavier. My first ever from scratch 240V circuit.

It's plumbing that intimidates me.
 
  • Like
Reactions: TydalForce