


Welcome to Tesla Motors Club
Discuss Tesla's Model S, Model 3, Model X, Model Y, Cybertruck, Roadster and More.
Register
Install the app
How to install the app on iOS
You can install our site as a web app on your iOS device by utilizing the Add to Home Screen feature in Safari. Please see this thread for more details on this.
Note: This feature may not be available in some browsers.
-
Want to remove ads? Register an account and login to see fewer ads, and become a Supporting Member to remove almost all ads.
You are using an out of date browser. It may not display this or other websites correctly.
You should upgrade or use an alternative browser.
You should upgrade or use an alternative browser.
Time to DIY PPF!!
- Thread starter nate704
- Start date

5 days so far, but I was not fully committed each day due to work, kids, church, and golf. =)How much time invested so far?
The most important thing is not to hurry. It is very frustrating and stressful task, so you are mentally and physically tired after each panel work ( for me at least). So, I took my time and did each panel and used heatgun to seal the edges. Most of the imperfections will show a day after you apply the film, but you can catch pretty much anything big and noticeable objects under the film right away with good lighting and microfiber towels.
Last edited:
Very proud of you.. and this is an amazing compromise between wanting to protect your brand new Tesla.. and avoiding something crazy like paying $6000 to basically wrap your commuter car in plastic.Day 4
Yes I DID IT!!
After 2 hours of intense battle with sticking film and millions of alignment points on the front bumper, I managed to successfully wrap the front bumper without any issue. Surprisingly,, I did not get any dust/lint/or whatever under the film. I have 1 visible ghost spot 5 mm diameter in size, but no one will notice except myself, so I didn't even bother to fix that.
The good thing was that the XPEL cut kit was perfect in terms of fit and quality. If I align one side perfect, I did not have to put much effort to algin the other side since they just fit.
So, full hood, full fenders, side mirrors, headlights and full front bumper are complete now! Huge relief!
Day 5 will be full doors and possibly rear quarter panels, door knobs, fog lights, and trunk strip. Stay Tuned!
I did the $50 OEM Tesla PPF kit on the rear doors and it took a while to get the hang.. but Im pretty confident I'd be able to do other sections of my car now. For $600.. I'd definitely take a challenge at wrapping the entire front if I knew I was keeping this vehicle long term. Its almost the perfect price where it makes a great weekend DIY project.. and should also end up as a pretty decent investment in keeping your car looking new.
Prepare lots of slip solution. I had two 1.5L pressure sprayer for the slip solution and two 16oz bottles for the tack solution, but I always ran out of the slip solution before I finish the large panels, such as fenders, hood, and especially the front bumper.Any tips for someone who is planning to do the same install?
I would get Four 2 liter (64 oz) bottles of the slip solution and 3-4 16oz tack solution mixed and ready to go, so that you don't have to stop and make the solution.
Also, do not fold the edges until you check any dirt/dust/object/hardlines/ghosting spots under the film. You can check it with good lighting and quick wipe down with the microfiber towel can identify any imperfection.
If you do find those imperfections, do not panic, and get the slip solution and lift the affected area gently and slowly with fingers and remove the dirt and "gently rub the film and surrounding area (aka massaging) in order to avoid any adhesive spot (aka ghosting).
chadol
Member
Hi nate704,
It is great progress you are making and sharing with us.
I am just back from my 1st 1300mi road trip with MYLR.
See all these (used-to-be) bugs!

I am glad that I have done the DIY PPF'ing as the 1st thing after getting my Y delivered.
Tomorrow I will wet these bugs and wipe them off. I anticipate PPF + ceramic coating(also DIY'ed) would help a lot.
After all, it is a peace of mind I have.
I can tell you that you will not regret doing it.
Cheers,
It is great progress you are making and sharing with us.
I am just back from my 1st 1300mi road trip with MYLR.
See all these (used-to-be) bugs!
I am glad that I have done the DIY PPF'ing as the 1st thing after getting my Y delivered.
Tomorrow I will wet these bugs and wipe them off. I anticipate PPF + ceramic coating(also DIY'ed) would help a lot.
After all, it is a peace of mind I have.
I can tell you that you will not regret doing it.
Cheers,
Finally time to do all 4 doors, quarter panels, full A pillars, rear hatch lower portion, and rear bumper.
I had to stop because the PPF kit that I got for the doors had horrible fitment (I got it from different seller on eBay than my usual supplier), so I had to return that and ordered from my guy.
The items will be here tomorrow and I will be restarting the job and finish.
I was not going to do the entire car, but changed my mind since the hardest parts were done and the total cost will be way less than the full front PPF.
Let us know how the rear hatch panel goes. I've read it can be..."difficult"...Finally time to do all 4 doors, quarter panels, full A pillars, rear hatch lower portion, and rear bumper.
I had to stop because the PPF kit that I got for the doors had horrible fitment (I got it from different seller on eBay than my usual supplier), so I had to return that and ordered from my guy.
The items will be here tomorrow and I will be restarting the job and finish.
I was not going to do the entire car, but changed my mind since the hardest parts were done and the total cost will be way less than the full front PPF.
Agree about the doors. I did full ppf for all four doors. They were the easiest to do and the best to start on, with the bumper the last to do. The PPF has already paid for itself with the amount of damage it has received from road debris. The paint below remains fine but the ppf after almost 8 months has some cuts and abrasion.If you can possibly raise the front end when you do the bumper, I highly recommend that. I used two floor jacks to raise the front of the car and it helped a great deal.
You should also consider doing the doors. They are easy and you will have protection, especially on the rear flair out area that gets rocks/grit thrown against it.
Great job and congrats on all the money you've saved!
I did notice that someone tried to key my front passenger door. They did the walk with low drag and then a quick slash as they walk pass. Left marks on the ppf but no damage to the paint. You can't buff out ppf but it's ok. It did its job. When it's time to replace, I'll DIY again.
I did not do the rear quarter panels because other DIYers said it would not be needed but already noticed some fine scratches that makes me feel that I should have done those but I could not easily find precut rear quarter panels when I was buying the ppf.
I did DIY ceramic coat over the ppf and the other areas of the car with no ppf.
I couldn't agree more.Agree about the doors. I did full ppf for all four doors. They were the easiest to do and the best to start on, with the bumper the last to do. The PPF has already paid for itself with the amount of damage it has received from road debris. The paint below remains fine but the ppf after almost 8 months has some cuts and abrasion.
I did notice that someone tried to key my front passenger door. They did the walk with low drag and then a quick slash as they walk pass. Left marks on the ppf but no damage to the paint. You can't buff out ppf but it's ok. It did its job. When it's time to replace, I'll DIY again.
I did not do the rear quarter panels because other DIYers said it would not be needed but already noticed some fine scratches that makes me feel that I should have done those but I could not easily find precut rear quarter panels when I was buying the ppf.
I did DIY ceramic coat over the ppf and the other areas of the car with no ppf.
The main reason for the whole car PPF was to cover the side panels from the fenders to the quarter panels since a lot of Tesla haters tend to key the car on the side.
The quarter panel area is kind of vulnerable since it has nice flatter area that people can key on or do any damage easily.
Completed!
Full Hood, Full fenders, Full Doors, Full Quarter panels, Full A pillar, Rear Hatch and full Rear bumper, side mirrors, Fog lights, Tail Lights, Charge Port doors, door handles.
It took me about a week since I did not want to hurry and took my time. Only installed 1-2 major big panels a day.
Now I can drive! =)
Congrats! I did the same thing. I didn't drive my car when I first bought it, until I had completed the PPF installation. That's a lot of self control because every part of me wanted to take the car out for a spin but I didn't want to have to clean and prep the car each time.
I did my own door PPF, and since I had a Cricut, I just bought the PPF as a roll and then created my own templates and had it cut them out. All in it took a couple hours, mostly for perfecting the template, but cost was around $20 and I have plenty of extra material for more PPFing.
For anyone considering, I totally recommend doing at least the application yourself. It's really not hard with the right tools (a spray bottle of soapy water...)
For anyone considering, I totally recommend doing at least the application yourself. It's really not hard with the right tools (a spray bottle of soapy water...)
I think you are talking about the small patch that goes on the rear door for splash scratch protection, correct? The whole door panel PPF is about $100 per door.I did my own door PPF, and since I had a Cricut, I just bought the PPF as a roll and then created my own templates and had it cut them out. All in it took a couple hours, mostly for perfecting the template, but cost was around $20 and I have plenty of extra material for more PPFing.
For anyone considering, I totally recommend doing at least the application yourself. It's really not hard with the right tools (a spray bottle of soapy water...)
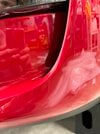
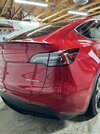
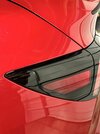
As requested, I am posting some picture. It is impossible to see the PPF film on the car in the pictures, but you get the idea. All major panels have wrapped edges, so less chance of lifting or peeling. I am not sure if it is common practice, but when you do the full A pillar, you can tuck the edge along the roof line under the rubber seal/flap along side the glass roof. It was very tedious and slow process since I had to lift the rubber while tucking in and squeegeeing the film at the same time and with less than an inch increment due to the tight space..


Attachments
Similar threads
- Replies
- 0
- Views
- 958
- Replies
- 15
- Views
- 2K
- Replies
- 4
- Views
- 2K
- Replies
- 3
- Views
- 2K