


Welcome to Tesla Motors Club
Discuss Tesla's Model S, Model 3, Model X, Model Y, Cybertruck, Roadster and More.
Register
Install the app
How to install the app on iOS
You can install our site as a web app on your iOS device by utilizing the Add to Home Screen feature in Safari. Please see this thread for more details on this.
Note: This feature may not be available in some browsers.
-
Want to remove ads? Register an account and login to see fewer ads, and become a Supporting Member to remove almost all ads.
You are using an out of date browser. It may not display this or other websites correctly.
You should upgrade or use an alternative browser.
You should upgrade or use an alternative browser.
Time to DIY PPF!!
- Thread starter nate704
- Start date

Congratulations! For a first time, it looks really good. Much better than my effort. I have some creases near the bottom of my front bumper and my kit did not have as good a fitment as yours. Lessons learned. Did you share links for your kit for others?
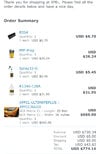
My supplier (on eBay), vitofi-91, is the best when it comes to the precise cut and pattern, but they are in Canada, so the shipping is about $60-80 for any piece and it takes about 7 business days to get to VA. It is still cheaper even after the shipping if you order all you want at once.
They can do any custom pieces and they will create the eBay listing per request.
They can do any custom pieces and they will create the eBay listing per request.
Anxiogenic
Member
Well after looking around I just ordered a roll directly from xpel and some installation accessories. They also sell the pre-cut kits too but seem to be much more costly than just a roll. How hard can it be to diy and cut your own as you go?
Attachments
Yeah good luck with that. Doing it with precision cut pieces was doable but not simple. Trying to do this with blank sheets would be crazy hard.Well after looking around I just ordered a roll directly from xpel and some installation accessories. They also sell the pre-cut kits too but seem to be much more costly than just a roll. How hard can it be to diy and cut your own as you go?
Last edited:
Not really. I've done my entire car with precut kits, and I think I can cut the time in half and produce better quality with the bulk install. The main downside of the precut kits are the alignment points. For example, front bumper has roughly 15 alignment points that you need to align before you actually squeegee the larger area. It take time and time is something that you cannot waste when it comes to applying the PPF. If you are struggling on one side of the front bumper alignment points and the other side is already starting to stick very good, so that you have higher risk of having hard spots, hardlines, ghosting, water spots, air bubbles, etc.Yeah good luck with that. Doing it with precision cut pieces was doable but not simple. Trying to do this with blank sheets would be crazy hard.
If you have just one bulk film, all you have to do is lay the big piece on top of the front bumper and start squeegeeing the entire bumper, and then you can start making cuts (assuming you are proficient at cutting films which is not hard to practice and gain experience).
I think for non professionals, it will be way easier and faster with the bulk film (you need to be good at cutting with good cutting knife (red dot)).
Bulk films will be really beneficial for the hood, doors, rear hatch lower portion with license plate, fenders, side mirrors, A pillars, and you have to learn where to cut for the front and rear bumpers.
Sorry have to disagree having done it both ways. Managing a large mass of film with limited time to stretch and shape is Much harder. Precut pieces guide you to correct fit via multiple guide points. Add to that red or other this material is not like cutting paper especially while avoiding a damage to the car. A kit (as you used) is the smart path if one wishes to DIY a project like this.Not really. I've done my entire car with precut kits, and I think I can cut the time in half and produce better quality with the bulk install. The main downside of the precut kits are the alignment points. For example, front bumper has roughly 15 alignment points that you need to align before you actually squeegee the larger area. It take time and time is something that you cannot waste when it comes to applying the PPF. If you are struggling on one side of the front bumper alignment points and the other side is already starting to stick very good, so that you have higher risk of having hard spots, hardlines, ghosting, water spots, air bubbles, etc.
If you have just one bulk film, all you have to do is lay the big piece on top of the front bumper and start squeegeeing the entire bumper, and then you can start making cuts (assuming you are proficient at cutting films which is not hard to practice and gain experience).
I think for non professionals, it will be way easier and faster with the bulk film (you need to be good at cutting with good cutting knife (red dot)).
Bulk films will be really beneficial for the hood, doors, rear hatch lower portion with license plate, fenders, side mirrors, A pillars, and you have to learn where to cut for the front and rear bumpers.
For the front and rear bumpers, yes I agree, it might be hard due to multiple stretch points and curves, but other panels, such as hood, doors, fenders, and quarter panels will be much easier with the bulk film, and those panels, you can wrap the edges and cut it on the inside, so that if you make deep cut, it will not be visible, and cutting the film is not hard. you just need to practice and have patience. (btw, do not try to cut the wet film since it will not cut well and you can't really feel and hear the correct cutting sound)Sorry have to disagree having done it both ways. Managing a large mass of film with limited time to stretch and shape is Much harder. Precut pieces guide you to correct fit via multiple guide points. Add to that red or other this material is not like cutting paper especially while avoiding a damage to the car. A kit (as you used) is the smart path if one wishes to DIY a project like this.
NaperY
OD 1/8: MYLR5 - Changed 4/14: MYP
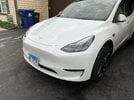
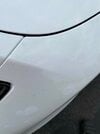
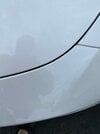
DIY'd it yesterday and today! Was one of the cheapo kits from Ebay. I think the second car i'll get right 
If anyone is wanting to do it i'd suggest a larger squeegee and an extra pair of hands, even if they have a beer in them most of the time.
Was told the foggy parts will go away with time, but i popped some of the big ones with a needle.
If anyone is wanting to do it i'd suggest a larger squeegee and an extra pair of hands, even if they have a beer in them most of the time.
Was told the foggy parts will go away with time, but i popped some of the big ones with a needle.
Attachments
voom500
Member
Nice !! What brand? Was it a full hood and bumper?DIY'd it yesterday and today! Was one of the cheapo kits from Ebay. I think the second car i'll get right
If anyone is wanting to do it i'd suggest a larger squeegee and an extra pair of hands, even if they have a beer in them most of the time.
Was told the foggy parts will go away with time, but i popped some of the big ones with a needle.
greatauror28
Member
Props to you for DIYing! As much as I would love to do this to my yet-to-be-delivered MYP I won't hear the end of it from the wife if there's even a single bubble or misalignment that she can see in the car.DIY'd it yesterday and today! Was one of the cheapo kits from Ebay. I think the second car i'll get right
If anyone is wanting to do it i'd suggest a larger squeegee and an extra pair of hands, even if they have a beer in them most of the time.
Was told the foggy parts will go away with time, but i popped some of the big ones with a needle.
SpaceMan99
Member
Well after looking around I just ordered a roll directly from xpel and some installation accessories. They also sell the pre-cut kits too but seem to be much more costly than just a roll. How hard can it be to diy and cut your own as you go?
How did you get on with the roll? I am likely going to go this route also.
I see you purchased 36" x 20'. What panels did you manage to get covered with that size film? I guess you only did partial hood? 36" doesn't look big enough in either dimension to cover it...? Love to hear more details about your experience, please!!
It is hard, due to the shape of the gradual curve on the door edge. The difficulty is not the cut, but getting the right size and shape templated. I used a Cricut to do my cutting. I produced a vector template, cut it into a roll of parchment paper to check fit. It took about 5 iterations, then I cut the PPF and applied.Well after looking around I just ordered a roll directly from xpel and some installation accessories. They also sell the pre-cut kits too but seem to be much more costly than just a roll. How hard can it be to diy and cut your own as you go?
So if you have the tools (either a Cricut or large format printer to print a template onto) and some skill with a vector curve editor it should only take a couple hours.
You could do it jiffy-style by tracing the PPF directly on the car freehand, and then cut it with an xacto. I think it will be mostly unnoticeable.
So….basically you could have just bought the pre-cut film and saved yourself the time of creating your own templates, tracing and cutting.It is hard, due to the shape of the gradual curve on the door edge. The difficulty is not the cut, but getting the right size and shape templated. I used a Cricut to do my cutting. I produced a vector template, cut it into a roll of parchment paper to check fit. It took about 5 iterations, then I cut the PPF and applied.
So if you have the tools (either a Cricut or large format printer to print a template onto) and some skill with a vector curve editor it should only take a couple hours.
You could do it jiffy-style by tracing the PPF directly on the car freehand, and then cut it with an xacto. I think it will be mostly unnoticeable.
Yup. But I enjoy this kind of thing, saved maybe $35 and have extra PPF now.So….basically you could have just bought the pre-cut film and saved yourself the time of creating your own templates, tracing and cutting.
Here’s my door panel template for MY
Last edited:
Whatever makes you feel good about yourself. I think I’d take a professionally cut, pre-cut kit over spending hours making my own templates and cuts to save $35. The pros who use whole rolls cut on the car, hence why their pros.Yup. But I enjoy this kind of thing, saved maybe $35 and have extra PPF now.
Here’s my door panel template for MY
No need to make templates at all. Just cut large enough to cover whatever panel you are applying and start squeegeeing from the center. Very minor stretching required around the curves, but not much effort will be needed. All you have to do after that is to cut the excess film and warp it around the edges.
Since the edges of the door have limited areas (0.5" or less) under it, you have to make sure that you make the cut properly based on the area that you can apply the film in the back.
OR
You an just use the precut film kit, but the quality and precision depend on the vendor. Luckily, my supplier's cut was super precise (within less than 1 mm) and the Xpel Ultimate plus flim is way better than other films when it comes to flexibility, easy to apply, protection, adhesion, etc.
3M film has less adhesion and very hard to stretch.
Similar threads
- Replies
- 0
- Views
- 1K
- Replies
- 15
- Views
- 3K
- Replies
- 4
- Views
- 2K
- Replies
- 10
- Views
- 2K