Welcome to Tesla Motors Club
Discuss Tesla's Model S, Model 3, Model X, Model Y, Cybertruck, Roadster and More.
Register

13 MS 85 can't go into drive, recent LDU rebuild, some clues from clicking sounds

This site may earn commission on affiliate links.
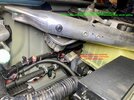
Here is some analysis of cowl water leak. Didn't fix yet, just analyzing to understand the problem more completely first. Easy hack is to run sealant in all the seams and gaps and may eventually be the only solution available given the design

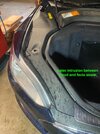
- Most obvious problem is rubber ends on 2 bottom corners of the windshield cowl seam has no sealant of any kind. Passenger side in particular is where wiper draws down a lot of the water. Unexplained purpose gap enables addition intrusion.

- Drain path goes forward on the car and dump in an opening in the wheel well. Just to have a hole from the wheel well in under the hood with a rubber flap cover seems undesirable. Most cars don't guide water forward with potential incoming airflow (when car travels forward) The plastic side covers may reduce this in MS. Most car runs water towards a drain in the very corner under the front hood just before the front door opening. Its a natural drain path and any incoming air flow while driving forward aids the path.


- Drain path into open wheel well is a rubber flap secured by plastic clip through a hole. The hole is yet another leak source. Best not to have a hole and just let the flap lay down by gravity (or secure by moulded rubber clip underneath) and top cover flap to maintain downhill grade for water flow into wheel well opening.

- Windshield is rigid and precise. Large hard plastic cowl piece is far from precise and will distort over time. Seam is sealed by a 1mm+ thick rubber surface on the bottom windshield clip. Not possible to expect a tight fit... water will sit in the seam and work to breach it. Most cars will accept natural bigger imprecise gap fill it with thin pliable rubber strip to seal off windshield water runoff from getting under seams.

- Lacking a 2nd cowl. Most cars have a metal shelf cowl below a plastic cowl housing wiper motors and articulating mechanisms. This is a 2nd barrier and guide for runoff water. MS has none.

Probably the only way to fix is the hack of bead of sealant. Doubtful any rubber tape will last long (also need a bevel one anyway to avoid having water sitting on a raised edge) Add rubber sheet under wheel well runoff guide which doesn't extend far enough and will leak before reaching wheelwell.

Next step after fixing this dam is any spray/leak path to DCDC. Might not be possible to prevent moisture entry so perhaps DCDC cover is best that can be done.
 
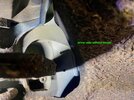
One more significant water intrusion at passenger wiper motor spindle hole. This might be one source of battery water intrusion @wk057 talks about

IMG_3115.jpegIMG_3114.jpeg

This 2013 RWD rarely parks in the rain and average 6kmi/year in Seattle (does rain here). Lives in garage at home and work. For cars that lives outside in the rain... I can see a big problem from these several windshield cowl leak passages.

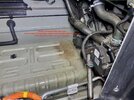
So looks like passenger wiper water run off takes out the DCDC and driver wiper water run off helps with the HV battery pack.
 
Last edited:
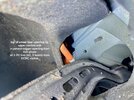
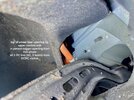
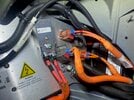
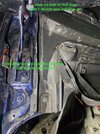
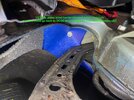
wheel liner has big opening for upper control arm where water can enter. DCDC HV lines just behind opening.
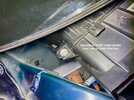
plastic cowl directly over top opening to DCDC, any leak past cowl seam probably going onto DCDC

IMG_3116.jpegIMG_3117.jpeg

Looks like only wheel liner changed after 2016. Cowl, windshield edge seal, wiper assembly PN all the same on newer cars since 2012.

Now onto devising improvements after design review :)
 
Solution v1.0 Need More Work

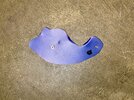
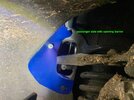
Fashioned a nearly letter paper sized barrier out of plastic folder (pdf attached with pattern, probably works for driver side too) to block off big hole in wheel well liner (12-15 cars, 16+ liner changed). Here are pics to show how big this hole is and A/B/C markers shows how close this hole is to DCDC

IMG_3116 (1).jpegIMG_3070.jpegIMG_3128 (1).jpegIMG_3131.jpegIMG_3136.jpeg

This cover probably reduce amount of water intrusion to DCDC AND also dripping down the HV line towards the heaters and AC.

Unfortunately, still additional water intrusion paths to DCDC and HV connectors from a 45 drive in light rain. On 3mi highway behind car sprays and parked for 10min.

IMG_3138.jpegIMG_3140.jpegIMG_3141.jpegIMG_3142.jpeg

Will likely need to find a way to cover DCDC/connectors from top on next Solution attempt. However covering up wheel well hole is probably desirable anyway to reduce moisture to DCDC and HV heaters/AC.
 

Attachments

  • wheel well barrier.pdf
    232.8 KB · Views: 82
One look under the frunk tub, and I resolved never to drive the MS in the rain.

Problem solved.

haha yep. Good solution for those can avoid rain :) the cowl water routing design is pretty poor. but then there is the car wash haha. My plug connector corrosion seems to have occurred a couple of days after a car wash.

btw. Not sure 2nd gen DC-DC bypassed all of the moisture problem of first gen. The driver side wiper pulls water through the big passenger wiper spindle hole opening. This seems to dump moisture in the center area behind the frunk. I think that’s where 2nd gen DC-DC relocated to. statistically. I think we still see quite a bit of coolant heater failures In 2nd gen. Don’t know but the poor cowl water routing probably dump moisture in a few places.
 
@howardc64
Thank you for your web page here, and your thorough write up of water ingress issues.
I have a 2013 MS 85. I just paid for an LDU rebuild, so I don't have the stomach or the wallet for HV battery and DCDC water issues. I do park outside (no choice for me), but I use a car cover.
I am a mechanical engineer, with access to Solidworks CAD software and a 3D printer. I would be open to working with you on solutions.

For the wheel liner, if it was changed in 16+, why not buy a used 16+ liner and install it? What is the part number of the pre 2016 liner? Part number for the 16+ liner?

Maybe for "water getting to HV connectors on DCDC", design a 3D printed piece that uses existing HV connector mounting points and nuts, and surrounds the connector? At the connector itself, where is the water getting in?

For the windshield, you suggested that sealant be applied across length of cowl. Correct?

You also suggested routine "plug & unplug" of HV connectors to remove corrosion. Correct?

Thanks,
Brian
San Diego, CA
 
  • Like
Reactions: cleverscreenam
@howardc64
Thank you for your web page here, and your thorough write up of water ingress issues.
I have a 2013 MS 85. I just paid for an LDU rebuild, so I don't have the stomach or the wallet for HV battery and DCDC water issues. I do park outside (no choice for me), but I use a car cover.
I am a mechanical engineer, with access to Solidworks CAD software and a 3D printer. I would be open to working with you on solutions.

For the wheel liner, if it was changed in 16+, why not buy a used 16+ liner and install it? What is the part number of the pre 2016 liner? Part number for the 16+ liner?

I didn't try the new wheel liner but there are 2 holes in the wheel liner and can't eliminate them completely. There is one on the very top (above the upper control arm) and windshield water run off is expected to flow forward and dump into this hole. Personally I think its a poor design because when the car drives forward, it will be hard to flow runoff water forward on a shallow grade against the wind. This is why so many cars dump windshield water in the back corner towards the door seam.

But the new liner may eliminate most of that big hole I posted in post #24. But not possible to completely seal since upper control arm need to freely extend from the frame to hold up the steering knuckles. Just didn't try the new liner after sealing mine and finding it didn't help keeping water off the gen1 DCDC. However, it probably reduce the water flowing to the HV cables for the coolant heater and AC compressor.

2012-2015 wheel liners have 2 PN per each side not sure which one. 2016+ is 1063693-00-D for front left, and 1063694-00-D for front right.

Maybe for "water getting to HV connectors on DCDC", design a 3D printed piece that uses existing HV connector mounting points and nuts, and surrounds the connector? At the connector itself, where is the water getting in?

I was thinking about trying some thermalplastic people use to shape Cosplay/Halloween costumes and heat shape a cover over the top of DCDC (have to be careful if using a heat gun to not melt stuff) 3D print a piece of plastic cover would be best. But probably need to think about how to avoid trapping moisture underneath so a cover with some standoffs to keep the cover off the DCDC housing. Just thoughts so far.

The connectors do have rubber seal inside and probably does the heavy lifting to keep out moisture. But given so much moisture gets dump onto the plug and nearby area, I guess not possible to keep out all corrosion. My gut tells me the high cabin/coolant heater failure rate for all generation of DCDC and front HV junction box is likely due to the high water intrusion off the windshield and wheel liner openings. It isn't clear how the water is getting into the plugs and past its internal seals. Just noting the massive water intrusion in and around these areas.

For the windshield, you suggested that sealant be applied across length of cowl. Correct?

Been thinking about this but not yet tried because even if can seal the seam of the cowl against various weak points on the windshield, the runoff path is still poorly designed. Even if DCDC gets covered up, water than likely just dump on top of the battery pack and also on top of the battery hump with driver side wiper sweeping water through the passenger wiper spindle hole. Am trying some aliexpress silicon wiper hole cover now but don't think it works very well, not sure any cover can work very well.

In general, have no good solutions yet. Most cars have 2 cowl layers (plastic below windshield, metal shelf which wiper motor mounts on) and route water run off towards rear corners on both sides. Model S has a wimpy plastic cowl with HV connections AND battery pack in the path of runoff water along with a "forward flow" shallow run off path that is unnatural when car is traveling forward with wind blowing back.

For now, I've just watched the weather report before deciding to drive to keep it out of the rain. Also note the multiple water ingress pathways into the battery including plugged breathing vents behind the front tires.

You are in San Diego (good for less rain) but park outside. I guess if you have MCU1, have to worry about the optical goo melting and leaking in hotter climate.

You also suggested routine "plug & unplug" of HV connectors to remove corrosion. Correct?

I will be doing this annually along with spraying some contact cleaners (Have to be familiar with disconnecting the HV to do this safely)

=====

Sorry but no complete solution now as the problematic design is quite significant. To completely solve the problem, I think something like the following is necessary

- Study car with good windshield and front hood seam water run off to see what they do
- Might need to fab a replacement cowl to include a rubber insert seal the seam and keep water from entering the seam between windshield and cowl
- Might need to custom fab a 2nd cowl under the first one to catch water intrusion from wiper spindle holes and also reguide the water runoff in a more effective path.
- Have a fairly large sized oval pipe routing all the run off water to dump on ground. Need to hunt for a dump opening. Maybe a 1/2" opening in front of battery pack (I run my AC drain pathway to here) or maybe towards somewhere where can cut a hole in the belly pan.
- Need to analyze water intrusion path in the hood seam and running under the plastic frunk covers to figure how how to handle these. I think most cars has a water run off channel where the hood seam is.

Anyway, quite daunting as there are water intrusion paths in quite a few places with HV circuits all around and battery mounted on lowest point on the car. Since I can park in garage and avoid driving in rain (not necessarily possible for everyone of course) Decided to focus on seeking more solutions for LDU rebuilds (seal source, rotor shaft damage, and inverter repairs) and plan to dig into HV battery next since it has a fairly significant water ingress issue.
 
Last edited:
I disconnected, sprayed contact cleaner, and reconnected the 3 connectors on the DC/DC converter yesterday.

Are these three connectors for
- Cabin heater
- Coolant heater
- AC compressor?

I went forward with the solution on post #18 in this thread - I stuffed a plastic garbage bag in there, and secured with a zip tie.

First photo is view from above. Second photo is from the wheel well.

IMG_20230121_110557.jpg


IMG_20230121_110542.jpg


Brian
 
  • Like
Reactions: cleverscreenam
I disconnected, sprayed contact cleaner, and reconnected the 3 connectors on the DC/DC converter yesterday.

Are these three connectors for
- Cabin heater
- Coolant heater
- AC compressor?

Yes. Cabin + coolant heaters on the 2 on top. Maybe thats why we see they have more failures than AC compressor?

s-l1600.jpg

I went forward with the solution on post #18 in this thread - I stuffed a plastic garbage bag in there, and secured with a zip tie.

I've been reluctant to use a plastic bagged solution thinking needs to breath. A plastic cover over the top with stand offs for breathing would probably be best. Was thinking of using thermal plastic as a DIY manufacturing solution.

However, upon seeing the HV battery further down below as another water ingress target. I decided for now to just check for good weather days before using the car (garaged, retired) Obviously not great solutions for cars in frequent use. The complete solution seems quite daunting so I've put it off for now. Water has entry points from windshield run off, wheel liner holes, and along the hood seams under the plastic frunk cover. Probably need some kind of plastic liner over the entire firewall/bulkhead area with built-in water run off channels below the cowl might be whats needed along with solutions for the wheel liner and hood seams. Need a bit of studying on cars with matured water intrusion designs and lot of trial and error testing solutions in rain and potholes of standing water.
 
@howardc64
Good discussion.
As a component with forced internal cooling, I would discuss further the need for breathing, or forced external convection.
While external cooling may contribute, if I was designing this part, I would put my money and design on the internal cooling, and have the external cooling as free lunch, and not required.

If the plastic garbage bag fails in the future (I saw it was held in place quite well, between the wheel well and other wires), I would go for a custom 3D printed solution that mounts from the top of the DC/DC converter.
I saw that the worst that the bag would fail is that it would melt, and you can recover from that failure.
A 3D printed part may have a lower melting point than the garbage bag!

I agree that the water ingress is complicated, so let it come in, and block it from damaging this component.
Brian
 
@howardc64
Good discussion.
As a component with forced internal cooling, I would discuss further the need for breathing, or forced external convection.
While external cooling may contribute, if I was designing this part, I would put my money and design on the internal cooling, and have the external cooling as free lunch, and not required.

Yes I figure coolant running through gen1 DCDC was sufficient for cooling. Breathing was more concern for trapped moisture from condensation. Moist air gets inside the bag, condenses inside the bag with less effective evaporation since little breathing channel.

BTW, ICE gets also lots of benefit from the hot engine nearby quickly evaporate what ever gets in. EVs is at a significant disadvantage here. Need to do better than ICE on moisture intrusion AND has more at risk HV.

If the plastic garbage bag fails in the future (I saw it was held in place quite well, between the wheel well and other wires), I would go for a custom 3D printed solution that mounts from the top of the DC/DC converter.
I saw that the worst that the bag would fail is that it would melt, and you can recover from that failure.
A 3D printed part may have a lower melting point than the garbage bag!

I agree that the water ingress is complicated, so let it come in, and block it from damaging this component.
Brian

Something like a 6 mil plastic acting as vapor barrier starting from under the cowl extended left to right side and guides water down forward and below the battery would be a possible solution. But since its a single sheet barrier, water will run where ever along that sheet and have many exit locations so not great control.

Ideally a 2nd cowl under the current cowl with a shallow grade water runoff channel to the sides down a tube exiting under the battery would be the best. I think this is classical solution for most cars. Here is a video of the Prius windshield water run off design.


Note the following

- 2:47 mark the top cowl gets pulled off. Note how the top cowl mates to the windshield. There is a flexible rubber seal that runs along the entire seam between windshield and cowl and lips over the windshield. You want a flexible seal because plastic cowl won't have a precise fit and will distort over time anyways and the thick rubber seal will take up the gaps. Posted Model S windshield cowl fitting design in this pic in post #19


Its impossible for Model S's thin layer of rubber to seal against the plastic cowl properly. Furthermore, without a lip over the top of windshield against water/dirt runoff... dirt gets trapped in the clip mechanism for the cowl further weakening its seal. When I pulled the cowl off... that clip channel is full of dirt gathered from life time of runoffs.

- 6:02 mark the wiper motor/gear/arm assembly is removed revealing its mounted on top of the 2nd cowl. This 2nd cowl would catch all the water that escaped the first cowl including the 2 cutout holes for the wiper arm spindle motor. These cutout holes are key water intrusion points because wiper will pull water downwards on return right into these openings.

Most cars will have this 2nd cowl with water runoffs towards corner of the side fenders and route to the bottom of the car. The drive side wiper will pull water towards the driver side runoff on the up swing and passenger wiper will pull water towards the passenger side runoff on the down swing. Often if someone parks under trees, sap and debris can clog these run off channels channels so people have had to clean these run off channels.

In summary, Model S has a leaky first cowl design, no 2nd cowl, and ineffective routing water forward in a shallow grade against blowing air while driving forward. And has moisture sensitive HV systems in this areas (Gen1 DCDC, HV devices, HV battery pack)

=====

To truly solve this, probably need

1. Redesign the first cowl with a rubber seal lip over windshield
2. Design a 2nd cowl under the first cowl and channel water to below the battery
3. seal/channel/block wheel well holes in a path that runs under the car
4. still need to study the water ingress along hood seams... Pulling the frunk plastic trim after a drive in the rain reveals water is running under the trim pieces.

1+2 are large pieces

I personally think protecting DCDC isn't enough. HV battery is at risk as well whenever driving forward in the rain or car wash. Only way to know "how much" mitigation is enough is repeated design iteration cycle of bolting on water runoff aid, drive in rain at high speeds + car wash, check water runoff, wait until dry off (or have > 1 car to pipeline the design iteration cycle), update mod, repeat...

So for now, I've been just avoiding the rain haha.
 
I disconnected, sprayed contact cleaner, and reconnected the 3 connectors on the DC/DC converter yesterday.

Contact cleaner is an excellent tool for removing debris and oils from contacts that are sensitive to minor resistance. Reed switches. Old-fashioned ignition points (remember those?). Stuff where you can't use high contact force yet also can't have a half-ohm extra in the circuit. Or, to clean something dirty prior to relubricating it, that can't stand a real solvent.

However, I'd think that moving to the opposite approach would be a better choice, as you're intending to prevent corrosion: use a dielectric grease. The grease inhibits water intrusion, and the dielectric adjective indicates high resistance (dielectric "strength").

[This is one of the few times I agree with using a dielectric grease; it's completely unnecessary for, say, 12v circuits. Plain ol' chassis grease or Vaseline is fine for that stuff, but with a 400v connector? Yeah, use the dielectric stuff. It's really sold for things like spark plug boots, where the grease is subjected to maybe 15kv. Some people seem to think that if grease is needed for corrosion protection or whatnot, then you gotta use the dielectric stuff, but that's bad folklore, in the same category as, "leaving your battery on concrete will drain it", ugh.]

Put another way: if the resistance of the female contacts in a connector -- the "springy" contacts -- is affected materially by whether there's grease or a perfectly clean surface, then the contact has failed and at least the terminal should be replaced.

Are these three connectors for
- Cabin heater
- Coolant heater
- AC compressor?

Yes. If you have a straight-on view of the GEN1 DC-DC, the connector functions are silk-screened next to each connector. Quite nice.

DC-DC_Converter_07b.jpg
 
  • Like
Reactions: cleverscreenam