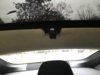
Welcome to Tesla Motors Club
Discuss Tesla's Model S, Model 3, Model X, Model Y, Cybertruck, Roadster and More.
Register

2nd run of camera switch that show a front image on the touch screen

This site may earn commission on affiliate links.

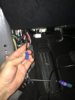
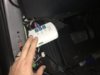
So next question, the cable coming from the display is very short on my car, it disappears into a cable bundle. It’s not long enough to locate the switch in the location you are referencing. Are others cutting the cable bundle to pull out this cable to get more length? Doesn’t seem like an easy task...
 

Attachments

  • 4E820176-4DA4-46B7-9D8A-CDAEAE1F66AB.jpeg
    4E820176-4DA4-46B7-9D8A-CDAEAE1F66AB.jpeg
    285.2 KB · Views: 155
  • 7789BFF9-2F26-4972-BBC6-CB241B011C71.jpeg
    7789BFF9-2F26-4972-BBC6-CB241B011C71.jpeg
    202.5 KB · Views: 139
Suggestion. If/when you folks are going to try the installation, plan ahead enough to give us a heads up when (day and time your timezone) when you are going to start. That way a couple of us that have done it, can try to be here/online and may be able to answer your questions as you run into them.

I'm going to post this suggestion again as this thread gets longer, so it doesn't go unnoticed.
 
SCEV, All the cables going to the display are the same length. I too experience "it being too short going into the cable bundle". I simply made that my last hookup and no, I did not cut into that bundle. Not worth the risk. Have to work around the shortness best you can.
 
SCEV, All the cables going to the display are the same length. I too experience "it being too short going into the cable bundle". I simply made that my last hookup and no, I did not cut into that bundle. Not worth the risk. Have to work around the shortness best you can.

Where did you mount the switch? Underneath the dash, to the left of the dead pedal...or “inside” the dash above the dead pedal?
 
Yes and yes. Been both places. Either one is good. If you have some foam or something you can wrap around it, you lessen any chance it might bump into something and make the slightest rattle. Not a bid deal, but you are there anyway.
 
Yes and yes. Been both places. Either one is good. If you have some foam or something you can wrap around it, you lessen any chance it might bump into something and make the slightest rattle. Not a bid deal, but you are there anyway.

Okay, I’ll see what works best. I’ve got 2 switches (3 cameras), but still waiting for 2nd switch to arrive before I can test fit everything.
 
A bit off topic but can the CanBus adapter be hacked to provide a way for some sort of motion sensor under the car to activate the trunk opening when the fob is nearby? I am thinking of a solution like Ford's foot unlock of the rear hatch. This is the one thing I really wish my car had (except for the forthcoming front camera).
 
  • Like
Reactions: DavidB and MP3Mike
A bit off topic but can the CanBus adapter be hacked to provide a way for some sort of motion sensor under the car to activate the trunk opening when the fob is nearby? I am thinking of a solution like Ford's foot unlock of the rear hatch. This is the one thing I really wish my car had (except for the forthcoming front camera).

Interesting idea... In theory it is possible, though I am not sure if the trunk can be opened from chassis CAN (which is what we're plugged into on the OBD port). I know if can be from the body bus... but will do some testing!

To make this work of course, we would need to listen for fob signal strength, ideally on the receiver in the trunk.. and if it is over a certain threshold, send out the command to open the trunk. Not sure if the fob signal strength is present on CH can either, but again, will look and see what I can find.

The firmware on the panda (can bus kit) is open source and is easy to update, so if we sort out the details it could work!
 
Are consolidated instructions and a video still on the way? If so, I'd rather wait for those to appear -- or do I have to plunge into the list of materials kindly assembled by Akikiki and appleguru?

Updated AP2 video is still on the way; I finally shot the last clip I need, so I expect it will be up by the end of the week / as soon as I can find some editing time.

I'm not sure on the plan for updated instructions, but perhaps those that have done successfully installs can help pull some together?
 
Halfway there...got the “baby cam” installed. Used some coat hooks from EV Items and just super glued the camera wings to them. Turned out great!

Next up is the front bumper cam, and a second switch. Hoping the signal is strong enough through 2 switches, and need to figure out how to use the menu button to switch between all 3 cameras.
 

Attachments

  • 3CD718E0-855A-4A55-AC88-1A88FAF1423E.jpeg
    3CD718E0-855A-4A55-AC88-1A88FAF1423E.jpeg
    258.2 KB · Views: 169
  • 2A0D16A0-EE7B-4084-AD39-00679C4490B6.jpeg
    2A0D16A0-EE7B-4084-AD39-00679C4490B6.jpeg
    378.8 KB · Views: 160
Has anyone with an early 2016 (pre-facelift) installed this yet? If so, please post some pics or details on where you located the switch. My cable from the display is not long enough to locate the switch behind the dash, and I can’t get it to fit behind the kick panel to the left of the dead pedal w/o the panel being pushed out significantly.
 
I saw where the pictures had shown someone had pulled the lower dash panel off (toward the driver) so one could see into the lower dash. Question: Did you take the T20 Torx screw out of the plastic panel that extends under the dash? This panel is thin and has the opening where the OBD port is seen. I ask because this is where I have placed and helped a couple of others put the switch. With the cable connected, and the wires in the connector, you can push it up under the dash and then use that thin black plastic panel to hold the switch up and prevent it from hanging down toward the floor.
 
I saw where the pictures had shown someone had pulled the lower dash panel off (toward the driver) so one could see into the lower dash. Question: Did you take the T20 Torx screw out of the plastic panel that extends under the dash? This panel is thin and has the opening where the OBD port is seen. I ask because this is where I have placed and helped a couple of others put the switch. With the cable connected, and the wires in the connector, you can push it up under the dash and then use that thin black plastic panel to hold the switch up and prevent it from hanging down toward the floor.

Hmmm, just tried that panel, but doesn’t seem to be enough room for switch with the cables connected. Attached are a few pics.
 

Attachments

  • 01ADD89F-77A0-4C12-85FC-BE2788A6733D.jpeg
    01ADD89F-77A0-4C12-85FC-BE2788A6733D.jpeg
    230.7 KB · Views: 129
  • 7B2390F7-0D92-4EB4-B6E5-F002F708E4D0.jpeg
    7B2390F7-0D92-4EB4-B6E5-F002F708E4D0.jpeg
    242.4 KB · Views: 119
Normal. Takes some wiggling and coaxing but doable. You are would not be different from others.

I really think it doesn’t physically fit there...the cables are hitting against the metal panel above them, bending them pretty severely. Jacket of the display cable is already starting to come out of the connector, don’t really want to push my luck trying to make it fit where there isn’t room.

Also, if the switch being placed there causes that panel to bulge down any, I think it would cause issues with the CANBUS kit being able to plug in.
 
If you are having that much difficulty, I can suggest this. I know how it works too, because I tested a prototype switch doing this.

You can remove the PCB board from the white box. I used Gorilla wide tape and wrapped the board covering the soldered contacts on the board to insure nothing touches. Then I used a small clear cellophane/plastic bag just a little larger than the board. I cut some holes where the connector and the cables attach. It's about 1/3-1/4 the thickness of the white box and plenty of room. Just took some minor finesse to allow the cables to slide just above the edge of the dash's front panel. Although that same un-boxed switch is currently installed on the other side of the console in a Model X AP2 for several months now, there's been no issues with it unboxed.