Welcome to Tesla Motors Club
Discuss Tesla's Model S, Model 3, Model X, Model Y, Cybertruck, Roadster and More.
Register

Anyone still rocking a Pi Zero W smart drive for TeslaCam on Sentry Mode?

This site may earn commission on affiliate links.
@C141medic, here are the instructions that I wrote up for people at work. These are really just a rehash of the information that is on the Readme file on the GitHub repo. Follow the link to marcone/teslausb and read the information that is there by the project’s author. Follow the link to the One-step Setup guide.

If you’ve actually tried this and it failed, one thing that may be throwing you for a loop is the cifs_version variable. I needed to uncomment that setting and change the value to 2.0 to work with my Synology DS415play.

Edit: if your cifs path to your storage is \\synology\teslausb\
archiveserver=synology
sharename=teslausb


Hardware required:

  • Always-on CIFS server at home. This could be a desktop computer you leave powered up at all times, but I use a Synology DS415play from several years ago that stores my local Time Machine backups, a large Plex Media Server library, as well as runs nightly bi-directional offsite backups between my house and a similar unit at my parents’ house 25 miles away.
  • Raspberry Pi Zero W (Pi Zero with built-in wi-fi capabilities) - Raspberry Pi Zero W - $10
  • Raspberry Pi Zero Case - Adafruit Raspberry Pi Zero Case $4.75
  • 6” Micro USB to Male USB A Cable - USB cable - 6" A/MicroB $2.95
  • Micro SD card – 32 GB or larger

Setup Instructions


  • Create a new “teslacam” account on your NAS box; create a new “teslacam” CIFS file share on your NAS box; assign permissions to the new share where the new teslacam account and your normal account have access to the new share
  • Download current software release from marcone/teslausb and extract image file from within zip file
  • Download balenaEtcher from balenaEtcher - Home
  • Flash image onto Micro SD card using balenaEtcher
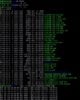
  • Mount new flash drive on your Mac/Windows/Linux computer to configure the setup process. In the root directory of the /boot volume on the SD card, there’s a teslausb_setup_variables.conf.sample file. Duplicate this to teslausb_setup_variables.conf in the same directory and edit the file as necessary
  • I’ve highlighted the lines below that I needed to change.
  • The cifs_version line needed to be uncommented and set to version 2.0 to work with the Synology DSM software. I figured this out by having a HDMI cable on the Pi Zero to see the mount.cifs error message and then ssh’ing into the box to debug further. You may or may not run into similar issues with your file server.
  • If you edit the timezone line, you also need to uncomment the line
  • Eject (Safely Remove) the /boot volume from your computer and insert the Micro SD card into the Pi Zero
  • Plug the USB cable into the “USB” port on the Pi Zero. Do not use the PWR port! The PWR port is only valid for power, where the USB port can power the Pi Zero and also allow the computer to see the device on the USB bus. This took a while to figure out because everyone assumed it was obvious which port you would use.
  • Test the Pi Zero by plugging the USB cable into your computer. On the first boot, it takes about 5 minutes to configure the Pi Zero. After that, it takes 30-60 seconds for the Pi Zero to boot. When it has booted, you will see the green status LED flash once every second. At this time, you should see a CAM volume on your computer. It will contain the required TeslaCam folder.
  • Eject the CAM volume and disconnect the Pi Zero from your computer.
  • Plug the Pi Zero into one of the front USB ports on your Tesla and the dashcam should be active
  • When you arrive at home, the Pi Zero will automatically login to your wi-fi network and copy any new video files from the media to your NAS server
  • Review the videos on your home computer my mounting the teslacam network share.
teslausb_setup_variables.conf
#####################################################################
# SAMPLE CONFIGURATION FILE FOR TESLAUSB Pi Setup
#
# Example config file for teslausb_setup. Lines with "#" are comments/ignored.
# Remove the "#" before "export" to activate a line. Be sure to rename this file
# to "teslausb_setup_variables.conf" and place it in the "boot" folder of your
# SD card.
#
######################################################################

# Default variables for CIFS (Windows/Mac file sharing) setup
export ARCHIVE_SYSTEM=cifs
export archiveserver=your_archive_name_or_ip
export sharename=your_archive_share_name
export shareuser=username
export sharepassword=password
# export cifs_version="3.0"

export camsize=100%

# if you set camsize to less than 100%, but don't want music to use
# all the remaining space, you can specify how much space you want
# music to use by setting this variable
#export musicsize=4G

# If you want to automatically copy music from a CIFS share every time
# the Pi connects to wifi, set the following variable. The share is
# assumed to exist on the same server as the archive share. It can
# be the same share as the share used for backing up recordings, but
# the folder needs to be different.
# export musicsharename=your_music_share/music_folder

# Wifi setup information. Note that Raspberry Pi Zero W only supports 2.4 GHz wifi
export SSID='your_ssid'
export WIFIPASS='your_pass'


# If doing a headless (i.e. automatic) setup
export HEADLESS_SETUP=true

# uncomment to enable a samba server that exports the recordings
#export SAMBA_ENABLED=true
# uncomment to enable guest access to the samba server
#export SAMBA_GUEST=true

# uncomment if you want to set the time zone to something other than the default 'BST'
# Can be an actual timezone, or "auto" to attempt automatic timezone detection
# export timezone="America/Los_Angeles"

# By default there is a 20 second delay between connecting to wifi and
# starting the archiving of recorded clips. Uncomment this to change
# the duration of that delay
# export archivedelay=20

# Uncomment if you want to override the default hostname of "teslausb"
# export TESLAUSB_HOSTNAME=teslausb-Model3

# Uncomment if setting up Pushover push notifications
# export pushover_enabled=false
# export pushover_user_key=user_key
# export pushover_app_key=app_key

# Uncomment if setting up Gotify push notifications
# export gotify_enabled=false
# export gotify_domain=https://gotify.domain.com
# export gotify_app_token=put_your_token_here
# export gotify_priority=5

# Uncomment if setting up IFTTT push notifications
# export ifttt_enabled=false
# export ifttt_event_name=put_your_event_name_here
# export ifttt_key=put_your_key_here

# TeslaUSB can optionally use the Tesla API to keep your car awake, so it can
# power the Pi long enough for the archiving process to complete. To enable
# that, please provide your Tesla account email and password below.
# TeslaUSB will only send your credentials to the Tesla API itself.
# export [email protected]
# export tesla_password=teslapass
# Please also provide your vehicle's VIN, so TeslaUSB can keep the correct
# vehicle awake.
# export tesla_vin=5YJ3E1EA4JF000001

# Uncomment and change if you want setup scripts to be pulled
# from a different repo than github.com/marcone/teslausb
# export REPO=marcone

# Uncomment and change if you want a different branch than main-dev
# export BRANCH=main-dev
Very helpful. Thanks. I’ll try it and see what happens. As you mentioned may have to change cifs=2 rather than 3.
 
It was too easy. Ordered raspberry Pi zero W and once I figured out the right usb port on the PI to plug into the car, it all started working without doing anything but changing the config during install. Mine is uploading to a linux server at home.
 
Hey Everyone - Just tried doing this, and i get a "get_script failed" message. What did I do wrong?!

I changed the setup file, renamed it, added my correct values.
 

Attachments

  • Capture.JPG
    Capture.JPG
    182.8 KB · Views: 92
Has anyone managed to get this to work with Google Drive?

I've followed the instructions to the letter, but it never seems to upload the videos anywhere, no obvious errors in the archiveloop.log either.

If anyones got a 'dummys guide' that is proven to work for Google Drive uploads, could you share please? :)

I finally got this to work with google drive.

There are 2 problems that needs to be addressed.

1. The date is wrong and will cause errors. I could not get ntp to work correctly or consistently, so i used rdate.
Date and time are incorrect on Raspberry Pi - Raspberry Pi Forums

1) sudo apt-get install rdate
2) sudo nano /etc/rc.local (from what I understand this file executes after the boot)
3) added the line "sudo rdate -s time.nist.gov" before the line "exit 0"
4) cp /usr/share/zoneinfo/EST /etc/localtime
5) sudo apt-get remove ntp (since I don't need it anymore) - I ddi not do this step.

2. The config file for rclone isnt in the right location.
I created a directory under /mutable/configs/rclone
mkdir /mutable/configs/rclone

then i reran rclone config. which created a config under that directory, and will symbolic link to /root/.config/rclone. If this doesnt show up, make the symlink.

all errors should show up under /mutable/archiveloop.log

Once i resolved these two issue, sync started happening.

Hope that helps someone.
 
  • Informative
  • Like
Reactions: focher and DaveW
Thanks @YauKwan

I don't think this is working for me still though, as I'm in the UK I did it to GMT (no BST option) I've not tried in the car yet but copying over files and folders into the TeslaCam folder hasn't resulted in anything arriving in my Google Drive folder - when I look in the mutable logs it says:
There are 0 event folder(s) with 0 file(s) to move.

Is there a proper way I can test this, other than just trying in the car with real files?
Unfortunately, I'm a complete newb when it comes to Raspberry Pi, so I can't help with your situation.

But I did find a much better setup video:

Got mine setup and working yesterday. Very pleased with the result. I used marcone's branch: marcone/teslausb
 
Been trying to get mine working for 3 days, tried so many things with nothing working.

Mine flashes twice, thinks for around 10 seconds, then reboots and just does this in a loop. It doesn't even create a log file, so I can't see where it's going wrong, any help would be greatly appreciated, spent so much time on this so far.
 
Tried to configure it three times but keep getting "get_script failed". It doesn't look like it gets a DHCP lease so I assume it didn't join the wi-fi. I have added the sections that I have edited below in case anybody can see anything obvious. I have amended my SSID and passwords but they use the same character sets so should cover if it is a special character issue and the SD card is 128GB

# Default variables for CIFS (Windows/Mac file sharing) setup
export ARCHIVE_SYSTEM=cifs
export archiveserver=fileserver
export sharename=TeslaCam
export shareuser=Tesla
export sharepassword='d93n03_an391n'
# export cifs_version="3.0"
export camsize=60%

# if you set camsize to less than 100%, but don't want music to use
# all the remaining space, you can specify how much space you want
# music to use by setting this variable
export musicsize=30G

# If you want to automatically copy music from a CIFS share every time
# the Pi connects to wifi, set the following variable. The share is
# assumed to exist on the same server as the archive share. It can
# be the same share as the share used for backing up recordings, but
# the folder needs to be different.
export musicsharename=TeslaMusic

# Wifi setup information. Note that Raspberry Pi Zero W only supports 2.4 GHz wifi
export SSID='BTHub5-T000'
export WIFIPASS='5dxa9012h9e'

# If doing a headless (i.e. automatic) setup
export HEADLESS_SETUP=true

# uncomment to enable a samba server that exports the recordings
#export SAMBA_ENABLED=true
# uncomment to enable guest access to the samba server
#export SAMBA_GUEST=true

# uncomment if you want to set the time zone to something other than the default 'BST'
# Can be an actual timezone, or "auto" to attempt automatic timezone detection
export timezone="auto"
 
Tried to configure it three times but keep getting "get_script failed". It doesn't look like it gets a DHCP lease so I assume it didn't join the wi-fi. I have added the sections that I have edited below in case anybody can see anything obvious. I have amended my SSID and passwords but they use the same character sets so should cover if it is a special character issue and the SD card is 128GB
OK, so to avoid a long story, I'm just going to summarize... I had zero success using single quotation marks. I had to remove every instance of single quotation marks to finally get it to work.

Try doing the same, as you have a bunch of them, too.
 
OK, so to avoid a long story, I'm just going to summarize... I had zero success using single quotation marks. I had to remove every instance of single quotation marks to finally get it to work.

Try doing the same, as you have a bunch of them, too.
Just gave it a quick try and didn't seem to make a difference. My PC is now refusing to read the SD card so will take a better look over the weekend
 
Just gave it a quick try and didn't seem to make a difference. My PC is now refusing to read the SD card so will take a better look over the weekend
That part is actually normal. There are several different partitions that are created on the SD card, most of which Windows can't mount. But it should still mount the "boot" partition.

So you actually got further than before this time, if you're seeing windows complaining about not being able to use the disk.

Also, this video is really worth watching:

 
I too saw the crosstalk video and decided to take the plunge. Got thrown off by him using the wrong github link too.

I got everything up and working, and did load music on there too, but I do not have it syncing. Instead of syncing the sentry files to my windows PC, I'm syncing them to a shared folder on my synology NAS.

I'm having a problem though where the files only sync for like the first five minutes after I get home and park in my garage. I even enabled sentry mode, thinking my problem was that the car was going to sleep, but this did not fix it. Files don't continue to transfer when it wakes up to charge in the morning either. In fact, in the morning it takes abit for the dashcam icon to show up, so I suspect the Pi was off when I got in the car in the morning, even though sentry mode was on all night long.

Do I just need to start over again and reflash? I have a 2018 model S, not sure if the USB ports act differently or not.