Welcome to Tesla Motors Club
Discuss Tesla's Model S, Model 3, Model X, Model Y, Cybertruck, Roadster and More.
Register

DIY Power Lift gate for Tesla Model S Walkthrough Video

This site may earn commission on affiliate links.
I asked him if the kit should allow the liftgate to close using the keyfob ( as stated in his new draft fitting instructions ).
Also, if the liftgate should stop closing when it meets resistance. He said he was having problems getting a clear answer from the manufacturer, but would get back when he does get an answer.

Not concerned about closing with the fob myself, but very interested in what you can find about the resistance for obvious safety reasons.
 
Let me give an update to everyone here.

The new wiring harness would improve the situation a little bit, but I still suggest the manufacturer to increase the length of the cable of the poles, just like V1.

We did a install for our customer today, the anti-pinch work only in the beginning. Once the closing reach about 2/3, it no longer work. Also, we confirm that the key fob closing is not working as in V1. I have communicated with the manufacturer, and they think there's a problem in the initialization process. We talked with them side by side on the phone, and they are going to send come technicians over to look at it. Hopefully there will be a solution soon.

The new button is not as good as the old one, I also made the suggestion to them. They agreed that they will eventually switch back to the old button design.
 
For anyone else that might be a little shy of just wiring this up. Here is how I wired the factory button on the v2 kit.

IMG_20171027_141742.jpg IMG_20171027_141735.jpg

From left to right on the button. From the connector with the button in the box go Green/Black/Purple.
 
They are figuring it out, and I will keep you guys posted.

Installed another car using the new wiring yesterday. Still not perfect but there's some improvement. I have already gave my feedback and they will release the final version of the wiring harness soon.

Keep us posted on the foot sensor thing.
 
  • Like
Reactions: MIT_S60
Hi,
I have just received the footsensor from autoease,
It came in small brown box, and included a reasonable if non detailed set of instructions.
BE713E40-44BE-4D8D-8636-A0E115C7AE54.jpeg D46EC73C-7B38-4FE4-B369-1A3F96361777.jpeg
The sensor was a neat black box with attached cable.
1FD4ED0A-A724-477D-A449-913FBF94B8C3.jpeg
The sensor needs to be screwed to the underneath of the Tesla behind rear bumper, with provided self tapping screws.
The cable needs to be run from the sensor into the boot ( trunk) area. I haven’t looked to see if there are any handy holes in underneath ( rubber grommets) to enable easy cable entry into boot without drilling an extra hole.
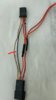
The cable from the sensor is then attached to the supplied harness.
962B0A09-4EC8-4B26-8E33-C013FEE8EA92.jpeg
This consists of four wires, 3 in a single cable with strpped wire at the other end, and a long green separate wire.
The 3 wires in the harness are black for earth, yellow for constant 12volt supply, and red for ACC, from further investigation this means a switched 12 volt supply that is only on when car is on.
We know where to tap a constant 12 volt supply from the power liftgate installation, hopefully one of the other wires in the Tesla sockets is for switched 12 volts.
The green wire needs to be connected to the liftgate button, which wire on the button will need investigation.
The kit also includes some tapping connectors, some screws, and a label to stick on the bumper.
67ABC599-202E-4401-B583-F43948DC73AF.jpeg
The installation does not look too daunting but does mean removing the same panels as for the liftgate installation, and having had a hard time replacing the large liftgate panel, I think I shall wait a while for the scars to heal further, before attempting an install.
Please see attached photos.
 
Last edited:
a hard time replacing the large liftgate panel

When I installed my dashcam I had to remove the panel again. I figured out a trick that made it pretty easy. The clips near the window closest to the front of the car like to pop back out so once I got one side clipped in (I did passenger side first) I replaced the screw on that side to hold things together while clipping in the other side.

Using this technique I was able to replace the panel without any assistance and it was fairly simple.
 
There is a button harness in the trunk area on the left hand side (as you look in behind the carpet wheel liner) that serves for the button available to passengers in the third row seats, I would think you could tap into that as well as the opposite side for all the power etc (same pace you tapped into for the liftgate). If you remove the trunk carpet there are flaps/holes that you can run the wire out of the car (these are like air/pressure vents on each side of the trunk behind the carpet).
 
Just had a thought on how to intercept the liftgate button wire without having to remove the large panel at all. If I can trace the appropriate wire at the control box end, then the whole installation can be done in thenboot (trunk) area.
 
It's the trunk latch wire, he just has the sleeve removed.

Guess that rear hatch panel is coming off anyway! Think I'll wait till we hear a definitive answer on the resistance sensor ability before I go in there to cut that wire.

Also...100th post!

Trunk Latch Wire.jpg