Welcome to Tesla Motors Club
Discuss Tesla's Model S, Model 3, Model X, Model Y, Cybertruck, Roadster and More.
Register

Installed a hitch and wiring harness on my M3

This site may earn commission on affiliate links.
There are some useful solutions in this thread, including discussion of the new grey cable.

Installed a hitch and wiring harness on my M3

I didn't post originally, but am using the ZCI Circuit Protected Wiring Harness Kit #119250KIT ZCI Circuit Protected Vehicle Wiring Harness w/ 4-Pole Flat Trailer Connector and Installation Kit T with a small 12v battery in the trunk to power incandescent lights on a boat trailer. Pricey but works perfectly.

Battery fits nicely in the left trunk well, and only put it in when towing. Can post picks once the bikes are off the rack of that's helpful.
 
Thanks. It would be nice if someone with Euro model 3 posts what exactly is plugged into the grey harness plug. But I guess they don’t really have a reason to ever go there since Tesla presented OEM solution to them.

I might have to just wait a bit more. I am not in a rush of any sort.

BTW, the battery in trunk would bother me ... going out 2-3 times a week in a season. It would be just matter of time, I’d run out of juice at the worst possible time ...
 
That was nice. I don't know that I would ever replace my Torklift to get those features, but I like the suggestion of replacing the underbody panel of the Tesla M3 with the new one that has the removable piece to access the hitch.
 
Unfortunately, the fact that Tesla model 3 is such an advanced car, brings its challenges, this is one of them. We are trying to add medieval style of wiring to model 3 next generation wiring and systems. I would definitely NOT splice any OEM wires. Nor would I try to tap some unknown nodes for ground or power. The system is too smart to detect vampire draw and go into “alarmed” state.

The stealth hitch, basically relies completely on power drawn from the battery .... there should not be any issues with that. I read few reviews that it works, but I do not know for sure what module to translate turn and brake signal they exactly use. I doubt it’s their own ...

I still think Tesla will eventually offer OEM solution in North America, because they know this would happen and in the end it will hurt them .... people simply do use the vehicle to transport bikes and most people hate themn on the roof, even if it would be safe to do so. Often it is not ...

I think the evidence of the bottom cover and ready to go harness, is evidence of it. I just wish there would be more info regarding the harness.

No hitch no Tesla for me .... :-(

BTW, The EcoHitch might be OK, but the fact that you have to deal with the silly bolt which requires torquing every time I want to hide the hitch 2” square end, is just not cool. Over winter it’s ok, but in the summer, I use it once a week ... so I am used to frequently taking the ball end out. The Stealth is the right solution, kind of like most Euro cars have it. It takes 5 seconds, no wrench required. The Euro Tesla model 3 is the same way ...

I have the Stealth hitch system with the wiring harness they sell as a package. I installed it early last year and it worked fine until recently. I traced a few things yesterday and it seems that the power cable that I ran directly from the 12V battery in the Frunk must have some kind of worn insulation somewhere, because it is only delivering ~1.5V to the back module (it measures 13V either side of the fuse off of the 12V battery). Consequently, I'm thinking of abandoning the first wire I ran, which went from the Frunk, down the backside of the front wheel opening, and tucked inside the plastic trim that runs along the bottom outside of the car, then in through a grommet under the bumper.

Now I'd like to run the new wire from the 12V battery through the firewall, through the car interior to the back. Anyone know how to do that? Where should I poke it through?!
 
Dear Koots,

You've probably seen my posts above in this thread, but I'm still having very good luck with a small 12V in the trunk, and no need to fish wiring or search out damaged insulation:

"I am using the ZCI Circuit Protected Wiring Harness Kit #119250KIT ZCI Circuit Protected Vehicle Wiring Harness w/ 4-Pole Flat Trailer Connector and Installation Kit T with a small 12v battery in the trunk to power incandescent lights on a boat trailer. Pricey but works perfectly. The battery fits nicely in the left trunk well, and only put it in when towing. Can post picks once the bikes are off the rack of that's helpful."
 
  • Helpful
Reactions: KootsChewt
I have the Stealth hitch system with the wiring harness they sell as a package. I installed it early last year and it worked fine until recently. I traced a few things yesterday and it seems that the power cable that I ran directly from the 12V battery in the Frunk must have some kind of worn insulation somewhere, because it is only delivering ~1.5V to the back module (it measures 13V either side of the fuse off of the 12V battery). Consequently, I'm thinking of abandoning the first wire I ran, which went from the Frunk, down the backside of the front wheel opening, and tucked inside the plastic trim that runs along the bottom outside of the car, then in through a grommet under the bumper.

Now I'd like to run the new wire from the 12V battery through the firewall, through the car interior to the back. Anyone know how to do that? Where should I poke it through?!
I ran my power wire for the trailer light converter through a small hole that I drilled on a rubber grommet in the firewall. Then tucked the wire under the bottom doorwell trim, behind the rear seat bolsters, all the way to the trunk. I recommend that you instead tap into the 12v power output that is located under the rear seat (lots of people use that source to power aftermarket sound system components for their Model 3. It should be easier, quicker, and safer that how I did it. I drilled a small hole in the grommet through the firewall that the 2 orange high voltage power wires go through (for the cabin heater). You need to know what you're doing and take care not to damage the orange high voltage wires, and it was extremely difficult feeding the power wire through the hole in the grommet (tight fit).
 
  • Helpful
Reactions: KootsChewt
I ran my power wire for the trailer light converter through a small hole that I drilled on a rubber grommet in the firewall. Then tucked the wire under the bottom doorwell trim, behind the rear seat bolsters, all the way to the trunk. I recommend that you instead tap into the 12v power output that is located under the rear seat (lots of people use that source to power aftermarket sound system components for their Model 3. It should be easier, quicker, and safer that how I did it. I drilled a small hole in the grommet through the firewall that the 2 orange high voltage power wires go through (for the cabin heater). You need to know what you're doing and take care not to damage the orange high voltage wires, and it was extremely difficult feeding the power wire through the hole in the grommet (tight fit).

You could tap the 12V power underneath the right rear passenger seat. That's what I did for a radio and trailer wiring install and no errors so far.

Thanks all for your input. I ended up removing the wire (with ring and fuse) from the 12V battery in the frunk and connecting it to the 12V post under the rear right seat as suggested. Works a treat! I just tucked the wire under the carport along the passenger side to the area behind the sub, where the trailer harness module lives. I've attached a few photos for anyone interested.


The cut wire is just visible at the passenger wheel area...
image4.jpeg


I slid the ring terminal inside the rubber cover and connected under the existing nut... (incidentally, part way through I became a bit nervous of the metal bracket right beside it - from a safety perspective, I probably should have pulled the positive cable off the 12V battery? Or would that have even done anything if this is powered by the DC-DC converter off the HV pack?)
image5.jpeg


The wire tucked easily behind the bolster beside the folding portion of the rear seat, and from there I chased it along the passenger side just under the carpet...
image1.jpeg


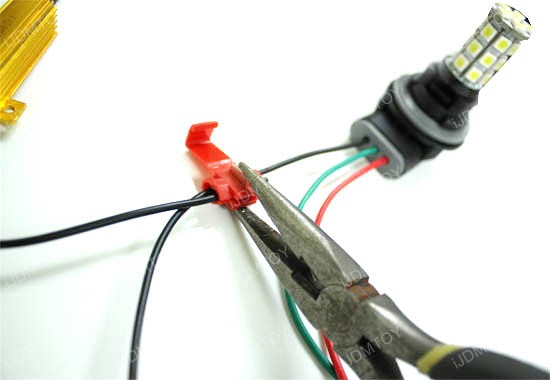
I used an inline connector and heat shrink tubing to connect to the black wire on the module that came with my Stealth Hitch wiring kit. The ground (white) is connected to the bracket you can see in the background near the subwoofer amp. The green and brown wires go to the right tail light and are connected with a tap thingy that has little blades that cut through the insulation on the existing tail lights and the wire that runs to the "in" side of the module.
image3.jpeg


They look kind of like the orange tap in this image. I find that they needed some extra squeezing with pliers, and even still, I've had to "resquish" them in the past to get the lights working again. Maybe I'll wrap them tightly with electrical tape to try and hold them tight. Darn, should have done that while I was in there tonight!!
LED-Bulb-Add-Load-Resistor-4.jpg
 
  • Informative
  • Love
Reactions: android04 and pmc1
Thanks all for your input. I ended up removing the wire (with ring and fuse) from the 12V battery in the frunk and connecting it to the 12V post under the rear right seat as suggested. Works a treat! I just tucked the wire under the carport along the passenger side to the area behind the sub, where the trailer harness module lives. I've attached a few photos for anyone interested.


The cut wire is just visible at the passenger wheel area...
View attachment 541882

I slid the ring terminal inside the rubber cover and connected under the existing nut... (incidentally, part way through I became a bit nervous of the metal bracket right beside it - from a safety perspective, I probably should have pulled the positive cable off the 12V battery? Or would that have even done anything if this is powered by the DC-DC converter off the HV pack?)
View attachment 541883


The wire tucked easily behind the bolster beside the folding portion of the rear seat, and from there I chased it along the passenger side just under the carpet...
View attachment 541884

I used an inline connector and heat shrink tubing to connect to the black wire on the module that came with my Stealth Hitch wiring kit. The ground (white) is connected to the bracket you can see in the background near the subwoofer amp. The green and brown wires go to the right tail light and are connected with a tap thingy that has little blades that cut through the insulation on the existing tail lights and the wire that runs to the "in" side of the module.
View attachment 541889


They look kind of like the orange tap in this image. I find that they needed some extra squeezing with pliers, and even still, I've had to "resquish" them in the past to get the lights working again. Maybe I'll wrap them tightly with electrical tape to try and hold them tight. Darn, should have done that while I was in there tonight!!
LED-Bulb-Add-Load-Resistor-4.jpg
To power off the car completely, disconnecting the 12v battery isn't enough. The way to do that is to unplug the black "j"-shaped connector a few inches from the 12v DC output post that you connected to.

I foresaw the same issues with splice connectors that you are having because the taillight wires are tiny. That's why I used PosiTaps instead (https://smile.amazon.com/gp/aw/d/B001MPW54G). I've had no issues with them, but I do plan on switching them out with a more elegant inline wiring adapter that requires no tapping or splicing. I already have all the parts, just need to put it together. The custom adapter just plugs in between the taillight and the wiring connector.

P.S. see here for how to disconnect all 12v power from the car Tesla Model 3 Hard Reset | Mountain Pass Performance

P.P.S. see here for info on the parts needed to make a taillight wiring harness adapter that doesn't require tapping or splicing What type of connector used for tail lights
 
Last edited:
So 5 pages already and nobody has mentioned that the trailer is not level. Change your receiver to one that is lower, so that the trailer is level when hooked up. There are many different ones to choose from - 1 inch or 2 inch step up or down for example. You may even be able to turn yours around so it's a step down and reinstall the ball so it's back on the top. Whatever works to get it level.
 
Just wanted to add my experience to this thread, the contents of which helped me while doing my research. I installed a Torklift stealth hitch and the Tekonsha Zero Contact Interface (ZCI) wiring harness on my 2020 Model 3. The hitch install went smoothly and I have not included pictures because they would duplicate many postings on this thread. This post is mostly about the wiring harness set up, which is shown in the attached picture. I used the 12V supplied by the existing, but not used, trailer wiring connector at the center top crash bumper, modifying the connector blanking plate to support a modified insulated male spade terminal to tap the 12V. The trailer harness wiring was routed through the existing but unused grommet on the lower rear panel, cutting the wires and then reconnecting them. To avoid overloading that access I routed the 12V wire through the parking sensor wire harness access hole to the lower rear passenger side. The electronics were mounted in that area (rather than the driver’s side as shown in many instructions). Like others in this thread my wire colors were.

Driver Side Passenger side

Gray Brake Grey Brake
Pink Taillight Yellow Taillight
Purple Left Indicator Red Right Indicator

Installed the ZCI sensors being super careful to get the wires in their sensor slots, wrapping the adhesive foam to hold them there and making sure the arrows pointed to the lights. Being super careful since others have reported difficulties with getting this setup to work and these issues are the most likely causes.

Everything worked just fine. One of the issues with this setup is that the trailer connector +12V goes off when the car goes completely to sleep. The Tekonsha electronics says that it needs constant +12V to retain its learning, or you have to go through the learning routine after power up. I did not want to connect directly to the battery for 2 reasons. One, the hassle of running a wire up front, which I have done on other vehicles, including a big RV and it is not fun. Two, the YouTuber Ingineerix made a comment in his “how to get Tesla Model 3 12v” videos that you do not want to connect directly to the battery because the Model 3 coulomb counts energy to and from the 12V battery. Ingineerix’s qualifications to make such a statement are evident in the quality and depth of his Model 3 teardown videos.

In my case I will be using the hitch mostly for a bike carrier and only occasionally to tow a light duty trailer. So, I installed an in line push button switch, attached to the passenger side trunk metal roof so that I only turn the trailer wiring electronics on when I attach the trailer, and then I know that I have to run through learn mode as a component of the attaching the trailer sequence.

IMG_20200531_150427.jpg IMG_20200531_150443.jpg
 
  • Like
Reactions: android04
Unfortunately, the fact that Tesla model 3 is such an advanced car, brings its challenges, this is one of them. We are trying to add medieval style of wiring to model 3 next generation wiring and systems. I would definitely NOT splice any OEM wires. Nor would I try to tap some unknown nodes for ground or power. The system is too smart to detect vampire draw and go into “alarmed” state.

The stealth hitch, basically relies completely on power drawn from the battery .... there should not be any issues with that. I read few reviews that it works, but I do not know for sure what module to translate turn and brake signal they exactly use. I doubt it’s their own ...

I still think Tesla will eventually offer OEM solution in North America, because they know this would happen and in the end it will hurt them .... people simply do use the vehicle to transport bikes and most people hate themn on the roof, even if it would be safe to do so. Often it is not ...

I think the evidence of the bottom cover and ready to go harness, is evidence of it. I just wish there would be more info regarding the harness.

No hitch no Tesla for me .... :-(

BTW, The EcoHitch might be OK, but the fact that you have to deal with the silly bolt which requires torquing every time I want to hide the hitch 2” square end, is just not cool. Over winter it’s ok, but in the summer, I use it once a week ... so I am used to frequently taking the ball end out. The Stealth is the right solution, kind of like most Euro cars have it. It takes 5 seconds, no wrench required. The Euro Tesla model 3 is the same way ...
The 2020 M3P has a large unused electrical connector at the spot for the hitch. Might have everything needed for hitch wiring.