Welcome to Tesla Motors Club
Discuss Tesla's Model S, Model 3, Model X, Model Y, Cybertruck, Roadster and More.
Register

Installed! Austin MY C Pillars for Parcel Shelf

This site may earn commission on affiliate links.
Data point for Houston. The install charge was $96.00. There is a service line item called Parcel Shelf Retrofit that was added. They came to the house with the parts and were in and out in about an hour. $313 out the door. Definitely dampens the sound nicely.
I wonder if this line item includes the lower carpeted trim or if its just the 3 pieces everyone else in this thread is getting (left c pillar, right c pillar, and parcel shelf)
 
Only had the three pieces installed, but that’s all I ordered. I’ll go look and see if there is any additional trim. I didn’t even know that was a thing.
Yeah, I think all the model Y's delivered with the cargo cover all have that bottom carpeted trim that extends to wear the rear seatbelts rest. Either way, it's cool that they did install the pieces for you with no issues. Lots of SC's are giving conflicting information and I guess it's up to each SC to decide what they will order/install for us.
 
I just finished retrofitting mine two days ago. I think there is a minor noise benefit. Parts cost to me was $211 for the three parts as in post #1. I picked them up at my local service center. I had to wait weeks for them to come in, though. It took me an hour to install; I’m familiar with car trim though so if you’re not - maybe it’s worth paying them to install?
 
  • Like
Reactions: ElectricAnt54
Submitted my order about 2 weeks ago.
Pick up date is this Sat Aug 13 according to the app.
They haven't said anything back except pushing out service schedule because they said they need more time.
So I guess it is possible to order these parts in Canada.

If you are going to try, I suggest choosing mobile service instead of picking a service centre like I did. Mobile service should actually driver these parts right to your door.
Tried to order for mobile service, and they cancelled my appointment, stating "this retrofit is not an approved Tesla repair".
 
  • Like
Reactions: leecox
Nashville is fun…
 

Attachments

  • 4DFA5586-0FD0-405C-B7BF-2820F125115A.jpeg
    4DFA5586-0FD0-405C-B7BF-2820F125115A.jpeg
    186.5 KB · Views: 346
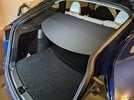
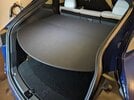
Finished! The install task was 3 out 5 if you like playing with Legos and you have the right tools. I'm going at this blind just by videos and what people have said on the thread. I completed the project in about 2.5 to 3 hrs. The biggest part for me was the lower C pillar and lower seat cover thing.

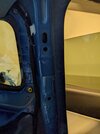
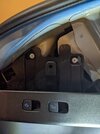
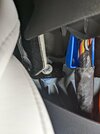
I started with the left driver side. Figured this had the charger and 12v attachment so it took a little more finesse. What everyone said about the lower C pillar is true it's a pain, but once it's removed the access to the seat belt bolt is super easy (socket extension is needed 6in min. 10in is good) Note make sure you remember the orientation of the seat belt, it's keyed so it can only go one way but make sure you tuck it under the carpet then place the plastic over the carpet or else it makes a rubbing noise added to your other creaking noise in the car.

Install tips:
Watch the video of the guy tinting the roof, and read the install for the CCS adapter to remove the lower C pillar.

1. Lower C pillar in the front by the seats will have 2 metal clips with locator pins. These are a pain to remove. Tug enough around them and you can pull the one on top. The lower one is very hard, just place your hand close to the pin and hulk it and the sucker will pop out. The rest is held on by the upper c pillar.
2. Trick for upper c pillar separation to prevent the clips from falling. Slide you hand in between the separation and when you get close to a clip push in the top c pillar and swiftly pull on the bottom c pillar.
3. Once the lower C pillar is free you can remove the seat belt bolt. The bolt does have Loctite. You will feel the resistance when unbolting. Make sure you add Loctite again before installing.
4. Take a pic of the seatbelt placement so you remember how to reinstall.
5. Removing the upper c pillar use swift tugs to free the plastic clips-, I took pictures of each pin location. same for the passenger side.
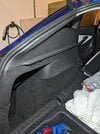
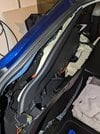
6. Where the c pillar meets the roof liner by the trunk hold the liner and tug the c pillar.
7. Wiggle you way out of the rear door roof liner.
8. Freedom!! well almost remove the seatbelt guide, dont break it you need it.

Remember it's always easier uninstalling 🤣

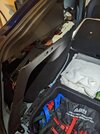
Picture time. I took pictures of where the plastic white pin connectors will mount to the frame. So when you install the new c pillar you can place your palm at these locations and pop them in.

I made a video of the passenger side install, I should have it up shortly.

Thanks for the help everyone!
 

Attachments

  • PXL_20220929_010322526.MP.jpg
    PXL_20220929_010322526.MP.jpg
    532 KB · Views: 254
  • PXL_20220929_010307292.MP.jpg
    PXL_20220929_010307292.MP.jpg
    492.6 KB · Views: 201
  • PXL_20220928_231538064.MP.jpg
    PXL_20220928_231538064.MP.jpg
    597.4 KB · Views: 197
  • PXL_20220928_223750428.MP.jpg
    PXL_20220928_223750428.MP.jpg
    409.7 KB · Views: 197
  • PXL_20220928_223747176.MP.jpg
    PXL_20220928_223747176.MP.jpg
    481.1 KB · Views: 190
  • PXL_20220928_223742663.MP.jpg
    PXL_20220928_223742663.MP.jpg
    409.7 KB · Views: 201
  • PXL_20220928_223111213.MP.jpg
    PXL_20220928_223111213.MP.jpg
    371.9 KB · Views: 190
  • PXL_20220928_223413143.MP.jpg
    PXL_20220928_223413143.MP.jpg
    459.7 KB · Views: 193
  • PXL_20220928_223124332.MP.jpg
    PXL_20220928_223124332.MP.jpg
    564.7 KB · Views: 245
So it is quieter?
So I just finished test driving the MY with the shelf installed drove it on both highway and street. Here is my take on quiet level.

1. Motor whine under full acceleration is gone. I can't hear the whine over the same audio volume.
2. Rear suspension thud by going over bumps or uneven road, it sounds more solid like BMW or Benz in terms of sound. The lower fq of the thud is there, but the resonation of the thud is gone so it sounds solid. The sound is more balance from front to back going over bumps, if that makes sense.
3. Small creaks from suspension has been dampened, still there but not as annoying.
4. Which by far is the best bonus that no one talked about is the actual audio experience. Settings unchanged (high surround, tidal hifi audio, same eq setting) and it was night and day with the shelf installed. Right away I noticed the audio coming from the rear hatch, having the audio set to high surround gave a more immersive effect in the car. I'd say its on par with M3 level of audio experience. Now you can actually hear the rear speakers!

Overall the driving experience has been enhanced with the shelf installed.

I cant wait!
Now debating the install myself or let the "pros" do it....
 
Had a service appointment to take care of a couple of warranty issues. They had the parts I ordered for the shelf and I just had them do the install there. I think it was about $130 for service. He told me they had to replace the seatbelt bolts, but they didn't replace the foam. I was able to take my original c-pillar interior parts with me (had to ask for them as they were going to be taken by the service center).

IMG_3698.JPG
 
  • Like
Reactions: JDEWD250
Somethings rattling in the left panel that was installed... I need to look at it and see if somethings loose.
I might have left a plastic pry somewhere in one the panels, I haven't found it since... I know I lost a couple of those tiny white clips, of which I think I heard an awkward rattle last night. Any case, I ordered some of those white clips from Amazon (https://a.co/0CfeaQD), because I'm ocd, I'll wait for those to get here then take it all apart again and maybe find that plastic pry too, lol.
 
E38BAF9D-C981-4205-85CF-D7F1A8A7999C.jpeg

After my DIY install, I also lost few of those white trim clips and noticed lower and upper pillar panels are not tightly fitting.
I ordered these trim piece using the Tesla app service.
This is the the part name & number for the white plastic clip : EDGE CLIP,6MMX15,SOLID,POM( 1496105-00-B))
I paid $3.25 each!!!!! Yes, the Tesla Sc guy I talked to also said 'unbelievable'.

(Update after install)
Now the edges of upper and lower panels fit each other tightly. Job done.

I might have left a plastic pry somewhere in one the panels, I haven't found it since... I know I lost a couple of those tiny white clips, of which I think I heard an awkward rattle last night. Any case, I ordered some of those white clips from Amazon (Amazon.com), because I'm ocd, I'll wait for those to get here then take it all apart again and maybe find that plastic pry too, lol.
 
Last edited:
  • Informative
Reactions: ElectricAnt54
View attachment 859397
After my DIY install, I also lost few of those white trim clips and noticed lower and upper pillar panels are not tightly fitting.
I ordered these trim piece using the Tesla app service.
This is the the part name & number for the white plastic clip : EDGE CLIP,6MMX15,SOLID,POM( 1496105-00-B))
I paid $3.25 each!!!!! Yes, the Tesla Sc guy I talked to also said 'unbelievable'.

(Update after install)
Now the edges of upper and lower panels fit each other tightly. Job done.
Yes, I noticed that I was missing one or two of these, I had to move one from the middle to the edges to get it to not be loose... Crazy that it is so expensive!! I can see why on my car they were missing for the 3-4 spots in the middle..