Welcome to Tesla Motors Club
Discuss Tesla's Model S, Model 3, Model X, Model Y, Cybertruck, Roadster and More.
Register

The perfect Model 3 emergency jack?

This site may earn commission on affiliate links.
This thread is slowly steering back to the "emergency" aka side of the road topic it started out as!

A ratcheting breaker bar??? I never! Kinda want one and can return my 1/2" actual breaker bar to the bench from living in the frunk.

My 2011-2018 Cayenne jack is easy to operate but has a +5lb weight penalty over Audi.

That said, a nice flat garage floor is not the side of the road on dirt/uneven surfaces. Still curious how these single leg jacks will work in real life, but I have more confidence than a cheap scissor jack... At least for now.
 
Has anybody discussed bottle jacks ?


That's a pretty expensive little bottle jack. However, that's the first one that I've seen that is that low.

Begert Engineering in Washington State (the original and erstwhile makers of the Rennstands) pioneered secure jacking adapters for bottle jacks,

I've experimented with inexpensive 2 ton Torin bottle jacks, but they are too tall to use on Teslas.

I've modified one for my Lexus RX350 by drilling the center lifting screw with the 5/16 inch hole done on the X-Y tab;e on my milling machine.

That modification as shown in the photo works perfectly for high clearance crossover SUV's with pinch welds like the RX350 and the Rav4.

on vehicle.jpg
 
Drill-driver adapter for scissors jack.
In the past few days, I experimented with various battery powered adapters to power drive the Torin Big Red scissors jack with my jacking socket adapter to provide quick raising on my Mod 3. These are the adapters that I used.

drill driver adapter.JPG


I tried a Makita 1/2 inch drive impact wrench, a Makita 1/4 inch impact driver, and at the very last, the cheapest 1/2 inch 18 volt refurbished driver drill that I purchased for $5 at Ryobi Outlet Direct Tools Store (also available at Directtoolsoutlet.com) with a 2 amp hour battery.

To my surprise, the refurbished Ryobi did the best. Both the impacts would annoyingly go into the impact mode. The Ryobi, drill set at the lowest speed, did just fine.

The entire Ryobi could be had with battery and charger for about $50 delivered, less at the outlet store.

This inflater would be a really handy complement to the drill driver. since it uses the same battery and charger.


Ryobi P737D inflater.jpg
 
  • Like
Reactions: RustyShacklefo
@Mike500 I posted an idea of mine at another thread (post#44 at Tire Rotation [recommendations on where to get tires rotated?]) because it seems like that's where it belongs. But you seem like a smart and curious engineering type. I'd be curious what you think of my idea.
I wouldn't worry about the Tesla twisting and causing broken glass or other issues. Pretty much everybody, including Tesla mobile service lifts the entire side of the car from one jack point. I myself have done it at least 20 times on my Model 3.
 
  • Like
Reactions: RustyShacklefo
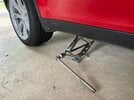
Maybe not "perfect" but another alternative for an emergency jack:

I may be paranoid but for most of the scissors jacks I've looked at, I worry about them buckling or breaking, or the screw binding or stripping, or the small contact patch sinking into the ground. The Porsche jack in the original post looks pretty good but it's hard to come by in Canada and usually quite expensive if you find one (and some of my concerns still apply to it).

I carry both a small electric air pump and a bicycle hand pump as a backup, to inflate a tire repaired with a plug kit I also carry. I wondered if a suitable pneumatic jack existed and found this one from Vevor:
VEVOR Pneumatic Jack, 2 Ton/4400 LBS Air Bag Jack, Triple Bag Air Jack for Vehicle, Extremely Fast Lifting Action, Max Height 11.8"/300 mm, Compact Size, Short Handle | VEVOR US

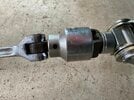
The valve assembly has an air tool quick connector but I needed to attach a tire pump. I realised I didn't need separate inlet and outlet valves and even the safety relief valve wasn't really needed in this situation. I removed the hose fitting from the valve assembly and found it had a standard ¼" MNPT thread, so I attached it to a female to female coupling and a tank "snifter" valve.

air_jack_1.jpg air_jack_2.jpg

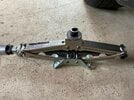
The two handles that came with the jack aren't needed either. You'll have to get down on your hands and knees to position the jack and from there it's easy to move it by gripping the rubber ring bladder.

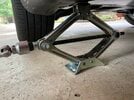
In this minimal form, the jack fits nicely in the Model 3's subtrunk.

air_jack_3.jpg

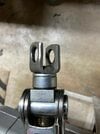
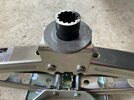
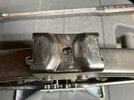
In order to make it easier to position, I replaced the screw holding the rubber support puck with an M8-1.25X16mm hex cap screw, which I drilled and tapped to hold a rubber foot peg for the car's jack point locator hole. I also cut a slot in the screw head to allow it to be tightened with a large flat screwdriver, since the size of the hole in the puck wouldn't allow a hex socket to be used.

air_jack_4.jpg air_jack_5.jpg

The jack is pretty easy to use, requiring about 50-60 psi to raise the tire off the ground. The jack is lowered by pressing the valve stem, just as you would to deflate a tire.

air_jack_6.jpg

Drawbacks of this jack are that it's fairly large compared to a compact scissors jack and it's quite heavy, at about 27 lbs. (12.25 kg).
 
  • Like
Reactions: android04 and Bouba
If you really want a 3 pound jack, I prefer the aluminum Audi A6 jack, one of which I modified for a friend, before I even owned a Tesla. Here are photos of that jack.
View attachment 967162View attachment 967161
View attachment 967163
Hi Mike, thanks for detailing this solution, picked one of these Audi jacks up and planning to construct a adaptor for the Model 3 that mimics yours.
And was hoping for some dimensions and details you feel works best for the adaptor? OD, Length, Positioning of the fasteners location on the lift pad if you are sharing those details?

Also wanted to inquire if anyone possibly has a video of this Audi jack, with this adaptor as placed in the reference photos, lifting a Model 3 if at all available ?

Empirically mine looks like the jack pad adaptor could potentially rotate freely about the jacks hinge pin and out of the engaugment pocket if the adaptor does not "tightly engage" with the packs jack point at its pictured location above.
It doesn't feel intrinsically as stable as if the lift adaptor were placed closer to the centerline of the lift pads hinge pin?

Curious if you would detail the position of the fastener on the top surface of the jack pad that has been drilled and tapped presumably?
Did you just thread intot he base material, or possible add a backing nylock nut which is what dictated the adaptors positioning?

Is it advantageous to keep the adaptors fastener as close to the support cross pin/hinge pins center point as is possible to help load the jack equally?

With the way you have used this, is it at all a concern or possibly advantageous to move the adaptor over the centerline of the jack pad hinge pin to create more intrinsic stability, or is that a non issue from your perspective?

Thanks for sharing your ideas on the topic
 
Last edited:
I've uploaded photos of the last Audi A6 aluminum thack that I modified for the Tesla Model 3. The bushing is 20MM or .79 inches and is machined from a rare 1.75 inch diameter UHMW Spectra round. The countersunk flat head M6x1.0 A2 stainless steel socket head cap screw is threaded into a tapped hole about 12mm off from the hinged rod below it. It is locked in with a serrated flange lock nut.

The center of the bushing is the functional designed center load point of the jack. The "U" shaped cradle is only for positioning the jack from shifting on the vertical pinch weld. Hope this helps.

main.jpg
extended head view.jpg


Th


head view.jpg
 
  • Like
Reactions: rotarypower101
Thank you, it does.

I guess what I'm driving at with placement of the adaptor is, on my specific jack (which to me looks functionally identical to yours) if a force is Not placed directly over the centerline of the original jack pad rotation point, there seems to be a torque induced, possibly small enough to ignore, not sure, and wondering if it might be prudent to keep all the loading vertically oriented?

If I am looking at your placement correctly, the added adapter would likely sit inside the battery lift point pocket and tilt inside the pocket with the "hinge pin side" loaded at the bottom flanged step, and the furthest point from the hinge pin loaded at the top of the adaptor.

A tight fit will likely help mitigate those issues, but I think that may be the way that adaptor is loaded even with a wide flanged base?

Sorry for the crude annotation, my F360 app broke on me recently...
Hope that describes the issue I am seeking clarification on.

And since the lift point pocket actually isn't even orthogonally shaped as I am depicting to help express the idea, I'm wondering if there might be some issues with allowing the adaptor to rotate when lifting?

Its possibly a non issue, but wanted to seek clarification if anyone could possibly address that detail.

extended head view.jpg

6008E0EE-22D3-4ADB-A5C6-40C9C16F1E13.jpg
 
Last edited:
I found that modifying my 2013 Acura RDX jack worked well. I drilled and installed a large washer, a Husky 5/8" x 3/8" drive socket, held by a M8 Allen head screw/nut. Took some grinding to enlarge washer hole and shorten the socket, but fit was great. The jack drive needed to be edge ground for the 1-1/4" x 1/2" drive socket to work for jacking. I keep a Tesla spare wheel/tire in the garage. The RDX has a pneumatic small spare in the back, so now I can keep the required jack/tools for both cars in the RDX. For most scenarios of a local area flat, I'll have to get the RDX (or since it's my Wife's car, she'll just call me), load up the spare wheel/tire and go replace the flat. I'll have to decide when we take a longer trip to load up the spare, but probably not - just call AAA.
P.S. I scraped up one of the wheels pretty badly on her Tesla, so I bought a new wheel and a really cheap tire to put on the damaged wheel for the "spare". Unfortunate, but now at least I have a plan and tools to execute the plan.

Appears the pics may be all out of order - go figure.
 

Attachments

  • IMG_0654.JPG
    IMG_0654.JPG
    601.4 KB · Views: 2
  • IMG_0653.JPG
    IMG_0653.JPG
    414.2 KB · Views: 1
  • IMG_0665.JPG
    IMG_0665.JPG
    340.4 KB · Views: 2
  • IMG_0656.JPG
    IMG_0656.JPG
    943.1 KB · Views: 2
  • IMG_0657.JPG
    IMG_0657.JPG
    346.9 KB · Views: 3
  • IMG_0662.JPG
    IMG_0662.JPG
    475.7 KB · Views: 2
  • IMG_0663.JPG
    IMG_0663.JPG
    438 KB · Views: 3
  • IMG_0664.JPG
    IMG_0664.JPG
    376 KB · Views: 2
  • IMG_0651.JPG
    IMG_0651.JPG
    708.5 KB · Views: 4
  • IMG_0652.JPG
    IMG_0652.JPG
    592.6 KB · Views: 2
  • Like
Reactions: Mike500