Welcome to Tesla Motors Club
Discuss Tesla's Model S, Model 3, Model X, Model Y, Cybertruck, Roadster and More.
Register

TMS P85 motor humidity: high voltage câbles seal leak, error GTW_w176

This site may earn commission on affiliate links.
Hello everyone,

Here is my problem:

26/12: my Tesla model S gave me error messages: GTW_w018 and w157: reduced electrical power; GTW_w174 and w177: provide battery replacement based on voltage (12v); regenerative braking off; GTW_w017 reduced power.

But she continued to drive.

Then on 28/12: it drives, I stop to buy bread and when I want to restart, then it no longer starts: DI_w127: parked carefully, BMS_f027 and GTW_w176: impossible to start.

It is no longer guaranteed, as it was registered in 2014.

Call from the tow truck, direction the Tesla garage.
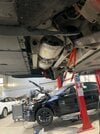
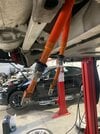
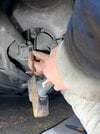
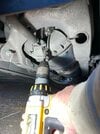
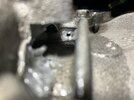
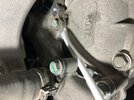
The garage told me that it had disconnected the + and - of the motor (power side) and discovered moisture there. This is due to the seals on the DC cables which are HS.

By the way, the courtesy vehicle at Tesla is free during the warranty period, then it's 130€ per day. I should have taken advantage of it more often when it was guaranteed.

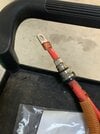
To change the seals, the cables must be replaced because they are crimped at the factory. The seals are not replaceable because they are blocked between the crimped terminals. (1,000€)

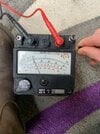
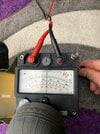
In addition, the humidity having entered the engine (rain), the engine block must be completely replaced. Standard exchange. There is a current leak, visible on the megger (mega ohm meter). Motor insulation fault which causes all the faults mentioned above to appear. (6 500€)

So an estimate of €7,500.

I ask them: is it possible to try to let the engine dry
Answer: yes, we can try but if it works, I will have you sign a liability waiver in the event of electrocution because there has been water observed in the motor. I say ok.

The estimate is updated to 1500€ for the cables, I validate.

A week later, he calls me: still the same, current leakage fault. In addition, the estimate and redone: €8,000

I ask where the extra €500 comes from: answer: we have to look. Do you still have the quote for €7,500? we no longer have the initial (dematerialized) quote.
No luck, me either because I did not print it.


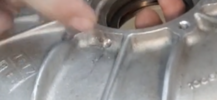
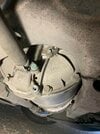
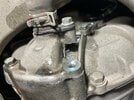
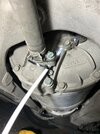
I ask to see the car in the workshop. I note that there is nothing openable on the motor to dry it, apart from 2 holes DN 20 (the penetration of the + and - cable). There is an inspection hatch (~10cm by 5cm) in the center of the engine block but it has not been opened… (it does not help drying in my opinion)

I ask if a second-hand engine is possible: answer: it is already a reconditioned engine in the estimate.
Surprise on my part.
But hey, the quote is in English (Tesla Lille), it may have been written but I'm not good at English.

So, I ask to have my engine reconditioned. Answer: it is an operation carried out in Amsterdam but only for Tesla, internally. Not for customers. At the garage, we only do standard exchanges of the entire engine block.

Info: A reconditioned engine is guaranteed for 4 years.

I indicate that: My engine block was replaced 2 years ago, free of charge because the car was still under the 8-year warranty. Answer: He tells me that it was also a reconditioned engine but that it does not benefit from the 4-year warranty because it is only the remaining time of the car under warranty that is taken into account.

This is where I am.

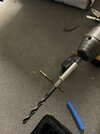
I'm thinking of bringing the vehicle back to my house to actually try to dry it out.
I hope to be able to send a flow of warm air into one of the DN20 holes + put a heating blanket over the entire engine block for 1 week.
I also need to find a megohmmeter to be able to test before-during and -after.

When do you think ?
 

Attachments

  • DBE935F9-D77E-4031-B017-8C588BAFBF0C.jpeg
    DBE935F9-D77E-4031-B017-8C588BAFBF0C.jpeg
    423.1 KB · Views: 1,124
  • F3AC4050-8159-4149-900E-36DF55113FA5.jpeg
    F3AC4050-8159-4149-900E-36DF55113FA5.jpeg
    396.8 KB · Views: 258
  • D562FA4D-FD93-46D3-867D-D216057D5716.jpeg
    D562FA4D-FD93-46D3-867D-D216057D5716.jpeg
    396.7 KB · Views: 247
  • 411F05F8-9A73-4B86-9AD4-4F8FF04E45A3.jpeg
    411F05F8-9A73-4B86-9AD4-4F8FF04E45A3.jpeg
    381.7 KB · Views: 250
the LDU was completely disconnected electrically.


The megohmmeter gives the same value at all five measurement points.


The value is close to 4 Mohm today when the black wire (COM) of the megohmmeter is connected to the châssis ground.


strange, when I reverse the wires (Red + on the châssis ground) the value is 1.1Mohm. (attached photo)
 

Attachments

  • 46672D70-BEED-42EF-AAF1-0F5613921628.jpeg
    46672D70-BEED-42EF-AAF1-0F5613921628.jpeg
    449 KB · Views: 951
  • D75ECF6B-580B-462E-B5FB-9BD57954FA19.jpeg
    D75ECF6B-580B-462E-B5FB-9BD57954FA19.jpeg
    417 KB · Views: 157
Upvote 0
Big news of the day: I reconnected everything (with all the electrical precautions) and the car is running. There are no more errors.


My novice DIYer drying (without removing the LDU from the car) worked.


But, I drilled into the bottom of the rotor. I hope there are no metal shavings that got inside. My hole was below the level of the coolant blocked inside.

When the bit was drilled, the coolant came out (hopefully along with the metal shavings).

also, if there were, maybe they will stick to the bottom of the rotor thanks to the dried coolant? (I still hope)


Now, the original problem is still there The seal leaks and fills the engine.


Drilling into the reluctor chamber without dropping the LDU is somewhat perilous, as Howards points out:

- Reluctor = 6000RPM at 100km/h.

- How to drill ? (attached file)

- If metal shavings remain in the chamber, it may tear the seal and/or destroy the bearing.

- Impossible to drill at 6 o'clock in the chamber if the LDU is not disassembled. (Drill at 5 o'clock but the métal shavings fall at 6 o'clock by gravity)

hard to stay without trying anything
 

Attachments

  • 7C35E222-1573-447B-99DE-623477846218.png
    7C35E222-1573-447B-99DE-623477846218.png
    78.7 KB · Views: 175
Upvote 0
Big news of the day: I reconnected everything (with all the electrical precautions) and the car is running. There are no more errors.

My novice DIYer drying (without removing the LDU from the car) worked.

Surprising. But a good surprise :)

I guess LDU still need to be removed to
  • change seal
  • re-grease or change the rotor bearings
  • drill weep hole
  • clean if any coolant residue on inverter harness
So probably still need to search for a rebuild capability.

Avoid opening the gearbox if not necessary. Reassemble with proper gear shaft/bearing alignment seems quite tricky. I got a whine after rebuild and still haven't figured out the source. Probably need to raise rear off the ground and spin LDU in dynotest mode to listen for noise source.
 
Last edited:
  • Like
Reactions: OttoPV60
Upvote 0
Hi all,


I finally decided to drill the purge. Here is my modus operandi:


- Start by closing the hole created at the back of the rotor (which had been used for drying) to avoid sending debris inside the rotor.

- Send water (no alcohol because the forest may be hot) in the chamber of the reluctor via the hole of the speed sensor

- For the drilling angle (in order to reach the 4mm wide groove) see the video at 8:10 and at 8:47 on:

- Remove the black silicone with a cutter for good visibility

- Make a point (using a hammer and a punch) at the location of the hole (in the rounded corner)

- Clean the bit often during drilling (depth = ~ 8 or 9 millimeters)

- As soon as the water comes out: stop directly drilling (hope all the metal shavings will come out)

- Flush by injecting "ISOPROPANOL" alcohol into the reluctor chamber

- Take a small pipe. On one side put it in the hose of a vacuum cleaner. On the other side: slide it with "back and forth" movements in the chamber of the reluctor to suck it up everywhere (in the hope of sucking up the metal shavings, if any)

- Fit a 6mm pipe in the drilled hole to create the purge.

- Rinse by injecting ISOPROPANOL into the reluctor chamber and observe if the evacuation is good.

I removed the o-ring from the speed sensor to allow air in when draining the coolant.


On the photo of the hole, we can see the 4 mm groove at the bottom. I didn't go any deeper with the drill bit. Therefore, I do not think that metal shavings could have entered.


I fixed a bottom of transparent bottle on exit of the purge, under the car. I drove at 50 km / h maximum, the leak seems to be a drop every 2 km.


No rolling noise.


If I add coolant too often: I will add a peristaltic pump to return the leak to the front coolant reservoir.


attached are the photos


I will keep you informed if there is any change over time.
 

Attachments

  • BE899EA9-1AD2-4B37-9021-B8568B7BB436.png
    BE899EA9-1AD2-4B37-9021-B8568B7BB436.png
    1 MB · Views: 173
  • FDB622EB-D472-4C05-85F3-42E3797CAFFA.jpeg
    FDB622EB-D472-4C05-85F3-42E3797CAFFA.jpeg
    424.7 KB · Views: 151
  • 8A0E5B11-B611-41CD-9531-0145FFB7A5C3.jpeg
    8A0E5B11-B611-41CD-9531-0145FFB7A5C3.jpeg
    431.9 KB · Views: 148
  • 1CD812F2-3F5F-4C31-8F16-2C1D9BB27856.jpeg
    1CD812F2-3F5F-4C31-8F16-2C1D9BB27856.jpeg
    508.4 KB · Views: 153
  • D0672828-C3B2-4447-B196-1B754393095C.jpeg
    D0672828-C3B2-4447-B196-1B754393095C.jpeg
    436.3 KB · Views: 156
  • 5915FC28-E47A-4DC8-9C68-BF1A98F718BB.jpeg
    5915FC28-E47A-4DC8-9C68-BF1A98F718BB.jpeg
    673.8 KB · Views: 152
  • 59E1CD22-0BD0-4E52-AFBA-8AAE326AD292.jpeg
    59E1CD22-0BD0-4E52-AFBA-8AAE326AD292.jpeg
    278.8 KB · Views: 152
  • 0567F994-0794-4BEB-935A-917C12495023.jpeg
    0567F994-0794-4BEB-935A-917C12495023.jpeg
    852.9 KB · Views: 149
  • 59C2D7EB-2D18-4A42-B0A4-DA130588FFAF.jpeg
    59C2D7EB-2D18-4A42-B0A4-DA130588FFAF.jpeg
    564.8 KB · Views: 154
  • 3350F330-8FEB-4ADB-AC5A-5CC3058BBA58.jpeg
    3350F330-8FEB-4ADB-AC5A-5CC3058BBA58.jpeg
    480.4 KB · Views: 149
Upvote 0
Impressive. And I guess initial proof drilling drain tap without LDU removal in a Tesla might be possible :)

My cheap 5mm borescope from Aliexpress is too thick to squeeze between reluctor wheel and housing to view internal chamber. But maybe your hole is large enough for 5mm borescope. I also recently see borescope that can look sideways and backwards. Probably has multiple cameras. But surely expensive.

Anyway, just some more ideas for internal inspection once weep hole exist.

But I guess you still have washed out ceramic bearing. When I disassembled mine, the bearing seem to function ok even with destroyed grease but I think spin less smooth compared to re-greased bearing.
 
Last edited:
  • Like
Reactions: OttoPV60
Upvote 0

Attachments

  • 64365737-6D95-473C-BB48-B48B39483FC7.png
    64365737-6D95-473C-BB48-B48B39483FC7.png
    277.2 KB · Views: 151
  • Like
Reactions: howardc64
Upvote 0
yes if I had one. I would like to look with this (5,5mm) :


My $5 Aliexpress borescope came with cheap version of this 90 degree viewing angle adapter. Didn't work very well but of course its cheap. A good design surely require proper analysis of optics geometry.

Here is a 5mm tip dual camera borescope design. Surprising price is actually not ultra expensive (<$200)

Amazon.com: Triple Lens Endoscope Camera, Teslong Industrial Borescope Inspection Camera with Light, 16.5ft Flexible Automotive Scope Camera Snake Probe, Home Waterproof Fiber Optic Bore Cam for Sewer(5" IPS LCD) : Industrial & Scientific

Here is a Toyota master mechanic youtuber using this exact one (amazon link from his video) to inspect HG coolant leaks (pressurized ICE coolant system, watch coolant seep through HG seam)


Here is another link with additional explanation

dual camera borescopes videoscopes inspection cameras dual-lens (oasisscientific.com)

Anyway, I might have to upgrade to one of these (maybe someone sell used online for cheaper) instead of the 45 degree mirror attachment :)
 
Upvote 0
One more useful observation for you.

Speed Sensor Chamber without vent hole maybe much less likely to have inverter damage. Without this hole, aerosolized coolant doesn't travel by air to the inverter side so the coolant attack is mainly through the outer rotor bearing and cause low stator isolation. I thought I read in a post your LDU doesn't have speed sensor vent hole? If so, your inverter side might be okay. Here is an LDU rebuld that also had stator low isolation but no inverter coolant damage

Tesla Large Drive Unit (LDU) Motor Teardown and maintenance - Page 8 - openinverter forum

But your initial post's picture shows slight wetness under the inverter CANBUS connector so maybe there is moisture. Failed HV cable seal is another potential source but your pictures didn't show the seal was heavily compromised and cable looks pretty clean.
 
  • Like
Reactions: Gtech
Upvote 0
i wonder how they got original Tesla seal?? and is it actually different from what we can get our hands on or just re-labeled...

I know of people that have contacted them. Also looking at the seal in the video and seals for sale from Ukraine on ebay (these videos are posted by Ukraine based repair shop) These are just Ceimin seals on Aliexpress. Cage construction, seal color, plastic round seal protector are all identical. Probably laser etched + repackaged. Here is my spare Aliexpress Ceimin seal for reference.

IMG_0141.jpegIMG_0142.jpegIMG_0143.jpeg

Also I've never seen a tan color seal out of an LDU sourced from Tesla new or reman. They are always black. Either chewed up 3 lip seal or a single lip seal with concentric grooves. Often, different PTFE blends (different hardness for different shafts) have different colors from manufacturers. Don't know if just for identification or is a consequence of material blends.

BTW, if interested in the gory design details on sourcing an alternative seal besides Aliexpress Ceimin, can read here. Probably most recent 7-8 pages are all on seal design and choice discussions. I've also reported results from contacting seal manufacturers large and small.

Tesla Large Drive Unit (LDU) Motor Teardown and maintenance - openinverter forum
 
Upvote 0
Toyota diagram doesn't show availability but they do sell more LDU parts than Tesla


I ordered the breather vents from Toyota. No sign of it 4 months later (none in US) although a couple of people got their earlier. I'm guessing probably just initial small stock that probably got exhausted.

In any case, Tesla's recent LDU coolant seals seems no good or maybe no better than Ceimin from these 1-2 year LDU failure posts. Been thinking about why... here are a couple of theories (weakened seal energizer, lacking excluder)

Tesla Large Drive Unit (LDU) Motor Teardown and maintenance - Page 13 - openinverter forum
 
Last edited:
Upvote 0
On my LDU made in 2019: there is no event hole between the reluctor chamber and the rotor chamber.
(Fortunately because to plug it, we still had to find a solution with the LDU on the car. Silicone?)

Strange, a few drops of coolant came out of my drain during the first 5 kilometers.
Now nothing for 60km.

I sucked and blew: my drain is not clogged.

I continue to observe to know when the seal leaks the most.
 
Upvote 0
On my LDU made in 2019: there is no event hole between the reluctor chamber and the rotor chamber.
(Fortunately because to plug it, we still had to find a solution with the LDU on the car. Silicone?)

I think most people seal vent with JB Weld (2 part cold mix epoxy). Others with access to machine shop weld it shut.

Strange, a few drops of coolant came out of my drain during the first 5 kilometers.
Now nothing for 60km.

I sucked and blew: my drain is not clogged.

I continue to observe to know when the seal leaks the most.

There are many possibilities to how leaks occur and unfortunately we don't have any observation. Ideally, a test lab would study the seal leak behavior for a specific seal on a table with testing machine(s)
  • Does it leak during rotation? What speed? What coolant/stator/shaft temperature?
  • Leak during/after rotation direction change : R-D?
  • Leak while parked (static leak)
  • Leak with changing temperature (simulate car parked outside in cold northern climates)
  • Adding contamination in the coolant
  • Vary coolant temperature and flow rate (pressure on seal)
  • Observe impact of coolant silicate crystallization forming around seal lip from heat
  • Remove seal and measure energized seal pressure on a 30mm shaft after some usage
  • Observe impact of adding debris on the dry side (bearing grease, RTV sealant from sealing reluctor chamber)
Since leak is always small, its necessary to have multiple high speed cameras to capture the leaking event.

Anyway, obviously can not do this while driving the car. And probably wasn't tested to this level during design/revision phase for the seal. So we have high LDU coolant leak problem with existing Tesla seal.

Many possible leak scenarios. Maybe your frequent observation can help us find some leakage pattern :)

Any seal maker will caution trying to seal coolant without making leak drain solution. All coolant water pump in ICE have weep (leak) hole. Even more advanced coolant seal for electric motor have very sophisticated leakage control solution. Can see video on this link for EV motor coolant seal designed by EKK (big Japanese seal manufacturer)

Tesla Large Drive Unit (LDU) Motor Teardown and maintenance - Page 9 - openinverter forum

Or an easier solution is to oil cool and exchange oil heat to coolant with standard matured heat exchanger. Small Drive Unit (SDU) does this. Oil is much thicker than coolant and much easier to seal. But week hole is always necessary. I guess oil leaking into stator maybe take much longer to have problem.
 
Last edited:
  • Like
Reactions: cleverscreenam
Upvote 0
@OttoPV60

BTW, I made a page in the LDU rebuild website outlining the 2 key modifications that maybe possible to significant improve longevity and reduce leak damage.
  • drilling weep hole with LDU in car
  • sealing speed sensor vent hole with LDU in car
I hope others can follow your work and continuously improve on the methods. If someone has LDU removed, they can test the drilling method followed by opening the rotor end plate to confirm no metal debris.

Tesla LDU - Preventive Mods (google.com)
 
Last edited:
Upvote 0