Welcome to Tesla Motors Club
Discuss Tesla's Model S, Model 3, Model X, Model Y, Cybertruck, Roadster and More.
Register

My DIY Rear Facing Jump Seats Retrofit (with Service Bulletin / Official Instructions)

This site may earn commission on affiliate links.
Inductive coils are good for losening bolts but can burn carpets and trims. Im not supprised the shop doesn't want to try in this repair, with carpet in place. A Big soldering iron might work. Im thinking a monster 800w one.

You can use one of the old stripped bolts as a thread chaser. I normally cut 4-6 vertical slots in the old bolts threads with dremel/hack saw. if I dont have the correct size tap on hand when out in the field. Will work. Takes longer to clean than a tap.
Nice... i'm taking it in to a local welder to just have them do it... I'm amazed with how much heat travels down a regular bolt when put under a lighter flame... so if some heat can be added, I wouldn't be surprised if they can get them out without attaching a weld nut... . I'm going to take it in on friday.
 
  • Like
Reactions: Drewflux
Nice... i'm taking it in to a local welder to just have them do it... if some heat can be added, I wouldn't be surprised if they can get them out without welding... I'm going to take it in on friday.

Alright! I've completed the removal project at my local friendly welder! He and his buddy used a precision welding flame,... some water spray bottles to make sure the seat straps and surrounding plastic and carpet didn't ignite... a few taps of the torx plus into the stripped bolt head... and a laser thermometer thingy to make sure it reached 400 degrees. and it was out! No welding of a nut onto the head of the bolt needed...

in fact, it almost came out without heating it up, but the red thread locker did not want to give up the last few turns... it was weird that the red thread locker wouldn't give up without the heat. It was shocking to me to see how much easier it was to remove the bolt after applying heat. I thought it would be a little easier with heat but it was MASSIVELY easier after heating.

They cleaned the thread locker off the bolts and rescrewed them in to hold the barrell nut and we are all good until we reinstall them.

It's interesting to see how different the car feels with 50 pounds out of the trunk. It's definitely a little more nimble and when going 80 or 90 on the highway and going over a big long dip in the road, you can feel how the car can self correct without feeling heavy. Hard to explain, but I definitely can tell a difference over speed bumps too... Who knew 50 pounds would make a difference? Best part of this story is how much better it is to be able to take the seats in and out of the car.... I have my little camping mattress all ready to roll.

By the way... the welder was working on a sweet car... a 2000 horsepower old body type camaro.... they are racing guys... has anyone worked with K&K welders in austin? They are amazing.
 
  • Love
Reactions: MP3Mike
Little late to the party but maybe it can help the next guy, if you have a torch and can heat a bolt cherry red you can heat a bolt outside the car then with visegrips or the like hold the cherry red bolt to the stuck bolt, that way you avoid a flame in the car.

I am debating the rear facing seats, kids are small enough I could use them and car is a VIN in the 42000range so I believe it is already halfway setup for the seats.
 
Yes... I think the cherry red thing would work but would take a while to get up to 400... the thing came out like butter at 400... it probably would come out fairly easily even if you couldn't get it to 400. I was surprised that even direct heat from that small torch took a couple of minutes to get it up to that temp... the guy said they have more issues with inductive heaters catching things on fire than the small torch... I think the biggest thing is not to attempt removing the bolt without some heat. The barrell nut also needs to be protected and the way that thread locker stacked up and became more difficult at the end of the removal process (prior resorting to the heat), made me realize heat is your friend. Next time I install the seats... I'll use a small amount of thread locker or none.

I love the rear facing seats, but now that they are truly removable from my car... I REALLY love them...
 
Yep... super glad I kept at it. I am most surprised by how the driving dynamics changed going over hills and dips at higher speed... I guess the added weight is magnified when going over bumps like bending your knees and bouncing up and down on a scale. There are a couple of bumps on SH-130 near 290 in Austin that I am always in autopilot when I travel at 90 mph, and the long dips are along a curve... it can feel almost like you could go airborne a little bit but today without the seats in the car, the car doesn't bounce as low when it comes down... it makes me realize that I've been driving a mini-model X with those rear seats.
 
Heard today from the indy/authorized body shop that the rear crossmember has arrived (they ordered around 8/4, at the shop on 8/21 - 11 working days, 17 calendar days) and they can install it tomorrow. That's the last part / task of the whole install.
 
Back to the DIY seat install. This is the wrap up.

The indy body shop installed the rear crossmember with same-day service, once the part arrived from Tesla.
They charged me $125 for the part and 3.8 hours @ $48/hr for $315 total with taxes. It was clearly the first time they did this job, so is probably longer than an experienced tech would take, but their hourly rate is way less than Tesla, so I wasn't bothered by it.

All the wiring was in place for the liftgate switch. All my trim was pre-scored for the strikers and seat attachments, so I didn't need the templates, or to measure anything (except for the location of the switch - see below).

I also added two new high-brightness LED lights using the existing trunk lighting wiring, just had to finish cutting the pre-scored light openings in the trim and pop the lights into place. This is the sort of "freebie" you get to do when you DIY ;)

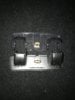
The parts I needed from the list in the service bulletin were just these:
(this depends on what you transfer with the seats - try to get the left and right strikers as they are pricey).
(Strikers are correct part number for my 2015 that falls within the "new rear node" also called "2nd generation rear node")

ASSEMBLY - HIP STRIKER LEFT 1013626-00-D $97.30
ASSEMBLY - HIP STRIKER RIGHT 1013629-00-D $97.30
SWITCH FOR 3RD ROW SEAT w/ POWERED LIFTGATE 6008902-00-A $22.00
BARREL NUT, M10 2006869-00-A $3.60 (Qt 2)
BOLT, TORX, M10x28.4 1022449-00-A $0.59 (Qt 2)
BOLT M8x20 WITH MAT POINT 1014747-00-B $0.22 (Qt 4)

These two parts cover the cuts you have to make into the back of the second row seats to expose the existing latch mechanisms hidden in the back of the seats. I spend some time feeling to make sure the latches were there, and made a single slit to inspect before going to town cutting the openings. I had to trim the plastic of the bezel slightly with my pocket knife to get these bezels to fit tightly. It definitely looked like the upper and lower parts came from different runs - one had new packaging, the other had faded packaging.
2ND ROW BEZEL UPPER 1013633-00-A $2.00
2ND ROW BEZEL LOWER 1014277-00-A $2.00

The "Headrest Latch cover" and M4 screws were not needed, as those parts were already attached to the seats I was using. The 8 M10 nuts were also not needed - I believe these are used to hold the crossmember in place, but the body shop did that part.

I did break two of the "Heart Flex Clip with Washer" (aka door panel clips) that hold the rear trim in place - I had bought a dozen to have, so it was no big deal - 1025401-00-A $0.22 each.

The C-pillar trim panel that holds the liftgate switch is very backordered, and the SC wasn't very hopeful about it, so I just carefully cut a rectangular opening for the switch in my existing trim. It has the proper recessed space for the switch, just needs to be cut. The switch has a clip on the back that holds it in a panel behind the trim, so getting the opening in the trim to line up with the place it clips into was harder than usual - I lined it up by using my laser line level (normally used for carpentry) to establish a line with the trim removed, then fit the trim in place and transferred the marks. To double check, I stole a can of play-dough from my kids and pushed it into the recess to make an impression of the space. In the end, I was within a couple of millimeters and just had to extend the opening a little bit on one end.

-THE END-


IMG_9767.JPG IMG_9767.JPG IMG_9768.JPG IMG_9769.JPG IMG_9770.JPG IMG_9778.JPG IMG_9771.JPG
 
Hi, is that the parcel shelf left side plastic bracket/trim? Look familiar. I always wondered where the RFS liftgate switch was mounted. Is the harness near it too? Hmmm, I guess if we order the Tesla switch and cut that cutout opening, we could install our own internal liftgate exit switch?