Welcome to Tesla Motors Club
Discuss Tesla's Model S, Model 3, Model X, Model Y, Cybertruck, Roadster and More.
Register
This site may earn commission on affiliate links.
I was thinking about this over coffee. Anybody who is considering spending $400 for the Macsboost kit could DIY this for next to nothing. I need somebody to confirm the relationship between the spacer thickness and the camber, but I don't have a refresh X. If anybody is in the Bay area I'd be down to shim and measure the camber and toe values so we can share the data freely.

Some notes:
- Another member has already confirmed the $400 shims are off the shelf 2.9mm (approx 1/8").
- Factory hardware appears to be M12

a98aeaa6d8c4732c843503177200dedb.png


To do this at home you will need four M12 (metric, so the nominal diameter is 12mm) washers, approx thickness of 3mm; 1/8" is a close standard equivalent. A correctly sized washer will work in pinch.

If we can measure the factory arm's flange, I can draw a simple square part that others can customize for their desired thickness, if they want to hit a target alignment. There are plenty of shops that will mill these for you

426054ebfc7a1e7465d46e9e5d0e1d03.png


IMG_4916-markup.jpeg


Quick mock up with a non-standard thickness that I priced through Xometry. I quoted laser cut 6061 below but other materials are available for an additional cost. Grade 5 Titanium will double the price...to a whopping $11.

If you are happy with the alignment from the 1/8" thickness there is no reason to have a spacer machined.

f63a8fcbb82e764162d37c7bed5db0a0.png


f90aeef6d43beda7719d95e2e51b17d8.png


59e9d5441f7009b65fc60ea2def20a78.png


Of course, the cost goes way down with volume and we can do cool things like anodize or powdercoat. There are also other manufacturing options available with volume.

If none of these options speak to you grab some 1/8" stock, a hacksaw, and a drill!
 
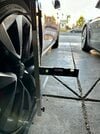
I need to spend some more time with my QuickTrick gen 4 alignment tool; but on my initial attempt (to read the stock camber as delivered):

Calibrated sensor to tire/floor level.
Set horizontal to equal to tire level.
Set vertical to 90 degrees from horizontal. Did these on both sides.
Drivers side rear camber shows -3.85 degrees!!!
Passenger side rear camber shows -1.55 degrees.

What the heck, I have to hope some kind of error on my setup because that seems insane with passenger side being basically alright, and drivers side being insane. I'd think if this is the case I'll take it to Tesla and tell them to fix it as that's way outside even their "pseudo spec". Visually the drivers side is far more tilted inward I admit.

Camber is a pretty straight forward check. Can you post a photo of how you set up and measured? For a quick check, from a levelish surface you can use a level or any other straight surface. Place across the flats of the wheel, paying attention to any wheel features that might touch the level, then measure with a zeroed out angle finder.

Tesla isn't going to fix anything, but if you are under warranty you can probably raise a stink. They'll probably insinuate that you hit something and threw the alignment out of spec.
 
These look very nice. Also interested in the price, material, link, all the above :)

How much change did it have on your camber?
I'm not sure what they are made of, but they are anodized.

I got them from user Thadeus Strong on FaceBook.
He's an Admin of the Tesla Plaid Performance Group on FaceBook.

He also has thicker shims with bolts for lowered cars. Says it should correct up to 1.2' +/- camber.
The thinner ones I have corrected mine 1' of camber.
He specced them for non lowered cars and should be between .7' and 1'.

I'm not sure of any other way to contact him. But he said if anyone is interested to go ahead and message him.

Here's his FaceBook link:


His FaceBook name: Thadeus Strong

Link to the grpup: Log into Facebook

My chat with him earlier:

Send them my way please. I’m still waiting on the newest batch. Made a slight revision to taper the corners for ease of install. And there’s a thicker size coming in for slammed cars.


Hope this helps.
 
I’ll work on this some more tomorrow, likely installing my shims as well. But the steps are zeroing the meter to the levelness of the ground under the tire. Then leveling the bottom bar to match that. And the vertical to a 90degrees from that. Thus it should be square and reading only the differential tilt. I got quite a different number this time at -3. I suspect I didn’t settled the suspension. Enough previously after raising and lowering right before those first readings.
 

Attachments

  • IMG_2369.jpeg
    IMG_2369.jpeg
    560.8 KB · Views: 158
I’ll work on this some more tomorrow, likely installing my shims as well. But the steps are zeroing the meter to the levelness of the ground under the tire. Then leveling the bottom bar to match that. And the vertical to a 90degrees from that. Thus it should be square and reading only the differential tilt. I got quite a different number this time at -3. I suspect I didn’t settled the suspension. Enough previously after raising and lowering right before those first readings.

You can try to "bounce" the front and rear of the car. I write bounce in quotes because you want to stop the car before the rebound.

Is your work area flat and level? I can't tell from the pic but it looks like it isn't level?
 
It’s in my garage and pretty level up to that line across after the front wheels. Then it slopes down a lot. But that said I’m going to do what I can to find a perfectly level space without multiple slabs of concrete that could be out of whack.
 
Much happier today after settling the suspension and doing the measurement on the most level pavement I have; I got -2 on both sides from the factory. Also got 3/16 inch total toe. That’s actually acceptable and will be excellent with the shims once I get myself a socket extension. Missed that I’d need a 24” one. Lol, I have 3 3” ones but can’t get far enough out to get leverage on those bolts.
 
Thanks @ZuleMYP for confirming the measurements.

As promised, here is the model and print that anybody can fork to their liking. You'd only really need the model if you wanted to machine a non-standard thickness.

A few things to note about the part: I've increased the diameter of the M12 clearance hole and added an optional 1/8" radius around the part. The tolerances on this part are pretty much a football field 😂

View attachment 974528


If you are able to measure your camber and toe before and after, please contribute your information to this thread!
Is there a reason to not do a 1/2" radius that i am missing? seems with 1/2" radius the shim/washer would be undetectable...
 
Does anyone have a recommendation for us spring suspension pre-refresh drivers who just want to save their tires?
I have a 2015 MS on springs, and the rear tires on my 21" rims are showing inner wear.
Is there a cheaper fix than adjustable links?
I've put my 19" wheels back on for winter, but i need to fix the camber before buying new tires for the 21" rims in the spring.

Many of us are planning to use shims. There's a thread here on that.

 
I'm not sure of any other way to contact him. But he said if anyone is interested to go ahead and message him.

Here's his FaceBook link:


His FaceBook name: Thadeus Strong

Link to the grpup: Log into Facebook
Thanks, I tried contacting him a few days ago, still no response and not accepted to the group, anyone have any better luck? those shims look the most factory setup vs the others
 
I can't speak for the X, but on my S, I used the Macsboost shims and it got my rear camber well under negative 2 degrees in the low position. My previous rear tires were gone in 5k miles. My next set had 3k miles and everything was wearing great. I then went with square 20" wheels.

I had very little front vibration in the 38-42 mph range. When I went with the track pack brakes on my MS Plaid and it is totally gone now. I went with the 20's to go with my track pack brakes. My refreshed MS LR never had any vibration at all.
Hi, did you have these put on yourself or a shop here in Dallas?
 
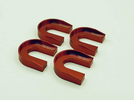
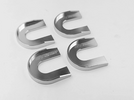
Thadeus Strong just posted in the Tesla Plaid Performance FB group. I hate camber and had planned to drive mostly in the low position, so I'm going for the "red race err" option:

Here we have an inexpensive and precise way to reduce camber in the rear suspension. These shims are CAD designed for easy install while maximizing contact surface with the factory parts. They are the CNC manufactured to strict tolerances from 6061 aluminum prior to being anodized for corrosion resistance and street cred.

Two options are available. As suspension height affects camber and relative geometry, the listed camber reductions are approximate.

•Silver street setup
$60 shipped intro price
Designed with factory height and mildly lowered cars in mind
Provide a .7 degree reduction in camber
Utilize factory bolts

•Red race errr….lowered AF setup
$85 shipped intro price
For slammed cars or anyone who hates camber
Provide a 1.5 degree reduction in camber
Utilize longer bolts which are included

These are great for DIY garage installations. But the toe will change, and you should get your car aligned afterwards.

All orders through PayPal please to [email protected] with a shipping address included
 

Attachments

  • 1701029280666.png
    1701029280666.png
    971.1 KB · Views: 54
  • 1701029305293.png
    1701029305293.png
    905.8 KB · Views: 53
Last edited:
  • Informative
Reactions: NJturtlePower