As a poor slob with no mechanical/electrical ability, and thus wholly-dependent on a local shop for help, any update on timing/status NewportAutosnd?I will be launching the website in June once i return and should have product ready to ship around July 1st for all the interior speakers. The sub and eclosure with amp im hoping to have the same timeframe with, we are just running alittle behind getting the first one finished to start testing with.


Welcome to Tesla Motors Club
Discuss Tesla's Model S, Model 3, Model X, Model Y, Cybertruck, Roadster and More.
Register
Install the app
How to install the app on iOS
You can install our site as a web app on your iOS device by utilizing the Add to Home Screen feature in Safari. Please see this thread for more details on this.
Note: This feature may not be available in some browsers.
-
Want to remove ads? Register an account and login to see fewer ads, and become a Supporting Member to remove almost all ads.
You are using an out of date browser. It may not display this or other websites correctly.
You should upgrade or use an alternative browser.
You should upgrade or use an alternative browser.
- Status
- Not open for further replies.
Xena2020
New Member
I have no idea how to do any of this lol but I want a better sound system. Mainly add rear speakers (the ones that aren’t activated) and a sub. Anyone know a place that can do it and has worked on model 3? I’m in SoCal
Help! I hate the sound.
Help! I hate the sound.
groovyd
Member
I have no idea how to do any of this lol but I want a better sound system. Mainly add rear speakers (the ones that aren’t activated) and a sub. Anyone know a place that can do it and has worked on model 3? I’m in SoCal
Help! I hate the sound.
After hours of research, you've got what I think is universally accepted to be the best shop in the world just down the street from you...Reus Systems. Heading to a local installer today, but I may well end up having to pay (hopefully just a share of if I can get a group buy going in Vancouver/Seattle, but no takers yet) for their installer's air and hotel fees to make his way up north.
groovyd
Member
After hours of research, you've got what I think is universally accepted to be the best shop in the world just down the street from you...Reus Systems. Heading to a local installer today, but I may well end up having to pay (hopefully just a share of if I can get a group buy going in Vancouver/Seattle, but no takers yet) for their installer's air and hotel fees to make his way up north.
I'd let them do mine in a heartbeat if I was anywhere near them.
NewportAutosnd
New Member
As a poor slob with no mechanical/electrical ability, and thus wholly-dependent on a local shop for help, any update on timing/status NewportAutosnd?
We are getting very close. I have the enclosure done that and need to get it installed for testing. I have the speakers completed already and am just waiting on the sub to get finalized. Once that is done we will open up the website to order the speakers and start the pre-order on the woofer while we are having the enclosures made.
Hey all! Sorry to leave you hanging for a couple days. I have done a few big things on this in the midst of my other work and projects, and was going to do my video on Friday last week, but with groovyd having some trouble with the middle dash speaker, I decided to try something slightly different before recording. Two major things... tldr, I will summarize on the bottom.Any progress on the tweeter video?
So first off, the Infinity speakers do sound really a lot better when you replace all 3, as opposed to doing just 2. If you intend to do just 2, I have tested and highly recommend disconnecting the center speaker and tweeter in that case. They seem to muddy up the sound somehow if they remain active with the new speakers. And the 2 speakers on the outsides of the dash, behave pretty well for installing, however, the middle speaker has a wire loom that needs moving (this is actually pretty easy, but only if you lengthen the cable going to the tweeter next to that speaker, More on that in a Second!) If you move the wire loom toward the cabin of the car, I have confirmed it is completely out of the way for the speaker install, and all is well. the speaker will drop straight in and lie flat. HOWEVER, I also just checked deeper in by pulling the tweeter on the dash out to dig around a little under the dash, and I found that the speaker does lie flat but is also pretty much in direct contact with the car frame. Obviously, that's not ideal and so you might think it makes sense just to make the bracket thicker. The trouble is that, as best I can measure, there is almost exactly 1cm between the dash base and the decorative cover once that is back on. I designed the bracket to barely fit in that space with the Infinity speakers. But I also just realized that the center of the dash seems to have an extra millimeter or two of space above it for that third tweeter to fit in. So to resolve the issue @groovyd is having, I am printing right now a slightly thickened bracket (about .5mm thicker to be exact), which is barely bigger, but should be just enough to pull the center speaker completely off of the frame, while still fitting under the cover. With the other issue groovyd had with the blade connectors being too tight, I have started prying them up just slightly to loosen them before shipping, so you can get them on more easily. Then just use some pliers to crimp them down ever-so-slightly to make sure they are snug.....or just solder them if you don't mind doing that sort of work.
I also spent.... many many hours of time the past week protoyping, testing, and protoyping again brackets to hold the tweeters so you can actually replace all 3 stock tweeters perfectly, with no issues. The tweeters and their brackets are actually far easier, to install, because they have no tolerance issues fitting into the space allotted. And the door tweeters, if you have the brackets, are super simple to swap without any screws even. I have posted pictures on this post, and will add the free STL download and ordering ability to the site for those too. I also built plugs for all the tweeters and can solder and mail those too. The weird bit is the center dash tweeter. As @flashflooder mentioned long ago, it is a passive tweeter (with a resistor inline). This is actually serendipitous, because,even though I cannot just send a cable for that one to you, if you buy the focal tweeters, they do come with the appropriate resistor cable already. Then you can attach the plug that I CAN send and you now have a longer tweeter cable, which allows you to move that wire loom I mentioned in the first paragraph. It's simpler than it sounds; I will show in the install video.
In short! After doing all the work above, I will test the center speaker one more time with the thicker bracket and then I will now be able to shoot the video for install, because I can actually fully install everything in the way that my perfectionism requires, without hacking it all together. For those of you who have already ordered the front dash brackets and plugs, if I find that the center speaker benefits from the thicker bracket, I will be happy to just send the new design straight to you at no charge with some extra speaker adhesive padding to install with. I think that's everything, but let me know if there are any questions! Below are the brackets printed and tested successfully with the door tweeters (smaller brackets) and the center dash (the weird looking one). Both are exact replicas of the original stock speakers, with space in the center to mount the focals.


Last edited:
Also, as a side note. I just modified and printed successfully Travis' 8" woofer brackets for the door, so I have them physically and can modify them easily now. Just have to take the door apart and get to testing!
alexcimorelli
Member
Awesome! Could I purchase a couple prints of his “cut and drill” style brackets from you? I believe he posted both STL files. I received the Audiofrog GS60’s and I’m anxious to get them installed.Also, as a side note. I just modified and printed successfully Travis' 8" woofer brackets for the door, so I have them physically and can modify them easily now. Just have to take the door apart and get to testing!
ElectrekPanda
Member
For Sale: Infiniti 4022 Qty: 1
I need 3 but it comes in pairs; hence, 1 extra speaker
I need 3 but it comes in pairs; hence, 1 extra speaker
bradhs
Member
Do you want to split the one pair? I'm in San Diego.
For Sale: Infiniti 4022 Qty: 1
I need 3 but it comes in pairs; hence, 1 extra speaker
kel8kel
Member
I have no idea how to do any of this lol but I want a better sound system. Mainly add rear speakers (the ones that aren’t activated) and a sub. Anyone know a place that can do it and has worked on model 3? I’m in SoCal
Help! I hate the sound.
I've done exactly that on my SR+. I went to Reus systems to get a system installed and it sounds amazing. Better than anything I've heard in my entire life, this speaking as a former basshead

I actually participated in their "beta" program so I got a small discount on getting this done in return for them getting a whole day to experiment on my car.
What they did to my car:
Activate the front door tweeters and replace with their own
Mid range driver replacement on dash
Add an 8" subwoofer in the OEM premium woofer location (right side of trunk behind the felt)
Activate the rear speakers
The amp to actually drive all the speakers is actually built into their subwoofer box.
Everything looks OEM and there's no trace of any stereo installation except for the 12v tap on the front battery and the amazing sound. The highs and mids are so crystal clear, I swear, the Reus speakers are better than focals in my opinion. As for activating the rear speakers, while it gives a more ambient sound, it's not really needed if you're sitting in the driver position most of the time IMO.
If your interested in this SR+ program, tell them I sent ya. They're not officially advertising this package yet.
As for activating the rear speakers, while it gives a more ambient sound, it's not really needed if you're sitting in the driver position most of the time IMO.
Thanks for the report!!
Quick question. Did you hear a before and after on the rear speakers isolated? I've been thinking that's a no-brainer upgrade, but it sounds like maybe it's not? Just wondering how you know that they're only creating a little fill compared to the stock SR+? I'm wondering if they tuned them well, so that they are subtle but would make a big difference if you killed them as part of the overall upgrade. Thx!
ElectrekPanda
Member
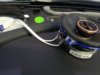
I have completed replacing the 3 dash speakers with infiniti 4022. I spent the most time on the center speakers but the wire loom is on the way. After several trial and error, I was able to drop it in. Overall, about 3 hours. It might have 2 hours if I did not ran into that wire loom challenge. Thanks for making the kit!
Attachments

Hello again all! After a few more days away, I have accomplished a lot. I officially shot a full video of the entire install for all 3 tweeters and midrange speakers, including set up with brackets, solder, crimping, and taping, and then I shot video of taking the dash apart, install, and putting it all back together. That is a lot of video!! I haven't edited it together yet, but I will work on that tomorrow. I also rebuilt the midrange brackets from the ground up to resolve the issues that groovyd had with the center speaker, and at the same time I made the screw holes a little bigger and the screw tabs identical to the stock speakers. This all makes the install a little easier, but the original brackets are still just as good unless you have issues with the depth on the center speaker
After doing the full install video, I can verify that all the brackets work as intended. There is one caveat, and I am curious @ElectrekPanda if you found this on the original bracket design. On the passenger side of the car, there is a clip that holds part of the grill up and the Infinity speakers have one of the screw tabs intersecting with that space. On my install, I found that the Infinity tab has to slide just under that clip to install (unless you cut that tab off of the speaker), and this prevents the grill from completely closing a small gap on that side of the car. It's barely noticeable and doesn't rattle or anything, but it is something worth noting. Did you have that issue too, ElectrekPanda?
Tonight I will take photos of the tweeter plugs and post those on Audioliphe.com. I will also upload the STLs for everything. I am licensing them under Creative Commons non-commercial, share-alike license: this means anyone can use and improve them in any way you want as long as you share your improvements and are not selling the brackets. I did this specifically because I want the Tesla upgrades to be accessible to everyone whether or not you want to order them printed from me. If someone has any comments on that, I am open, though, as this is the first time I am building something like this.
After doing the full install video, I can verify that all the brackets work as intended. There is one caveat, and I am curious @ElectrekPanda if you found this on the original bracket design. On the passenger side of the car, there is a clip that holds part of the grill up and the Infinity speakers have one of the screw tabs intersecting with that space. On my install, I found that the Infinity tab has to slide just under that clip to install (unless you cut that tab off of the speaker), and this prevents the grill from completely closing a small gap on that side of the car. It's barely noticeable and doesn't rattle or anything, but it is something worth noting. Did you have that issue too, ElectrekPanda?
Tonight I will take photos of the tweeter plugs and post those on Audioliphe.com. I will also upload the STLs for everything. I am licensing them under Creative Commons non-commercial, share-alike license: this means anyone can use and improve them in any way you want as long as you share your improvements and are not selling the brackets. I did this specifically because I want the Tesla upgrades to be accessible to everyone whether or not you want to order them printed from me
. If someone has any comments on that, I am open, though, as this is the first time I am building something like this.Awesome! Could I purchase a couple prints of his “cut and drill” style brackets from you? I believe he posted both STL files. I received the Audiofrog GS60’s and I’m anxious to get them installed.
Yes I am happy to do that for you. Could you PM me exactly what you need? That way I can keep organized! If you are looking for his door woofer brackets, printed, keep in mind that those are massive print jobs (20+ hours per speaker!!) so it might take several days as I have to use the printer for some other stuff too
. You could send via paypal whatever you feel is fair, along with whatever it costs to ship.@bradhs I definitely will post a list of third party things needed. I will work on that tomorrow along with editing the install video.
@groovyd and @ElectrekPanda . I will send you both the updated midrange brackets free of charge, because I know you both already did at least part of your installs, but I want you to have the option of using them if they are helpful to you. I will also send them with more adhesive speaker foam to use if you have none remaining. I likely will not change that bracket design again, unless some people out there see something that really needs done.
groovyd
Member
Yes I am happy to do that for you. Could you PM me exactly what you need? That way I can keep organized! If you are looking for his door woofer brackets, printed, keep in mind that those are massive print jobs (20+ hours per speaker!!) so it might take several days as I have to use the printer for some other stuff too
@bradhs I definitely will post a list of third party things needed. I will work on that tomorrow along with editing the install video.
@groovyd and @ElectrekPanda . I will send you both the updated midrange brackets free of charge, because I know you both already did at least part of your installs, but I want you to have the option of using them if they are helpful to you. I will also send them with more adhesive speaker foam to use if you have none remaining. I likely will not change that bracket design again, unless some people out there see something that really needs done.
I will probably swap them out since I need to go back in there for the tweeter anyway and I bought the proper right angle torx after the first episode so i want to feel like i have a use for it
I will also need the 3 tweeter brackets and that lone extra tweeter you mentioned you had if possible since i only have the 2 from the focal kit I will need the third.I still get the original Torx bit rolling around somewhere behind the glove box when i turn. I've tried everything to find it and even let the Tesla service guys try to get it and they failed too. Annoying AF to have that bit rolling around in there.
One new thing I noticed and not sure if it is coming from the front left mid or somewhere else near there but when I wake my car from sleep now i hear a periodic pop/tick sound coming from that direction when no audio is playing about once every 5-10 sec. Not sure if it is the infinity tweeter crossover cap discharging or what but it seems to go away after driving for a few minutes. might swap out that mid with my extra.
@groovyd That rolling bit sounds super obnoxious. I am sorry that the first run was so tough....it was for me too without the correct wrench. I don't know what the pop might be, but I would also just check the blade connectors too to be safe. I have noticed that they can come loose if they are not really well crimped or soldered to the speaker. On my install, I decided to add a little bit of solder to the top of each blade where it connects to the speaker. You will see that on the video.
Also, for everyone, Audioliphe.com is now updated with the latest STL models for everything as well as the ability to order whatever I am building. groovyd, if you are planning to order the tweeter equipment, go ahead and I will ship the midrange updated set at the same time. ElectrekPanda, you can do that as well if you plan to do the tweeters. I had some printer trouble this weekend but figured it out and am back up and running. I am going to add instructions for building the plugs for those who are interested; that is the most difficult part for me to do. Building a set is fine, but they are tedious to do in large numbers!
Also, for everyone, Audioliphe.com is now updated with the latest STL models for everything as well as the ability to order whatever I am building. groovyd, if you are planning to order the tweeter equipment, go ahead and I will ship the midrange updated set at the same time. ElectrekPanda, you can do that as well if you plan to do the tweeters. I had some printer trouble this weekend but figured it out and am back up and running. I am going to add instructions for building the plugs for those who are interested; that is the most difficult part for me to do. Building a set is fine, but they are tedious to do in large numbers!
ElectrekPanda
Member
@groovyd That rolling bit sounds super obnoxious. I am sorry that the first run was so tough....it was for me too without the correct wrench. I don't know what the pop might be, but I would also just check the blade connectors too to be safe. I have noticed that they can come loose if they are not really well crimped or soldered to the speaker. On my install, I decided to add a little bit of solder to the top of each blade where it connects to the speaker. You will see that on the video.
Also, for everyone, Audioliphe.com is now updated with the latest STL models for everything as well as the ability to order whatever I am building. groovyd, if you are planning to order the tweeter equipment, go ahead and I will ship the midrange updated set at the same time. ElectrekPanda, you can do that as well if you plan to do the tweeters. I had some printer trouble this weekend but figured it out and am back up and running. I am going to add instructions for building the plugs for those who are interested; that is the most difficult part for me to do. Building a set is fine, but they are tedious to do in large numbers!
Thanks for the new parts but please don't ship them yet. don't want to open it again so soon right after closing it. LOL. I have been biking to work recently and have not had much time to listen to it. Hopefully, my install is good and I will not need to redo it. I'm not planning to replace the tweeter... yet. I will let you know. Thanks again, I really appreciate your work.
- Status
- Not open for further replies.
Similar threads
- Replies
- 105
- Views
- 6K
- Replies
- 1
- Views
- 2K
- Replies
- 5
- Views
- 3K
- Replies
- 30
- Views
- 3K
- Replies
- 18
- Views
- 3K