


Welcome to Tesla Motors Club
Discuss Tesla's Model S, Model 3, Model X, Model Y, Cybertruck, Roadster and More.
Register
Install the app
How to install the app on iOS
You can install our site as a web app on your iOS device by utilizing the Add to Home Screen feature in Safari. Please see this thread for more details on this.
Note: This feature may not be available in some browsers.
-
Want to remove ads? Register an account and login to see fewer ads, and become a Supporting Member to remove almost all ads.
You are using an out of date browser. It may not display this or other websites correctly.
You should upgrade or use an alternative browser.
You should upgrade or use an alternative browser.
DIY Big Brake Kit with Brembo 6 piston Calipers
- Thread starter jesse_le
- Start date
- Status
- Not open for further replies.
3geekfamily
Member
Brake fluid, I think.What fluid is everyone running?
Seriously, I'm going to go with the Castrol SRF. I'm not disciplined enough to change my brake fluid as regularly as I would need with the other fluids, so the higher wet boiling point is going to help me quite a bit.
3geekfamily
Member
What is everyone doing for the rears? I'm debating between:
1 - Buy the Girodisc rear rotors (or just leaving them stock), and grabbing a spare set of OEM rear calipers to send off to paint with my new fronts. My car is red and my wheels are bronze, so red isn't an ideal color for the calipers.
2 - Buy the MPP rear setup, and send the new caliper pieces off for paint with the fronts
3 - Just leave the things red, and paint only the front calipers to match stock
Admittedly, I'm probably going to go a bit ricey with the color of the calipers, but I think the end result is going to look good, AND perform great. As long as they don't turn brown at the track, they should be great.
3geekfamily
Member
What are you going to do if you change the color, though?I’m going with Girodisc rear rotors (they should be here tomorrow) along with Castrol SRF fluid and MPP SS Brakelines.
As for color, I’m still undecided!
")
The one that has me right now is BMW CCB color - it’s like a really faint gold/yellow color.
If i can source rear performance calipers then I will most likely do a color change. If not, I will just go red.
If i can source rear performance calipers then I will most likely do a color change. If not, I will just go red.
Just going to put this out there - 2nd group paid and Girodisc has been notified.
For anyone else that is interested, you can purchase the rotors using this link:
Tesla Model 3 Performance 370mm Front Rotors
The link will only be good till Monday and then it will be disabled.
For anyone else that is interested, you can purchase the rotors using this link:
Tesla Model 3 Performance 370mm Front Rotors
The link will only be good till Monday and then it will be disabled.
vietfella
Member
For rears, bought M3P rear calipers and going with MPP.R rear setup. Sticking with red for calipers. Running Motul RB660 brake fluid and will change pads over to Pagid RSL29sWhat is everyone doing for the rears? I'm debating between:
1 - Buy the Girodisc rear rotors (or just leaving them stock), and grabbing a spare set of OEM rear calipers to send off to paint with my new fronts. My car is red and my wheels are bronze, so red isn't an ideal color for the calipers.
2 - Buy the MPP rear setup, and send the new caliper pieces off for paint with the fronts
3 - Just leave the things red, and paint only the front calipers to match stock
Admittedly, I'm probably going to go a bit ricey with the color of the calipers, but I think the end result is going to look good, AND perform great. As long as they don't turn brown at the track, they should be great.
Paragon offers a nice set of front and rear two-piece slotted rotors(I think they offer free shipping). PFC makes some great pads sold through UP, Porterfield R4-S is excellent as well, and so are Carbotech 1521.I am probably going to order MPP rotors and do a more aggressive pad. Hopefully, that is sufficient for the street.
drpheta
Member
I have MPP rear rotors ready to go on when I install my fronts.
Lindenwood
Active Member
I don’t think these will be enough.

Last edited:
3geekfamily
Member
That’s exactly the color I’d be doing if I didn’t have bronze wheels. It’s subtle and just perfect.The one that has me right now is BMW CCB color - it’s like a really faint gold/yellow color.
If i can source rear performance calipers then I will most likely do a color change. If not, I will just go red.
Now you definitely need some new wheels to show it off better.
I don’t think these will be enough.
Might I suggest @SignatureWheel ?Now you definitely need some new wheels to show it off better.
Lindenwood
Active Member
Thank you for the great data!@santua only ONE more needed for the next order!
Thanks for pushing this, Jesse and the fantastic research from @drpheta. Was chatting with @buckets0fun at the track over the weekend about this setup and cannot believe I missed this thread. I felt a spongy pedal on the way home and fairly sure I boiled the fluid - stock calipers, stock rotors, 5th track day on RBF600. This seems like the easy button and I think it is unlikely track folks will find this lacking given the amount of time we can realistically expect in a session, especially with an RBF660, Castrol SRF, or Project Mu G-Four 335.
As a Corvette owner I am on the hunt for the same calipers as @drpheta's and leaving them as is.This caliper design in red reminds me of the pignose WRX 4-pots the Subaru community was aching for back in the day. To add to the info here, the pad shape on the DIY GM 6-Piston Brembo is FMSI D1405 and much more likely to be in stock than OEM Performance caliper pads. This list is non-exhaustive and untested, but hopefully helps someone searching in the future for track pads. You can probably guess the part number if you're looking for a different compound with the exception of Hawk and Ferodo. I have reached out to Performance Friction as I am somewhat surprised to not see a PFC08 or 11 in this size.
Manufacturer Part Number Cost Carbotech XP12 CT1405-XP12 $ Ferodo DSUNO FRP3133Z $$$ G-LOC R12 GP1405-R12 $ Hawk DTC-70 HB649U.605 $ Pagid RSL29 8081-RSL29 $$ Raybestos ST43 RC1405 ST-43 $
I am looking forward to giving this setup some track abuse and hoping to keep my 18s.
I have been reading through some brake pad threads on the Camaro forums and several are also reporting the Power Stop Track Day Pads, PST 1405, are a pretty decent pad for a DD seeing occasional track days. Specifically, they don’t seem to wear quite as long as other dedicated pads (order of magnitude 50-65% as much track time), and sound like they dust more than most, but generally hold up to the heat and can be had for around $150 per front pair.
Lots of positive reports on the ST-43s, though.
drpheta
Member
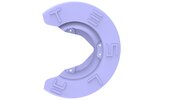
Those of you who removed the front dust shields. What tools were required? I'm getting ready to tackle this job soon.
vietfella
Member
To remove the dust shield you use a T30 bit to remove the 3 bolts. My front dust shields are enclosed, so I had to also cut them with a dremel. Otherwise you will need to remove the entire hub.Those of you who removed the front dust shields. What tools were required? I'm getting ready to tackle this job soon.
Refer to video from MPP.
Attachments
drpheta
Member
Thanks. Was hoping I wouldn't need to dremel off this thing.To remove the dust shield you use a T30 bit to remove the 3 bolts. My front dust shields are enclosed, so I had to also cut them with a dremel. Otherwise you will need to remove the entire hub.
Refer to video from MPP.
3geekfamily
Member
That's probably the coolest dust shield I've ever seen.To remove the dust shield you use a T30 bit to remove the 3 bolts. My front dust shields are enclosed, so I had to also cut them with a dremel. Otherwise you will need to remove the entire hub.
Refer to video from MPP.
takes about 60 seconds with a cutting wheel. make one slit, then use pliers to fold the cut over and it will pop right off.Thanks. Was hoping I wouldn't need to dremel off this thing.
- Status
- Not open for further replies.
Similar threads
- Article
- Replies
- 204
- Views
- 25K
- Locked
- Replies
- 59
- Views
- 8K
- Replies
- 11
- Views
- 12K
- Replies
- 24
- Views
- 9K
- Locked
- Replies
- 11
- Views
- 1K