Welcome to Tesla Motors Club
Discuss Tesla's Model S, Model 3, Model X, Model Y, Cybertruck, Roadster and More.
Register

DiY HomeLink Install using in car Service Mode - No need for Tesla Service or ToolBox

This site may earn commission on affiliate links.
I can pay for many years of myQ before it would cost as much as the homelink module. Doesn’t sound like a joke to me.
I think what people are paying for is the convenience of a potentially faster interaction with the door, no internet involved. I had HomeLink on my prior Tesla (3 years) and on several prior BMWs. It never failed to work.

Although I don't have direct experience with MyQ, I do read several posts regarding frustration with connectivity.
 
Homelink installation on 2021 Model 3 SR+ without removing bumper facia. This step by step guide shows how where and how to mount the Homelink module under the frunk.

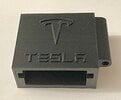
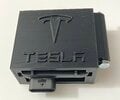
Bought Tesla Homelink kit part 1098355-00-B on eBay for $180. This includes bracket, bolt, and Homelink module 1114984-00-B.

If you don’t have the special bolt then you will need a regular hex head M6x1.0 by 25mm flange bolt.
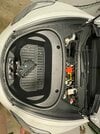
4D0356CD-02F5-4623-9AFA-F6B198204283.jpeg


1. Open Frunk

2. Remove 12v battery access panel by lifting plastic panel off

2EA036DA-8F19-42EC-AAA0-3B7F1A25265A.jpeg


3. Remove hood latch panel by pulling panel up to release clips. Flip panel over to expose the hood release button connector. Pull on the connector firmly to release. Set hood release button panel aside.
86686797-3A7B-4FE2-A921-8418E967F3AB.jpeg


4. Remove Frunk tub. There are 7 10mm bolts to remove. 1 in the upper right by the washer fluid, 2 in the back of the frunk tub, 2 in the frunk and 2 under the hood latch panel. Lift drink tub up and out to set aside. Watch any Frunk removal video on YouTube.

F20DD393-6F3C-4C54-A06A-D8CB69E0D437.jpeg


5. Find Homelink connector wrapped up with blue tape to the main harness. This connector is a three wire connector with a cap. The wire colors are green, black and blue

117EA7AA-7E3C-43F1-A248-3391C720603E.jpeg


6. Remove cap and tape. To remove cap first pull back on the locking connector and the press to release while removing cap. Lock release show in grey below.

E1334DE8-F9AD-49A3-80AF-63AE5FEED28A.jpeg


7. I chose to mount my Homelink using the special bracket and special bolt. If you don’t have the special bolt then you will need an M6x1.0 by 25mm flange bolt. The special bolt almost fits a 9mm socket or 12 point 5/16 socket (kind of).

Instead of removing the entire front bumper facia; I mounted the bracket the the front hood latch beam using one of the bolt holes available and letting the bracket hang down. This is in the center of the front of the car under the hood latch. There is one too the left and the right.

02FCB67C-9070-4B45-A775-AB644E174BC5.jpeg


1B405ECA-4ECA-470F-967E-8ED19FED5435.jpeg


Plug the connector in and replace everything in the reverse order that you have disassembled it.

Next you must activate the homelink module within the software. This can be done via service mode as of software version 2022.36 (?)

I currently have version 2022.44.25.3

Please see the next post below for service mode Homelink activation instructions
 

Attachments

  • 05664E25-07BD-43E0-B171-2BB2032F82FE.jpeg
    05664E25-07BD-43E0-B171-2BB2032F82FE.jpeg
    495.1 KB · Views: 163
  • 95BCF876-7CE3-4ED9-B1C5-0696B0F64CB9.jpeg
    95BCF876-7CE3-4ED9-B1C5-0696B0F64CB9.jpeg
    495.1 KB · Views: 157
Last edited:
Once you have the hardware for the Homelink module installed you must activate the Homelink module in the software of the car. Tesla has finally enabled you to do this part DIY through the service mode.

Do this only after installing the module.

1. Go to the car menu -> software -> press and hold on the model 3 for 5 seconds

2. Enter the service password with the dialog box that is presented. You are now in service mode.

3. Go to battery -> low voltage -> Homelink.

4. Press homelink retrofit and unlock the gate way

5. Follow onscreen instructions to unlock the gateway (up full on turn stalk + keycard + brake pedal pressed)

6. Car will reboot with software configuration update message displayed.

7. After car reboots press Test Homelink.

8. Exit service mode.

9. Program Homelink for your garage door

48C8EAD7-BA5F-4D2D-B2B8-0BA715E892F0.jpeg

1548671A-A17E-4094-B613-CB5FC62B2142.jpeg
3F1E71A1-364F-4193-8E2A-BEC3320A1995.jpeg
 
@RoBoRaT No I didn't see anything plugged into the radar connector in my 11/22 build Model 3.

@Rheckbert3 great write-up! Really appreciate the pictures, too. The only 'extra steps' I did for mine:
  • I put a long zip-tie around the bracket to secure the module, just in case that friction clip on the bottom comes loose. It's unlikely, but that clip points down, so if it came loose due to a big bump, the HL module would fall straight down.
  • I also put a bit of lock-tite on the bolt (mounted in the same spot you did)
Zip.jpg
 
  • Informative
Reactions: RoBoRaT
When I bought my module on eBay, it didn't come with a bracket so I zip-tied the module to the same place @Rheckbert3 and @turns2stone did. When I look for the bracket alone on eBay, they are going for $50! Anyone know where I could get a reasonable bracket?
Seems like something that would be cheaply solved by some creative 3D printing.
 
Seems like something that would be cheaply solved by some creative 3D printing
Seems like something that would be cheaply solved by some creative 3D printing.
Hello:

I have found reading your thread, fascinating.

I have gotten a 3-D printed mounting bracket that holds the HomeLink module without the Tesla mounting bracket. It mounts just below snd to the fight of the hood latch.

I’m attaching the YouTube video the describes the 3-D printed mounting bracket. The YouTuber supplies the 3-D .stl program to print the bracket. I found someone who printed the bracket for me. The cost as $35. Photos also attached.

The YouTube video is titled “Tesla M3 HomeLink Module Install - DIY overview” and the YouTube video url is
.

You mention that you have to type in the Service Password in order to enter Service Mode. Can you share the Service Password with me?
 

Attachments

  • C4A5C578-4070-488E-914A-2A3452B3062C.jpeg
    C4A5C578-4070-488E-914A-2A3452B3062C.jpeg
    813.9 KB · Views: 124
  • 41D2B546-8225-42CE-B7A7-09C476AA661A.jpeg
    41D2B546-8225-42CE-B7A7-09C476AA661A.jpeg
    406 KB · Views: 109
  • BAE40458-5908-4A43-82EB-3B7A8C12C649.jpeg
    BAE40458-5908-4A43-82EB-3B7A8C12C649.jpeg
    462 KB · Views: 145
For those who are looking for (reasonably priced) HomeLink module - looks like we have a seller:


But before ordering, I recommend to first wait and see if these prior sale transactions pan out. GLWS.
 
Just did this retrofit on our 2023 Model Y and made a YouTube video that's hopefully helpful for everyone: 10 minute DIY Tesla Model Y HomeLink Retrofit (Model 3 too! Save $$$!)

We were able to order parts from our local service center without issue, total was ~$230 USD before tax; it took them ~2 days to get the parts in.
Awesome DiY video - liked. 👍

In the spirit of saving $$$, the module can be installed without the bracket ($30) but same functionality.

Used double sided tape, placed the HL module as seen here:

Model Y
20211106_232132.jpg
 
Awesome DiY video - liked. 👍

In the spirit of saving $$$, the module can be installed without the bracket ($30) but same functionality.

Used double sided tape, placed the HL module as seen here:

Model YView attachment 907111
Nice! Personally I would at least put a ziptie around the frame rail… car vibrations are no joke!

(But I’m sure the double sided tape will be fine, especially if you used something like VHB)
 
  • Like
Reactions: RoBoRaT
Awesome DiY video - liked. 👍

In the spirit of saving $$$, the module can be installed without the bracket ($30) but same functionality.

Used double sided tape, placed the HL module as seen here:

Model YView attachment 907111

i noticed the bracket is made to have the module face forward and wondering if that has something to do with how the antenna in the module is oriented. it might be better to mount it vertical instead of horizontal for better range?
 
i noticed the bracket is made to have the module face forward and wondering if that has something to do with how the antenna in the module is oriented. it might be better to mount it vertical instead of horizontal for better range?
I really don’t think it matters much, I suspect the antenna is pretty omnidirectional. It’s just a trace on a PCB in a plastic case:

55E52CF4-1048-425E-AD4C-0154B6ADD05A.jpeg
 
Awesome DiY video - liked. 👍

In the spirit of saving $$$, the module can be installed without the bracket ($30) but same functionality.

Used double sided tape, placed the HL module as seen here:

Model YView attachment 907111
I personally wouldn't put the module there as it's on top of the crush cans. Perhaps mount it with the VHB tape where it's supposed to be without the mount is better.
 
  • Like
Reactions: RoBoRaT