Welcome to Tesla Motors Club
Discuss Tesla's Model S, Model 3, Model X, Model Y, Cybertruck, Roadster and More.
Register

[Mac] How to Format USB into 2 Partitions for DashCam and Music

This site may earn commission on affiliate links.
Since we already have one for PC. I thought I'd write one for Mac as well.

Here you'll find step by step instructions to format and partition 1 memory card or usb drive to use for both Dashcam and Music.

Background Info
To use 1 card for both Dashcam and Music, you'll need to virtually "split" the card into 2 separate partitions. When insert into one of the front USB ports, the car will understand and it'll appear as if 2 flash drives are present.

To play music from the drive, all you need to do is copy your music (without violating any law) to the newly partitioned drive. No special folder needed for music.

The Dashcam partition still needs its usual "TeslaCam" folder.

Warnings
  • This procedure is meant for advance users who know what they're doing. You must backup all data on your card before proceeding.
  • This procedure will erase all data on the card.
  • Attention: macOS sometimes automatically selects the main hard drive on your computer. Make sure to double check that you selected the correct drive BEFORE each step.
Tools required
  • There's no additional tool required. Disk Utility app on your Mac is the only tool you need.
  • We performed this procedure on macOS Mojave 10.14.4. If you don't have the same OS, it might look a little different but the steps should be very similar.
Let's get started!
Steps
Please read everything and not skipping steps.

1. Insert your Micro SD card or flash drive and Open the Disk Utility app
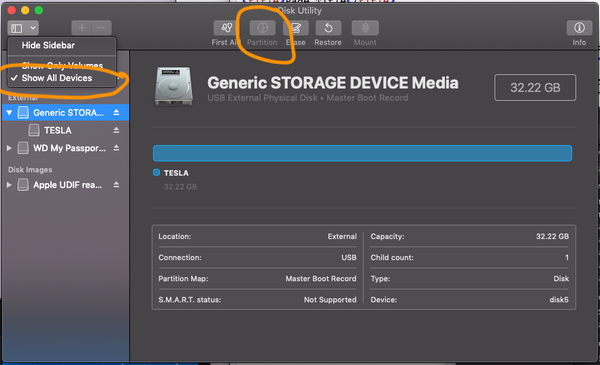
  • If you don't see all connected drives similar to the screenshot below, click on the top left button and select "Show All Devices"
  • It is important that you're able to select the top level of the card as highlighted in blue.
  • You might have notice that the "Partition" button is disabled, just ignore it for now.
a_Screen_Shot_2019-05-10_at_11.29.21_AM_copy_grande.png


2. Select your card on the top level and click Erase.

  • Name: ignore the name for now
  • Format: Journaled (must be this or you can't add partitions later on)
  • Scheme: GUID Partition Map
c_Screen_Shot_2019-05-10_at_11.32.42_AM_grande.png


3. Click Erase

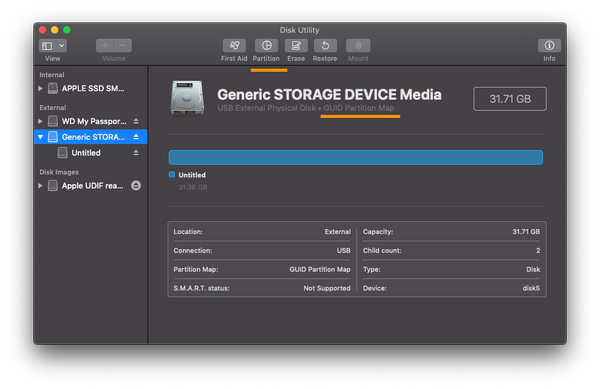
  • If everything went well, you'll see the screen like below.
  • The "Partition" button should be enabled by now.
Screen_Shot_2019-05-10_at_11.33.51_AM_grande.png

4. Still selecting the top level of your card, click on "Partition" to add partitions to your drive. One for TeslaCam and one for Music.
Screen_Shot_2019-05-10_at_1.08.52_PM_grande.png

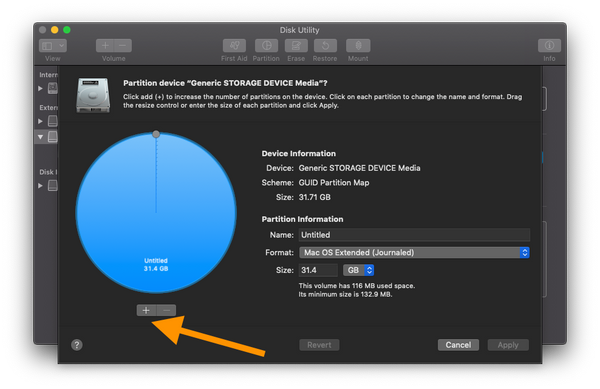
5. Click the "+" button to add a partition to the drive.
e_Screen_Shot_2019-05-10_at_1.09.45_PM_grande.png


6. You now have 2 partition, represented by the circle like below. Click on the left or right of the circle to choose a partition.
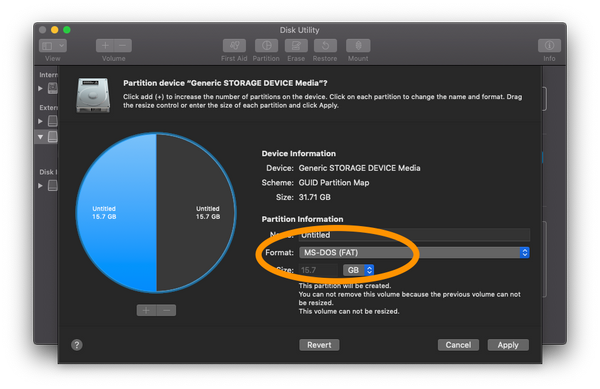
  • Give it a name (any name is fine, we gave ours MUSIC and TESLACAM)
  • Format: MS-DOS (FAT) (this is actually FAT 32 but mac only show FAT)
  • Size: set your desired size.
  • Click "Apply" and wait for it to be done.
f_Screen_Shot_2019-05-10_at_1.13.52_PM_grande.png


5. You should now have 2 partitions in your drive with names you gave them.
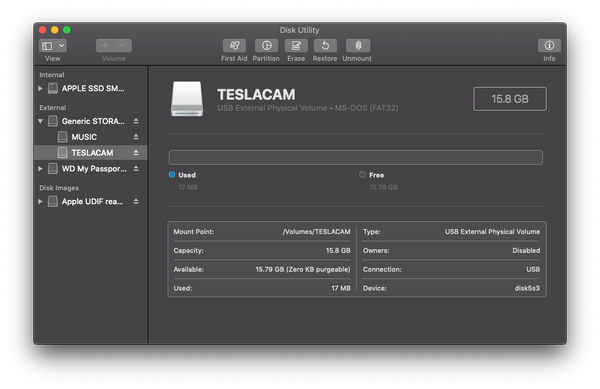
  • Note, these names don't have any effect on how things work. It's just for your reference.
g_Screen_Shot_2019-05-10_at_11.45.04_AM_grande.png


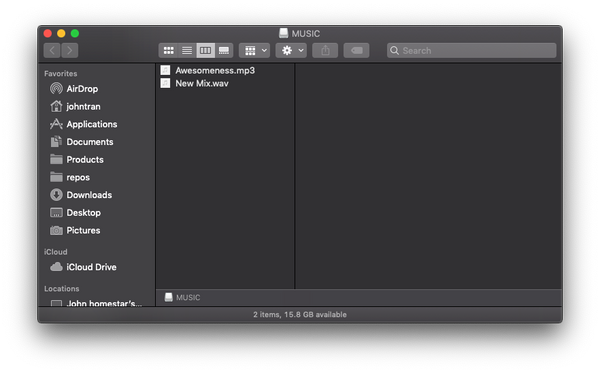
6. Go back to your Desktop. You should see 2 new drive icons, "MUSIC" & "TESLACAM".
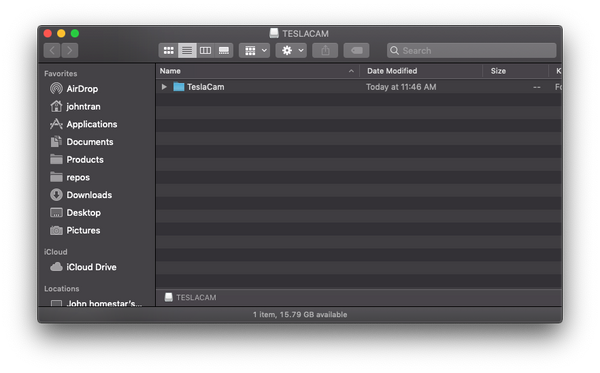
  • Open the TESLACAM (or whatever you named it for Dashcam storage) and create a folder called "TeslaCam". This folder must match exactly like this for Dashcam to work.
  • For music drive, you can just start copying your music to it. No special folder needed.
h_Screen_Shot_2019-05-10_at_11.46.16_AM_grande.png


i_Screen_Shot_2019-05-10_at_11.48.10_AM_e118bd69-c709-4ba2-b7de-8c178108cc2d_grande.png


7. Eject both drives and plug the memory card back into your car.
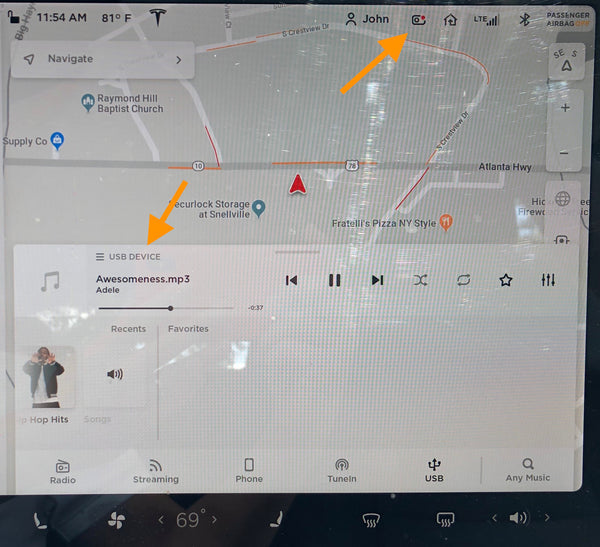
  • Dashcam icon should show up after 10 - 15 secs. Tap on it to start recording as usual. If you don't see the icon, just give it another try by unplug and plug it back in.
  • Open your music by tapping on the music icon. Scroll up to make it bigger and show available sources to play music from. On the bottom right, you should see the USB icon. Tapping on it to see all your songs. Tap on a song to play it.
j_IMG_4718_grande.jpg


8. You're done! Enjoy!
 
I have a few notes about this procedure:
  • When you create a GUID Partition Table (GPT; aka "GUID Partition Map" in Apple's parlance) with Apple's Disk Utility, a 200MiB EFI System Partition (ESP) is automatically created, although Disk Utility hides it from view. (The only hint that it's there is that the partitions are not numbered starting from 1; they're disk{n}s2 and disk{n}s3. The ESP is disk{n}s1, but doesn't show up in Disk Utility.) The ESP is necessary when booting modern computers, but it's useless for a TeslaCam or music drive. Thus, this procedure is throwing away 200MiB of disk space. This is unlikely to be a big deal on a big enough disk, but it deserves mention. Unfortunately, although using the Master Boot Record (MBR) partition scheme rather than GPT results in no ESP being created, this also seems to interfere with Disk Utility's ability to do subsequent partitioning operations. You could use a third-party partitioning tool to work around this (very minor) problem, and there may be a way to get Disk Utility to either not do this or repartition an MBR disk, but if so, I don't know how to tell it to do these things.
  • When you give the partitions names, be sure they're all-uppercase. If not, the lowercase characters will be removed, at least if my experience is any guide. As the names aren't critical, this won't affect functionality, but it may be helpful to have them show up on the desktop with full names, like MUSIC and TESLACAM rather than M and TC.
  • There are several threads on this forum about file corruption, some of which seems to be caused by there being no way to safely unmount media from the Tesla side. You can use the First Aid button in Disk Utility to repair such damage; however, such damage can accumulate over time, so I recommend doing this every time you transfer the drive from the Tesla to a desktop computer, to minimize the risk of it building up. I've seen one report that suggests the Tesla may be automatically doing the equivalent of Disk Utility's First Aid option from time to time, which may be why reports of problems have dropped off recently; but it's unlikely to hurt to run First Aid on both the partitions.
 
Looks like Tesla should start selling such a flash stick on the website.
Their probably is no real need. That said, perhaps what Tesla SHOULD do is to offer a media format and management option in the GUI. This would offload some of the work we've got to do, including media management and system administrative work. Just plug the USB in, and let the Tesla do the rest.
 
  • Like
Reactions: RBowen and Enginerd
I have a few notes about this procedure:
  • When you give the partitions names, be sure they're all-uppercase. If not, the lowercase characters will be removed, at least if my experience is any guide. As the names aren't critical, this won't affect functionality, but it may be helpful to have them show up on the desktop with full names, like MUSIC and TESLACAM rather than M and TC.
That's odd, this has never happened on my macs. If you use lower case letters, they're just changed to upper case letters, not removed.

Oh, and thanks for the guide, VTEQ!
 
So I did this and it works great, but what file format does music have to be to work?

I "Exported" music from iTunes and the files aren't showing up in the car when I try to find them.

I use MP3, but they aren't exported from iTunes; mine are mostly extracted from CDs using Linux utilities. I don't know what options iTunes offers or what formats other than MP3 the Tesla will understand.
 
So I did this and it works great, but what file format does music have to be to work?

I "Exported" music from iTunes and the files aren't showing up in the car when I try to find them.

Tesla supports FLAC and MP3.

iTunes by default uses AAC format (basically MP4) when ripping CDs, as well as when purchasing music via their storefront. Older iTunes purchased music can be in the Protected AAC format.

Most of my music is ripped from my CDs in Apple Lossless format, with some purchased via iTunes store. I use TeslaTunes which converts Apple's Lossless music files to FLAC format without any loss in audio quality. It copies over AAC files as is because Tesla originally supported playing those files.

You can find a test build here (called TeslaTunes_1.2.6-16-g8858973-dirty.zip) which adds an option to convert AAC to FLAC. I use this version, it works well. 2 things to note:
  1. that this will greatly increase the size of the AAC files, so you may need a larger USB stick to compensate
  2. older Protected AAC purchased music will be skipped
 
  • Like
Reactions: RBowen and TyH2009
Tesla supports FLAC and MP3.

iTunes by default uses AAC format (basically MP4) when ripping CDs, as well as when purchasing music via their storefront. Older iTunes purchased music can be in the Protected AAC format.

Most of my music is ripped from my CDs in Apple Lossless format, with some purchased via iTunes store. I use TeslaTunes which converts Apple's Lossless music files to FLAC format without any loss in audio quality. It copies over AAC files as is because Tesla originally supported playing those files.

You can find a test build here (called TeslaTunes_1.2.6-16-g8858973-dirty.zip) which adds an option to convert AAC to FLAC. I use this version, it works well. 2 things to note:
  1. that this will greatly increase the size of the AAC files, so you may need a larger USB stick to compensate
  2. older Protected AAC purchased music will be skipped
Thanks!

I'll have to try this later when I get home.
 
And .m4a, which is one of apple's default formats. Although it doesn't seem to work very well for me - songs seem to stop playing before they're done sometimes.

.m4a is one of the many extensions used for AAC files. It used to be supported, then wasn't. Its possible a recent update added support back, or attempted to fix whatever had broke, but I wouldn't know as I've been using TeslaTunes to convert my non-MP3 files to FLAC since October.
 
And .m4a, which is one of apple's default formats. Although it doesn't seem to work very well for me - songs seem to stop playing before they're done sometimes.
i had this same issue with exfat format and FLAC. once i downloaded FAT32 GUI Formatter and used that havent had the issue anymore.