


Since we already have one for PC. I thought I'd write one for Mac as well.
Here you'll find step by step instructions to format and partition 1 memory card or usb drive to use for both Dashcam and Music.
Background Info
To use 1 card for both Dashcam and Music, you'll need to virtually "split" the card into 2 separate partitions. When insert into one of the front USB ports, the car will understand and it'll appear as if 2 flash drives are present.
To play music from the drive, all you need to do is copy your music (without violating any law) to the newly partitioned drive. No special folder needed for music.
The Dashcam partition still needs its usual "TeslaCam" folder.
Warnings
Steps
Please read everything and not skipping steps.
1. Insert your Micro SD card or flash drive and Open the Disk Utility app
2. Select your card on the top level and click Erase.

3. Click Erase

4. Still selecting the top level of your card, click on "Partition" to add partitions to your drive. One for TeslaCam and one for Music.
5. Click the "+" button to add a partition to the drive.
6. You now have 2 partition, represented by the circle like below. Click on the left or right of the circle to choose a partition.
5. You should now have 2 partitions in your drive with names you gave them.
6. Go back to your Desktop. You should see 2 new drive icons, "MUSIC" & "TESLACAM".
7. Eject both drives and plug the memory card back into your car.
8. You're done! Enjoy!
Here you'll find step by step instructions to format and partition 1 memory card or usb drive to use for both Dashcam and Music.
Background Info
To use 1 card for both Dashcam and Music, you'll need to virtually "split" the card into 2 separate partitions. When insert into one of the front USB ports, the car will understand and it'll appear as if 2 flash drives are present.
To play music from the drive, all you need to do is copy your music (without violating any law) to the newly partitioned drive. No special folder needed for music.
The Dashcam partition still needs its usual "TeslaCam" folder.
Warnings
- This procedure is meant for advance users who know what they're doing. You must backup all data on your card before proceeding.
- This procedure will erase all data on the card.
- Attention: macOS sometimes automatically selects the main hard drive on your computer. Make sure to double check that you selected the correct drive BEFORE each step.
- There's no additional tool required. Disk Utility app on your Mac is the only tool you need.
- We performed this procedure on macOS Mojave 10.14.4. If you don't have the same OS, it might look a little different but the steps should be very similar.
Steps
Please read everything and not skipping steps.
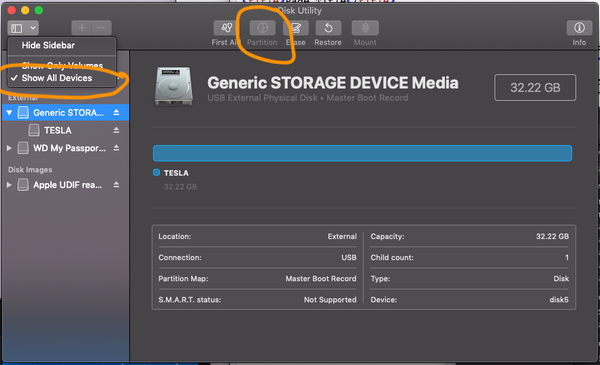
1. Insert your Micro SD card or flash drive and Open the Disk Utility app
- If you don't see all connected drives similar to the screenshot below, click on the top left button and select "Show All Devices"
- It is important that you're able to select the top level of the card as highlighted in blue.
- You might have notice that the "Partition" button is disabled, just ignore it for now.
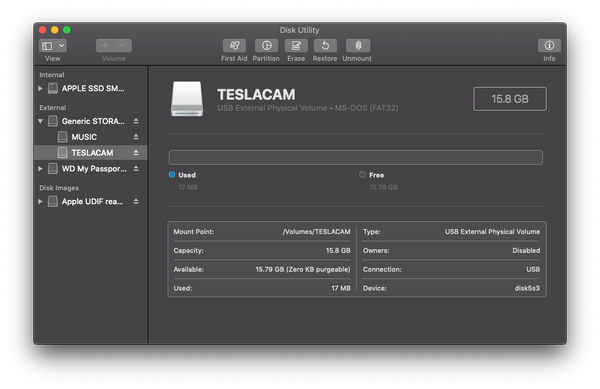
2. Select your card on the top level and click Erase.
- Name: ignore the name for now
- Format: Journaled (must be this or you can't add partitions later on)
- Scheme: GUID Partition Map
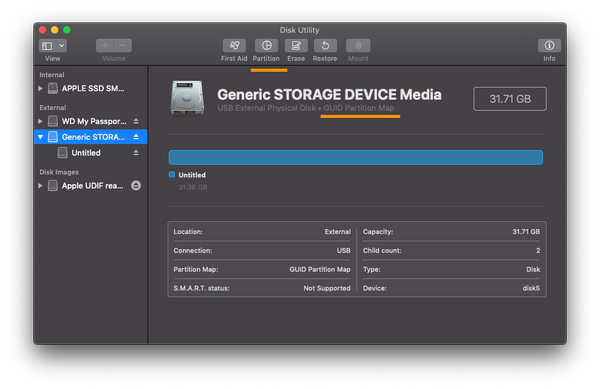
3. Click Erase
- If everything went well, you'll see the screen like below.
- The "Partition" button should be enabled by now.
4. Still selecting the top level of your card, click on "Partition" to add partitions to your drive. One for TeslaCam and one for Music.
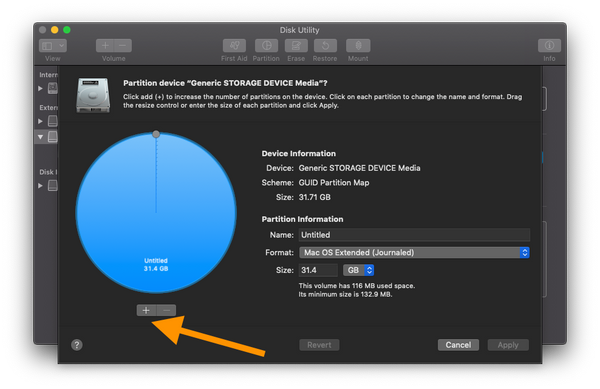
5. Click the "+" button to add a partition to the drive.
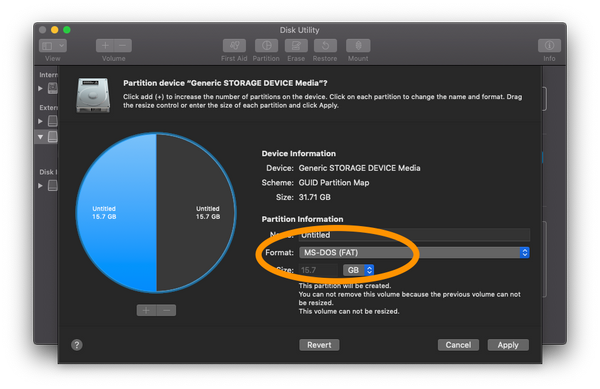
6. You now have 2 partition, represented by the circle like below. Click on the left or right of the circle to choose a partition.
- Give it a name (any name is fine, we gave ours MUSIC and TESLACAM)
- Format: MS-DOS (FAT) (this is actually FAT 32 but mac only show FAT)
- Size: set your desired size.
- Click "Apply" and wait for it to be done.
5. You should now have 2 partitions in your drive with names you gave them.
- Note, these names don't have any effect on how things work. It's just for your reference.
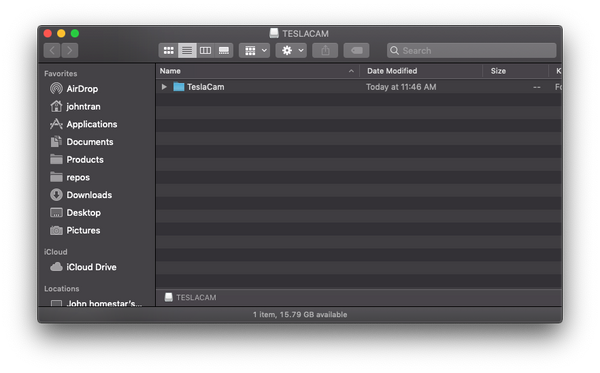
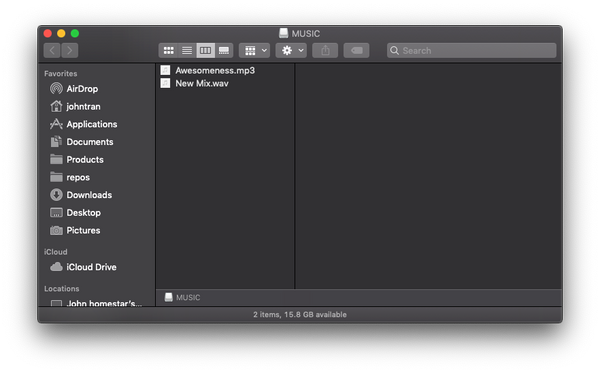
6. Go back to your Desktop. You should see 2 new drive icons, "MUSIC" & "TESLACAM".
- Open the TESLACAM (or whatever you named it for Dashcam storage) and create a folder called "TeslaCam". This folder must match exactly like this for Dashcam to work.
- For music drive, you can just start copying your music to it. No special folder needed.
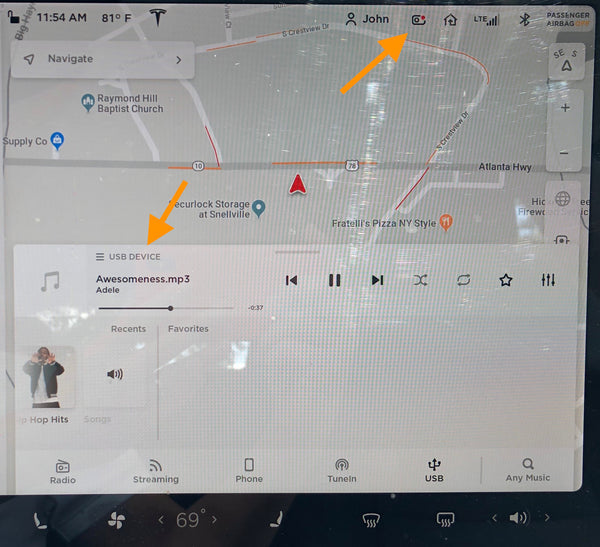
7. Eject both drives and plug the memory card back into your car.
- Dashcam icon should show up after 10 - 15 secs. Tap on it to start recording as usual. If you don't see the icon, just give it another try by unplug and plug it back in.
- Open your music by tapping on the music icon. Scroll up to make it bigger and show available sources to play music from. On the bottom right, you should see the USB icon. Tapping on it to see all your songs. Tap on a song to play it.
8. You're done! Enjoy!
