Welcome to Tesla Motors Club
Discuss Tesla's Model S, Model 3, Model X, Model Y, Cybertruck, Roadster and More.
Register
This site may earn commission on affiliate links.
Since there seems to be more interest, I am posting my experience below. I originally PM's it so as to not clog up the forum. Good luck and I hope it is helpful.

This will be long and I apologize. But the only way I can explain it is by sharing my step by step story. It took me about 2.5 hours doing it for the first time. Now that I know. I bet I could do this install in less than an hour. It's the unknown that kills me.

I also used the 12v in the mic area. Could not have been easier. Unsnap the vacant connector, lay your bare wires in, snap shut and done! But don't do it until your install is complete, of course.

I'll start by saying be very, very careful handling the rear cam cable. I ruined my first by handling it too roughly. It is ridiculously fragile. I can't emphasize this enough. Uncoil it very gently. It wants to coil and kink even after uncoiling. Very annoying. Handle it like a raw egg.

For cable routing to the rear: simply snake the cable up from the front cam directly into the camera housing. I actually snaked the cable from the mic area down to where the the front cam would be, so as to not have to pull 20ft of cable from the the other way. Leave excess hanging down from the mirror housing, they give you at least 5ft extra, which is nice. 6" will do. Leave the long end hanging in the cabin dangling from the mic area as you will route all of that in a second. You can hide the excess at the windscreen in the headliner easily.

Then route through the headliner straight up to the the pano/headliner junction. There is a huge gap between the headliner and the pano. Then along and around the pano on the pass side. Simply lay it in the area between the liner and the pano. Easy. Pull the center pano bar down, very easy. Takes a bit of a snap. Snake carefully past the bar and continue to the end of the rear pano on that side. If all of that takes you 5 min, I would be surprised. Then a bit of work begins. Leave the pano bar cover hanging until you are done so that you can fine tune at the end.

Let the cable hang down in the back seat.

Open the rear hatch. Remove the right side shelf bracket that holds the cargo cover. One torx screw. Unsnap that piece. All panels in the MS take a good strong yank to remove. More than you would think.

Remove the side ceiling panel that covers the rear quarter right behind the rear seat with another good yank. It's right above the panel you just removed.

Go back to the rear hatch. Pull the trim from the top of the hatch, no screws. Good, but gentle yank. Takes some fiddling. Trim removal tools really help here. Amazon, 10 bucks. Remove the right side trim from the hatch. Be careful here on this one piece and expect that you will break at least one of the blue panel clips because the force to remove it is more than the clip can handle. I broke one. You will need to buy replacements from Tesla. I didn't as the panel went right back in. I will when I have time. They are cheap.

Now comes the hard part if you do not want to jump the gap.

You will see a grommet tube that is attached from the upper right part of the roof to the upper right of the hatch. It houses several cables powering a variety of functions for the hatch, rear lights, etc. There is one on the left also. The reason the right works is that that left is simply too packed full of cables to have any extra space. Of course, right and left are as you are facing the area from the rear.

Pull the grommet from both the hatch and roof. Easy to do. But be very gentle and take your time. You need to re-seat those perfectly later on to preclude water intrusion. I did not need to lubricate them upon reseating. But if you feel you do, use only pure silicone. Not a spray, as it has petrochemicals in it that will degrade the the seal. Go to a plumbing store and buy pure silicone (95% pure, I think) and use that. It comes in a little container and seems really sticky to the touch. But works well as a lube.

Now this is the really important part. While I make it sound serious, it is not that hard. But I cannot emphasise the importance of a gentle and patient touch through this step.

Fashion a stiff wire that you will use to push through from the HATCH side of the grommet. NOT the roof side! Do not use a hanger! I used 14 gauge electric conduit wire. One strand, still insulated, that I pulled from excess 3-wire romex I had. The insulation helps in your effort to slid the wire through the grommet. Fashion a very small loop at one end. Deburr the edge of the wire loop with a file, emery board, etc. You want it to be smooth as possible so as to not damage any wire in the grommet.

Very carefully snake that tool from the HATCH side through the grommet until you see it at the other end, before it goes through the hole in the roof. Then get that loop through the hole of the roof hole and snake it between the roof and the headliner until you can grab it. Once through the grommet, it's easy to go through the hole and between the roof and liner. You will attach the rear cam cable to this. Once you can negotiate your way through the grommet, most of the hard part is done. Once I got this done, my stress was over. Use care because of the other wires.

Phew! Take a break. I need one just writing about it!

Now, attach the head of the cable wire to the loop you made. Keep it as flat as you possibly can against the wire loop because the grommet has pretty much zero excess room, wrap in electric tape or a tape that is not grabby. Very gently and slowly negotiate that wire through the hole and the grommet. It will take fiddling, swearing, praying and bribing! Can you really bribe a wire?

Detach the cable from the wire tool and pull about 3 ft of the cable through VERY slowly and let it hang. Ditch the the wire/loop tool.

Now it gets hard to explain, so I hope this makes sense.

Take the cable and gently push it up into the the rear hatch hole and work it to the left, toward the the center of the top of the rear hatch. This takes patience and a friend to to help. Takes lots of fishing. A wire tool will not help you here. You simply need to find the right spot. With patience, it is not impossible. But many have said it can't be done. But it worked for me!

If you take your time (with a bit of swearing) you will eventually figure out how to coax the cable to move through the void between the two spot welded pieces of AL that make up the structure of the hatch. While it does not seem apparent, there is room between those two pieces of AL that you can negotiate the cable through. I was actually surprised by this, as everything I had read had said that what I did was impossible.

Once you can get it to that first void, have your friend grab the tip of the cable and gently pull it out. Then you will do this two more times, through two more voids and access points. The third access point just happens to be at just about center of the rear hatch. Then pull the cable out and you are there!!!

Phew! Another short break as I look for typos...

Now for placing the rear cam. I put mine smack in the middle of the top rear glass. To do this, I tucked the wire up in the voids of hatch and replaced the trim pieces that I took off earlier. I then pulled the rear cam out of it's mount so I only had to deal with the mount. I cleaned the glass with denatured alcohol. Isopropyl would also work fine, I think. But make sure it is completely clean of all solvents, lubricants, etc, for a good bond. Windex is not good enough. I placed it about 1/4" from the top trim and actually tried to get it vertically/horizontally centered on the top defroster line because it made it easier for me to make sure it was straight. Hold that for a minute and then leave it alone for a good hour so it can bond. I actually turned on the rear defroster to warm the glass in order to activate the adhesive. The heat will help the adhesive to bond.

Then I popped off the top trim and pulled the wire through, plugged in the cam and...

DONE!!!

Good luck. I hope this helped. It was a pleasure to do this. Let me know how it goes for you.
 
I'm having some trouble getting the cable from the microphone enclosure to the windshield. I managed to get the power cable for the front camera in there without opening the camera housing, but I can't seem to get the rear camera cable through there. Any suggestions/tips?
 
I'm having some trouble getting the cable from the microphone enclosure to the windshield. I managed to get the power cable for the front camera in there without opening the camera housing, but I can't seem to get the rear camera cable through there. Any suggestions/tips?
Take the leap and remove the housing behind the rear view mirror. It will make for less frustration and a clean install
 
What about the housing above the mirrow? There's another thread that shows it off, but I have no clue how to remove that. I'll admit up front that i'm a little skiddish about this endeavor in general... something about taking apart my new car make s me uncomfortable.
 
The other thread - Install of Radar Detector, Dashcam, and Laser Jammer (LONG)

(I just found out I can't edit posts. welp.)
There are 2 parts that need to come off. The smaller of the 2 will come off easily by pulling down and forward (towards the glass); it's connected by 4 tabs. Then remove the actual mirror, 1/4 turn counter clockwise. This will require some force. The last one to remove is the grill looking cover which protects the front camera hardware. This too will require force. It will feel as if your going to break it and you won't. There are 4 metal type clips which may or may not detach from the camera hardware. If one or more remain, I was able to use nose pliers to remove...don't use your fingers since the metal can have sharp edges. One you get this 3 items off, you will clearly see how to route the 2 wires.
 
  • Informative
Reactions: benjiejr
Here are a few post install pictures. I was hoping to share actual install picture but my camera bugged out on me.

IMG_2125.JPG 
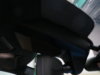
Here is a picture of the rear camera installed on the plastic trim NOT the glass

IMG_2126.JPG This is an overview of the wires you can hide. I'm not sure you can hide the wires completely and I did my best.
IMG_2127.JPG This is a close up view of the bottom plastic piece. I used a Dremel to notch a piece of the plastic so the wires tuck in better.
IMG_2128.JPG The wires heading towards the mic grill area run next to the car's front camera hardware. It's best to remove the plastic piece so you can see things better plus tuck the wires better.
IMG_2130.JPG Here's a view from the driver's seat. As you can see the BlackVue is completely hidden.
IMG_2131.JPG Here's the view looking at the back. As you can see the rear camera is hidden. I believe you can hide it better when mounted on the plastic trim versus the glass.
IMG_2132.JPG Another shot of the camera behind the rear view mirror.
 

Attachments

  • IMG_2129.JPG
    IMG_2129.JPG
    243.2 KB · Views: 399
There are 2 parts that need to come off. The smaller of the 2 will come off easily by pulling down and forward (towards the glass); it's connected by 4 tabs. Then remove the actual mirror, 1/4 turn counter clockwise. This will require some force. The last one to remove is the grill looking cover which protects the front camera hardware. This too will require force. It will feel as if your going to break it and you won't. There are 4 metal type clips which may or may not detach from the camera hardware. If one or more remain, I was able to use nose pliers to remove...don't use your fingers since the metal can have sharp edges. One you get this 3 items off, you will clearly see how to route the 2 wires.
Ah, more of those clips, that makes sense. Also, I was turning the mirror clockwise, which might explain why I couldn't get it to come off. I'll give it another try this weekend, thanks.
 
  • Like
Reactions: Maximus8
Ah, more of those clips, that makes sense. Also, I was turning the mirror clockwise, which might explain why I couldn't get it to come off. I'll give it another try this weekend, thanks.

Good luck with the install. One of the members here, @CHG-ON, has a great instructional that he posted. I used his recommendations on how to install the rear camera without any drilling and running the wire through the rubber flex conduit.
 
  • Like
Reactions: oogs
Just received my blackvue and installed the cameras. I have a 2015 85D and there was a spare connector in the mic area. Measure the voltage and had 10VDC and 12VDC. Opened the connector and connected bare wires to the 12VDC wires and closed the connector.

Cameras powered up. There are a few things I need help with, please.

1. The Vin connector is very hot. The car is out of the sunshine, so the heat has to be from current. Is anyone else experiencing a hot power connector?
2. I set the camera setting to America-NewYork Eastern, but the clock is showing the GMT time. I have saved the setting, rebooted the camera and it still won't show the correct time although it has the correct time zone.
3. The GPS and Speed do not work. I drove the car about 1 mile and the location is Korea and the speed is - - -

Any help will be appreciated.

Thanks, Mike
 
  • Helpful
Reactions: holtz13
Just received my blackvue and installed the cameras. I have a 2015 85D and there was a spare connector in the mic area. Measure the voltage and had 10VDC and 12VDC. Opened the connector and connected bare wires to the 12VDC wires and closed the connector.

Cameras powered up. There are a few things I need help with, please.

1. The Vin connector is very hot. The car is out of the sunshine, so the heat has to be from current. Is anyone else experiencing a hot power connector?
2. I set the camera setting to America-NewYork Eastern, but the clock is showing the GMT time. I have saved the setting, rebooted the camera and it still won't show the correct time although it has the correct time zone.
3. The GPS and Speed do not work. I drove the car about 1 mile and the location is Korea and the speed is - - -

Any help will be appreciated.

Thanks, Mike

1. Might be normal if you installed another SD card that runs faster (not recommended). This runs cool and flawlessly. I tried two other that ran very hot and video corrupted on the card, stopped recording.
2. Normal, correct time will sync (with your set timezone) after the camera will acquire GPS and time sync. Give it some time outside.
3. Also normal, unfortunately, it will work on and off because of the windshield that partially blocks GPS signals, sometimes it works, sometimes it doesn't.
 
  • Like
Reactions: Maximus8
1. Might be normal if you installed another SD card that runs faster (not recommended). This runs cool and flawlessly. I tried two other that ran very hot and video corrupted on the card, stopped recording.
2. Normal, correct time will sync (with your set timezone) after the camera will acquire GPS and time sync. Give it some time outside.
3. Also normal, unfortunately, it will work on and off because of the windshield that partially blocks GPS signals, sometimes it works, sometimes it doesn't.
@Kalud I just received the new system. It supposedly came with a 32GB SD card already installed. Thanks for the feedback on the other parts.
 
Thanks for the clarifications! I got mine installed. If you've never taken off a body panel before (like me) or run any wires, it will take patience and determination. Also, it's a little uncomfortable taking your new car apart :)