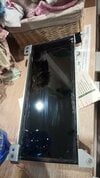
Looks like LCD+touch screen is separable. Didn't complete it myself but thought I leave info for future
All evidence suggest Tesla designed this touch screen themselves (industrial 17" touch screen unavailable in early 2010 design cycle) So they paired an off the shelf screen with their own touch screen matrix design. Adding in the optical viewing angle improvement goo that leaks.
Looking at the construction closely, the touch matrix are completely separate layer than the goo. The touch screen itself is really just glued to the LCD with only this goo and nothing else.

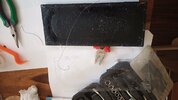
So theoretically should be possible to use a thin wire to cut the goo and separate the layer. However the goo is incredibly sticky and perhaps will stick again soon after cut. Perhaps have to follow the cut wire with something like waxed plastic sheet to keep it from sticking back together. I tried using scraper but the glass substrate cracked in a couple of places so too fragile besides cutting with wires.

A screw need to be removed and flex connector detached from each of the 4 touch screen flex cables so flex can be lifted up to wire cut the goo.


Of course after separating the 2 layers, there is the task of removing the goo completely and reassemble the 2 layers (figure out some way to keep the 2 layers together without the goo)
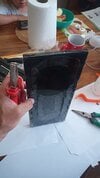
Cleaning the goo on top of LCD is likely a challenge as well. LCDs without any protective top layers are likely incredibly easy to scratch.
BTW, iphone/ipad glued LCD touch screens separation is basically this same process with a lot finer geometry. But they also get custom tools for the job")
Also if you just want to seal the edge where the goo can leak out with RTV, the touch screen flex cable need to be disconnected and pulled back to get underneath where the gap is. This may work since gravity pulls the softened goo to leak along the bottom edge. But the goo could also find its way behind through the gaps in the LCD. Don't really know.
All evidence suggest Tesla designed this touch screen themselves (industrial 17" touch screen unavailable in early 2010 design cycle) So they paired an off the shelf screen with their own touch screen matrix design. Adding in the optical viewing angle improvement goo that leaks.
Looking at the construction closely, the touch matrix are completely separate layer than the goo. The touch screen itself is really just glued to the LCD with only this goo and nothing else.
So theoretically should be possible to use a thin wire to cut the goo and separate the layer. However the goo is incredibly sticky and perhaps will stick again soon after cut. Perhaps have to follow the cut wire with something like waxed plastic sheet to keep it from sticking back together. I tried using scraper but the glass substrate cracked in a couple of places so too fragile besides cutting with wires.
A screw need to be removed and flex connector detached from each of the 4 touch screen flex cables so flex can be lifted up to wire cut the goo.
Of course after separating the 2 layers, there is the task of removing the goo completely and reassemble the 2 layers (figure out some way to keep the 2 layers together without the goo)
Cleaning the goo on top of LCD is likely a challenge as well. LCDs without any protective top layers are likely incredibly easy to scratch.
BTW, iphone/ipad glued LCD touch screens separation is basically this same process with a lot finer geometry. But they also get custom tools for the job
Also if you just want to seal the edge where the goo can leak out with RTV, the touch screen flex cable need to be disconnected and pulled back to get underneath where the gap is. This may work since gravity pulls the softened goo to leak along the bottom edge. But the goo could also find its way behind through the gaps in the LCD. Don't really know.
Last edited: