Welcome to Tesla Motors Club
Discuss Tesla's Model S, Model 3, Model X, Model Y, Cybertruck, Roadster and More.
Register

Stopped my MCU from leaking. Saved $$$.

This site may earn commission on affiliate links.
i had an old screen that was replaced under warranty for the bubbles a couple years ago so before i went in i experimented a little with it.

if you take a small gauge needle like one for insulin injections or vaccinations y'all know the tiny thing I'm talking about. anyway if you slide it inside to a bubble you can suck out the air. I didn't bother to play around and try to seal anything since it was getting replaced anyway.
Also in a different bubble i injected some warmed up Vaseline this just moved the bubble but i suspect there is a vacuum created by sucking out the air and injecting the Vaseline could possibly counteract that and make equal pressure then you could seal up the sides after sucking out all the air. not sure how good the Vaseline is at mixing with the goop in there already but it looked fine for the short while afterwards.
I upgraded to MCU2 a couple months ago due to the MB failing not just the DB, so it has another new screen now.
 
  • Like
Reactions: howardc64
i had an old screen that was replaced under warranty for the bubbles a couple years ago so before i went in i experimented a little with it.

if you take a small gauge needle like one for insulin injections or vaccinations y'all know the tiny thing I'm talking about. anyway if you slide it inside to a bubble you can suck out the air. I didn't bother to play around and try to seal anything since it was getting replaced anyway.
Also in a different bubble i injected some warmed up Vaseline this just moved the bubble but i suspect there is a vacuum created by sucking out the air and injecting the Vaseline could possibly counteract that and make equal pressure then you could seal up the sides after sucking out all the air. not sure how good the Vaseline is at mixing with the goop in there already but it looked fine for the short while afterwards.
I upgraded to MCU2 a couple months ago due to the MB failing not just the DB, so it has another new screen now.

Very cool, I'd imagine the capacitive conductive traces are embedded in the glass (probably itself a multilayered sandwich) so needles likely won't damage it. Did you power up the screen after surgery to see any damage to touch?

Started with 5 bubbles after 2 day SC visit, now at this stage. Had to wait until eMMC recall (just done, SC goodwilled earlier schedule from all the frustrations and potential damages (they won't admit) Upper left corner metal trim got creased during the visit too) so they void the recall from my tinkering.

IMG_0119.jpeg
 
Last edited:
Very cool, I'd imagine the capacitive conductive traces are embedded in the glass (probably itself a multilayered sandwich) so needles likely won't damage it. Did you power up the screen after surgery to see any damage to touch?
hahaha *sugar* i did all this while it was in the car an on. only had to pull off the trim to access the screws to pull it out a little to access the top of it where the bubbles were. I felt the screen with the needle and right behind the glass it slid right in without issue. I kept it angled resistance towards the glass so i didn't accidently have the potential to stab the actual screen
 
hahaha *sugar* i did all this while it was in the car an on. only had to pull off the trim to access the screws to pull it out a little to access the top of it where the bubbles were. I felt the screen with the needle and right behind the glass it slid right in without issue. I kept it angled resistance towards the glass so i didn't accidently have the potential to stab the actual screen

Awesome, more MCU1 leaking display surgery update.
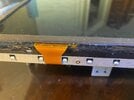
Needle

This definitely works to get air out. Need the following

- 30 gauge (0.3mm diameter) >0.75 inch length needle. Here is sample spec

BD PrecisionGlide™ 30 G x 1" Hypodermic Needles - 305128 – Medsitis

Unfortunately difficult to find. 5 pharmacies/3 chains near me didn't have it. Only found 0.3mm 0.5" length which can barely get to the edge of the bubbles closest to the edge. The short needle unfortunately clogs easily and can't reach bubbles even a couple of mm from the edge.

Will need multiple needles. Useless after clogged with the plasma goo.

Also tried 0.4mm diameter needle, doesn't fit. Too big.

BTW, Pharmacist might look at you funny thinking you are drug addict or not too helpful with a 30 cent/free item haha. Covid19 vaccination seems to be causing a shortage as well.

Bubble Extraction

Extracting the air bubbles is quite an interesting process. Face the screen upwards standing on the metal mounting legs so glass weight sits on the plasma seam. Due to the thick viscosity, when pulling the syringe plunger, bubble doesn't shrink immediately (or my short needle got some plasma goo clogging right away) but will feel the vacuum force on the plunger. After 10s+, bubble and nearby bubbles starts to get narrower and further from the edge. My 1/2" needle can't reach anymore. When the needle pulls out, the vacuum actually kind of seal the entry channel. If not immediately, seems eventually.

Screen Assembly

Also got a better idea of how the touch screen layers are setup. Here is summary and pic

A. 1/16" top protective glass. This is the glass you touch
B. top capacitive touch circuit layer (majority of the flex cable lines goes to here so probably some kind of matrix). Typically use transparent conductive material.
C. 1/8" glass
D. bottom capacitive touch circuit layer. Looks like just 1 line on each of the 4 edges of the screen. Probably something like a common ground. Typically use transparent conductive material.
E. Plasma
F. LCD
G. Diffuser/backlight etc.

Needle goes into E and I'm guessing D might just be a plane so tolerant of any needle scratches (don't know for sure but airborne spoon and I haven't damaged anything poking in here, my touch screen worked fine after getting some air out)

IMG_0121.jpeg


Plasma Cleanup

My bubble originate mid point on the passenger edge of the screen. This is right under the touch screen flex tape on that edge. After disconnecting the flex tape from touch screen board (pic in post #19) and removing the screw/washer that holds the tape down, could unfold the tape to reveal the plasma seam under the tape. It was the heaviest leaking spot on my MCU display.

Clean up is probably the most challenging part of the job before sealing that edge with epoxy. Iso Alcohol definitely doesn't work. Might have to just patiently pick away at it. But once the leak is really bad, not sure how it can clean enough to be sealed by epoxy. Resealing might be a repair technique reserved for preventive and initial bubbling.

Anyway, flex tape bonding to the class is fragile but durable enough to handle unfolding the tape to reveal and clean the seam underneath + reseal.

Anyhow, looking for longer needle now to get the rest of the bubbles and see if possible to clean off leaked plasma and epoxy reseal. Note my plasma leak is not heavy enough to be visible externally or onto the rear of the bezel. Only along the seam and behind one of the flex tape glass connections. Even then, need to find a good way to clean it off before applying epoxy sealant.

Resealing Decisions

One downside of resealing with epoxy is needle air removal will no longer be possible if still have air leak. Contemplating starting with resealing the bottom 2/3 of the screen first to see how things go.

Instrument Panel

Since the panel bezel is off for MCU removal, discovered also had air bubble on top edge hidden by the bezel. The LCD has a silver (metal?) surrounding edge bracket and the front glass mounts onto that with the plasma goo underneath. Mine had lots of bubble on the top silver edge. The front glass flexes quite easily so can just push on it to squeeze the air out. But they soon appear again as top glass returns back to its shape. Don't know if plasma volume changed or top glass/LCD warped and increased volume.

Since there is solution to remove/clean the plasma off instrument panel completely, not sure worth epoxy resealing (makes removing the glass and cleaning plasma much harder if not impossible)

Here is a pic after pressure removed most of the air bubbles. But they soon returned.

IMG_0120.jpeg
 
Last edited:
  • Like
Reactions: pilotSteve
MCU1 display surgery finished. Fixed for now :) Update for future attempts

Patient Status

IMG_0125.jpeg


Overview

The fix is basically epoxy air tight entombment to seal the plasma layer so no air gets sucked back in when thermal cycling plasma. I'd imagine this fix is only possible for early stage leaks. The plasma is nearly impossible to clean off and once it leaks too far, epoxy won't have enough clean surfaces to bond to provide an airtight seal.

Needles

30 gauge 1 inch needle. None at 6 local pharmacies and clinics. Went to a compound pharmacy (pharmacy where they can actually custom mix drugs per prescription beyond standard made drugs) and scored 8 ($0.25 each). Ended up using 4.

Epoxy

Used JB-Weld Pro. 5min setup, 1 hr cure. Gorilla epoxy reviews weren't great. So went with good old JB Weld.

ClearWeld Pro Size | J-B Weld

Air Bubble Extraction

This is a bit of an art after some practice. Here are some tips

- Brand new needle will work well first use. Bubble/air_strip will shrink immediately when plunger is pulled. On 2nd use, usually will be dealing with some clogging.
- To combat clogging. Here are some tips 1) get more needles and single use 2) soak needle in cleaner (used 99% Iso alcohol), pull plunger back, insert needle and jet out the alcohol. Do this a couple of times. 3) rotate needle 180 degrees after insertion into plasma bubble, this can sometimes unclog the tip clogged during insertion
- When bubble becomes small, I found holding vaccum in the plunger while pulling out the needle, often the air just suck through the needle channel as it exits ending up with a perfect bubble free seal. Quite satisfying haha.

Anyhow a bit of an art after some practice.

Towards the end, some bubbles were too small to do more extraction (might introduce some air during poking) and some bubbles were lower towards the LCD where needle can't get at it. I left these alone. You see those in the after pics. Not too objectionable.

IMG_0122.jpeg


Seal

First find the air leak source along the plasma seam. Plasma at the leak site is likely softer/gooeyer than places that hasn't leaked. Mine was under the flex cable near the glove compartment switch. Plasma is difficult to clean off and near a fragile flex cable connection, I chose to entomb the whole area (cable connections and all) with epoxy to create an air tight seal.

Go around the perimeter and inspect the plasma leak. Epoxy need clean surface to grab onto so anywhere plasma has oozed out a little, scrape off some plasma to reveal clean bonding surfaces.

Even if no leak under the 4 flex cables, still need to unfold them back to apply epoxy to seal the plasma seam underneath. Not too fragile but need to be careful and gentle. Cable bonds to glass (similar to LCD screen edge bond cable/tape)

The tiny 1 line flex cable over the both side of the 1/8" glass substrate, I just entombed this whole area in epoxy.

Someone said to remove the black tape around the perimeter. Impossible in my attempt picking at it with an exacto knife. Almost like it was baked on there.

IMG_0123.jpeg


Longivity

So will it hold? I'm guessing likely. When I extracted air near the leak source, bubble/strips soon form again with air entering again. After epoxy, no bubble/strip formed. So its air tight for the moment. Will the epoxy seal survive future thermal cycling? will plasma further liquidify and increase volume? Don't really know. Epoxyed perimeter at least gives the 2 layers of glass above plasma some structural rigidity rest of the display body to combat gravity pull with the vertical LCD orientation.

Reassembly tips

Top 2 bolts holding MCU1 to dash chassis really easy to cross thread with wrong angle. Easily too low of an angle. Bolts point more towards the roof than likely vantage point while seated.

=====

Will report back if not holding air tight seal.
 
do you think you can inject glue with a syringe ?

My opinion would be doubtful for a few reasons

- airborne spoon's post (#21) mentioned bubble just moved when injecting vaseline which make sense, air volume has to go somewhere.
- 30 gauge needle is 0.3mm outer diameter, inner diameter would be tiny. Can't even squeeze a high flow of alcohol through it. Probably get clogged fairly quickly with glue.
- The air pathway to suck in air bubbles probably can't be sealed by a small section of glue in 1 spot. Plasma is generally liquefied/weakened all around the area and probably just find another air channel eventually.

BTW, the LCD panel under the plasma layer is another air leak pathway since LCD layers are not air tight seal. But the plasma is its own sealer if gap is small. The common leak problem is the large gap (0.3-0.5+mm) between touch screen glass and LCD layer. Easy path for plasma to ooze out and suck in air as it softens/liquefy with heat. Anyhow, hope air don't come through LCD panel's much smaller pathway :)
 
Last edited:
Unfortunately the fix didn't hold after a couple of warmer days in the sun. Looks like air leak developed in the touch screen tape connection at the top edge. Probably the more complex surface area to entomb with epoxy.

IMG_0203.jpeg


Perhaps I didn't entomb with enough epoxy and seal off all air channel. Perhaps greater thermal expansion of liquified plasma created new air gaps. In any case, appears not a reliable solution for air bubbles but perhaps can prevent goo spillage (will check later with some time lapsed)

Also learned the 17" LG industrial display is standard (can purchase online) However, Tesla customized and added touch screen which probably explain why it didn't look as integrated as one might expect from a standard LG product. This might explain the sequence of problems with this touch screen from the start (bubbles from liquifying plasma on early units, yellowing borders on later units)
 
Another update a year+ later. Car parked in garage in temperate Seattle climate.

Leak has become much worse. UV+heat probably changes the properly of the goo in the screen. And looking at air bubbled area, there is no visual difference. So the claim of viewing angle application of this goo is probably false design decision.

Leak is from the MCU's bottom flex attachment to the underside of the top glass. I didn't apply any epoxy there originally (just cautious) but now realize probably safe to do so. Regardless, can't seal underneath the flex cable and there are surely exit channels through the edge of the LCD assembly below as well. Doubtful can really seal this thing. Used denatured alcohol to remove the leaky mess. Works pretty well.

Going to order a replacement and will see if actually possible to separate the touch screen layer and clean off the goo on this one.
 

Attachments

  • 68106509243__9766494A-972A-4A03-988E-4001E7DEDACC (1).jpeg
    68106509243__9766494A-972A-4A03-988E-4001E7DEDACC (1).jpeg
    141.7 KB · Views: 185
  • IMG_2072.jpeg
    IMG_2072.jpeg
    250.3 KB · Views: 110
  • Informative
Reactions: KalJoMoS
Just replaced mine with a used unit from ebay for $95+tax. Seller indicated these have scratches + no bubbling and is grade C but reviews are all awesome. Seller also has 99.9% rating so took a gamble.

I'd say grade is more like A- with tiny defect (under 3 of 91.3 FM) but YMMV of course and are a newer rev (black flex cable) than my 2013 original (orange flex cable). Just posting here for people hunting for replacement screens.

defect.jpeg
2013 original.jpeg
ebay replacement.jpeg
 
Just replaced mine with a used unit from ebay for $95+tax. Seller indicated these have scratches + no bubbling and is grade C but reviews are all awesome. Seller also has 99.9% rating so took a gamble.
Is there anything about these ebay units that will not have them bubble in the future? Do you have to upgrade the FW or is it just purely a parts swap?
 
Is there anything about these ebay units that will not have them bubble in the future? Do you have to upgrade the FW or is it just purely a parts swap?

This particular seller ( oemgpsnav ) seems to have a lot of these blemished and perfect units. I'm guessing they maybe sourcing from Tesla's MCU2 swaps? Just a guess.

Don't know if the leaky goo design changed from my 2013. The edges is a little tacky so I'm pretty sure the "optical viewing goo" was used but don't know if any formulation changed. The original was perfect for about 6 years (park in garage at home and work) until taking it to SC and they parked it outdoors in the sun for 3 days before refusing the eMMC change (this was just before HQ issued the recall) Then my bubbles appeared.

These screens are basically LCD + touch screen only so it just mates to the brains of the MCU1. No software update. The unit seems slightly brighter than my original and there is a gamma setting value on the sticker in the back. So maybe newer LCD LED backlight, maybe gamma... don't know.

Since you are in norcal. They ship from west sacramento. Well packaged, good quality, hence the nearly perfect ebay review.
 
My display had bubbles 2 years ago (12-14 S60). I bought a used display on eBay and sealed the perimeter with:
Permatex 82180 Ultra Black Maximum Oil Resistance RTV Silicone Gasket Maker, 3.35 oz. Tube https://a.co/gTR3Vfc
2 years later, no issues

I sealed my previous MCU1 screen with epoxy but it leaked not too long after. Recently removal showed it leaked on the bottom touch screen flex cable where I didn't apply epoxy.

Curious how you handled the flex cable area? Can't really get underneath so can only apply to the topside where its accessible.
I applied the sealant liberally all around and over the the flex connections and around the perimeter. Doing that does not appear to have had any negative effect so far.
 
  • Helpful
Reactions: brainhouston
I applied the sealant liberally all around and over the the flex connections and around the perimeter. Doing that does not appear to have had any negative effect so far.

Perhaps I'm treating the flex as too fragile, Probably can even lift up the flex and apply sealant underneath haha. Eventually I plan to see if possible to separate the digitizer and LCD part of the touch screen and remove all the goo. Digitizer does have transparent traces under the front glass so would need to be careful.
 
I’ve read about owners that have successfully removed the cover glass and goo from their forward display, but never the center screen. It may be difficult to remove the flex cables without damaging them. Keep us posted.
Yes, instrument cluster is much less fragile without touch digitizer. Maybe the capacitive wires of the digitizer is sandwiched and protected... I'll update whenever I get to this project haha.
 
Last edited:
My screen is leaking adhesive glue from the bottom of the touch screen. I am planning on upgrading to MCU2 in the near future. Has anyone who has tried to seal the bottom of the screen had any issues with removal when upgrading to a MCU2?
 
My screen is leaking adhesive glue from the bottom of the touch screen. I am planning on upgrading to MCU2 in the near future. Has anyone who has tried to seal the bottom of the screen had any issues with removal when upgrading to a MCU2?

I wouldn't think so. There are 3 basic pieces to MCU1

1. MCU's processing+network electronics with the heatsink + car's connection
2. Display and touch screen
3. Plastic silver front trim with glove box and emergency light switch

#3 would be the only piece reused if MCU2 don't come with a new one. #3 is removed when sealing #2. As long as sealant dries, hardens and don't run before assembling #3, it won't be an issue to remove and reuse #3.

Here is a pic of MCU2, MCU1 is same form factor. You can see 2 metal taps on top of the screen component (I think 2 on bottom too), thats how it attaches to the silver front trim. The edge of the touch screen where sealant is doesn't really touch the trim but probably within 1 cm. Anyhow, just make sure your sealant is completely dry before reinstalling the trim.