


Welcome to Tesla Motors Club
Discuss Tesla's Model S, Model 3, Model X, Model Y, Cybertruck, Roadster and More.
Register
Install the app
How to install the app on iOS
You can install our site as a web app on your iOS device by utilizing the Add to Home Screen feature in Safari. Please see this thread for more details on this.
Note: This feature may not be available in some browsers.
-
Want to remove ads? Register an account and login to see fewer ads, and become a Supporting Member to remove almost all ads.
You are using an out of date browser. It may not display this or other websites correctly.
You should upgrade or use an alternative browser.
You should upgrade or use an alternative browser.
MPP AWD/Performance Coilover Impression and Installation
- Thread starter beastmode13
- Start date


Yes, the trailing arm is much easier. You need to loosen the brace to have enough room for the bolt to slide out, this is part of MPP's instruction.
Sorry to bother you again but this is where I'm stuck. I cannot get enough torque due to awkward angles to get the subframe (brace) bolts to loosen. Maybe they are over torqued. Does this mean that without loosening that bracket I will not have enough space to slide the bolt all the way out on the upper portion of the longer trailing arm? If so I may be stuck.
If I put a socket extender at the end of the bolt it measures plenty of distance before it runs into the subframe assembly, although I can't be absolutely sure that with the stocky 18 mm Bolt end coming out that way that in fact it will have enough space.
So I wonder whether based on your experience loosening that subframe is absolutely necessary? Obviously a worst-case scenario would be getting the thing half apart and then not being able to get it back together. I assume car would not be drivable without that trailing arm properly located.
Last edited:
View attachment 522455 View attachment 522454
Sorry to bother you again but this is where I'm stuck. I cannot get enough torque due to awkward angles to get the subframe (brace) bolts to loosen. Maybe they are over torqued. Does this mean that without loosening that bracket I will not have enough space to slide the bolt all the way out on the upper portion of the longer trailing arm? If so I may be stuck.
If I put a socket extender at the end of the bolt it measures plenty of distance before it runs into the subframe assembly, although I can't be absolutely sure that with the stocky 18 mm Bolt end coming out that way that in fact it will have enough space.
So I wonder whether based on your experience loosening that subframe is absolutely necessary? Obviously a worst-case scenario would be getting the thing half apart and then not being able to get it back together. I assume car would not be drivable without that trailing arm properly located.
I would definitely remove the undertray and that bracket, then loosen just the one point of the subframe so you can drop it down a bit. It only takes a few extra minutes and will make your life 10x easier!
View attachment 522455 View attachment 522454
Sorry to bother you again but this is where I'm stuck. I cannot get enough torque due to awkward angles to get the subframe (brace) bolts to loosen. Maybe they are over torqued. Does this mean that without loosening that bracket I will not have enough space to slide the bolt all the way out on the upper portion of the longer trailing arm? If so I may be stuck.
If I put a socket extender at the end of the bolt it measures plenty of distance before it runs into the subframe assembly, although I can't be absolutely sure that with the stocky 18 mm Bolt end coming out that way that in fact it will have enough space.
So I wonder whether based on your experience loosening that subframe is absolutely necessary? Obviously a worst-case scenario would be getting the thing half apart and then not being able to get it back together. I assume car would not be drivable without that trailing arm properly located.
Humm. With the underbody aero cover removed, you should have clear access to the three bolts on the subframe bracket. I'll DM you with the illustrations. I just followed instructions posted @MountainPass website.
I would definitely remove the undertray and that bracket, then loosen just the one point of the subframe so you can drop it down a bit. It only takes a few extra minutes and will make your life 10x easier!
I'm assuming that bracket has to come down to allow a little bit of extra room for the wider bolt end of that long Bolt to have space to be pulled out? Is that right?
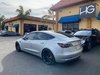
Finally got our MPP coilovers installed, absolutely in love with the look and performance. The car now feels like a proper sports car:
@Tim@adonisdetail,
Do you have spacers on that? Looks hella flush. More than standard. Maybe it’s just the drop?
Ski
Tim@adonisdetail
Former Vendor
@Tim@adonisdetail,
Do you have spacers on that? Looks hella flush. More than standard. Maybe it’s just the drop?
Ski
Yes I do, 20mm front 25mm rear
vogz
Member
Yes I do, 20mm front 25mm rear
What size and brand/model tire are you running? Any rubbing? Looks fantastic.
Finally got our MPP coilovers installed, absolutely in love with the look and performance. The car now feels like a proper sports car:
@Tim@adonisdetail,
Not to drift but what’s your average energy consumption currently with that setup (I.e. Lowered MPP and the 20/25 spacers)? Looking at doing the same on my M3P+. I’m running 20’s with PS4s summer and 20’s with PA4s winter.
Ski
darnelli
Member
is that a 20'' OEM wheel (offset is +35)?
so you run 20mm spacer front and 25mm spacer rear on +35 wheels front/back?
looks great!
so you run 20mm spacer front and 25mm spacer rear on +35 wheels front/back?
looks great!
Yes I do, 20mm front 25mm rear
Tim@adonisdetail
Former Vendor
What size and brand/model tire are you running? Any rubbing? Looks fantastic.
Same as stock, Michelin PS4S, no rubbing or bottoming out. The coilovers are a huge improvement over stock suspension that would bottom out with any hard bump.
@Tim@adonisdetail,
Not to drift but what’s your average energy consumption currently with that setup (I.e. Lowered MPP and the 20/25 spacers)? Looking at doing the same on my M3P+. I’m running 20’s with PS4s summer and 20’s with PA4s winter.
Ski
I dont know the exact difference between before/after but It feels like energy consumption is the same if not better than before. The entire height of the vehicle is now about 1.7" lower than stock so the frontal surface area has been lowered pretty significantly.
is that a 20'' OEM wheel (offset is +35)?
so you run 20mm spacer front and 25mm spacer rear on +35 wheels front/back?
looks great!
Yea stock 20" wheel, not sure the exact offset.
Tim@adonisdetail
Former Vendor
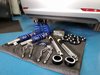
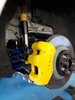

A few pics from the installation:
It’s nice to see all the parts spread out.
Yellow caliper looks great. Looks like it was spray painted without removing it from the car.
Riddle me this, why do the MPP instructions say to remove the OEM bump rubber and dust boot from the rear shock? They come with these as new components right?
Yes. You can see this in the picture of the various kits on their website.
Last edited:
Riddle me this, why do the MPP instructions say to remove the OEM bump rubber and dust boot from the rear shock? They come with these as new components right?
That wording is confusing. We wanted to make sure people don't use those components, but let's update that now to be more clear!
Riddle me this, why do the MPP instructions say to remove the OEM bump rubber and dust boot from the rear shock? They come with these as new components right?
That wording is confusing. We wanted to make sure people don't use those components, but let's update that now to be more clear!
The dust cover is actually one of things I don’t like about the MPP coilovers. In all the pics I see there is always a decent amount of the piston rod showing...which I would presume predisposes it collecting dirt/sand. On the UPP and Redwood they use rubber accordion dust covers that cover and protect the entire piston rod. Any reason for using the sleeve vs rubber accordion? What holds the sleeve up when the shock is extended? In the pics of the rear it looks as if the dust cover is even sitting on top of the shock body and not really covering the piston rod at all. would think it should cover the bump stop as well no?
The dust cover is actually one of things I don’t like about the MPP coilovers. In all the pics I see there is always a decent amount of the piston rod showing...which I would presume predisposes it collecting dirt/sand. On the UPP and Redwood they use rubber accordion dust covers that cover and protect the entire piston rod. Any reason for using the sleeve vs rubber accordion? What holds the sleeve up when the shock is extended? In the pics of the rear it looks as if the dust cover is even sitting on top of the shock body and not really covering the piston rod at all. would think it should cover the bump stop as well no?
At ride height the piston rod is not exposed, you may be looking at photos of the coilovers at droop or uninstalled. Most aftermarket and offroad suspension do not use a rubber accordion like that. Ultimately the seal is responsible for keeping out dirt and debris. If you live in an area where this is a concern, there are readily available aftermarket solutions such as universal accordion boots and even some neoprene styles!
DrZoidberg
Member
Makes sense now. You mean to remove those from the OEM top hat, so that you end up using just the hat. The dust boot and bump rubber can be stuck on the hat. Now back to my rear ride height question...That wording is confusing. We wanted to make sure people don't use those components, but let's update that now to be more clear!
Similar threads
- Replies
- 7
- Views
- 2K
- Replies
- 14
- Views
- 3K
- Replies
- 14
- Views
- 3K