Welcome to Tesla Motors Club
Discuss Tesla's Model S, Model 3, Model X, Model Y, Cybertruck, Roadster and More.
Register

2014 P85 Gets a 2017 facelift using OEM parts

This site may earn commission on affiliate links.
Hi everyone,

I have a P85D that I am hoping to do an OEM bumper + hood refresh on. I have a few quick questions that hopefully a few of you will be able to answer.
  1. My frunk is a single latch, does the new hood require changing the latch in order to work properly? Maybe the striker can be changed?
  2. Since it is a dual motor, I have the smaller frunk. Do I need to change it somehow? I believe that will create a lot of issues.
  3. Do the plastic pieces around the frunk need to be changed to the new style? Windshield washers? Obviously you cannot change the cabin air duct, or at least not very reasonably as far as I can tell. I suspect you would have to change the frunk, which is likely not reasonable either?
I feel very confident about the bumper portion, but I have always seen some custom work to make either hood work well. My main concern is with water intrusion (my car has already had a fun history of that).

I am attaching a spreadsheet with a list of parts I have gathered from previous posts. Part numbers have been updated to reflect the most current revision available. I believe this is everything I need, but I would love for you to double-check it.

T
Hi everyone,

I have a P85D that I am hoping to do an OEM bumper + hood refresh on. I have a few quick questions that hopefully a few of you will be able to answer.
  1. My frunk is a single latch, does the new hood require changing the latch in order to work properly? Maybe the striker can be changed?
  2. Since it is a dual motor, I have the smaller frunk. Do I need to change it somehow? I believe that will create a lot of issues.
  3. Do the plastic pieces around the frunk need to be changed to the new style? Windshield washers? Obviously you cannot change the cabin air duct, or at least not very reasonably as far as I can tell. I suspect you would have to change the frunk, which is likely not reasonable either?
I feel very confident about the bumper portion, but I have always seen some custom work to make either hood work well. My main concern is with water intrusion (my car has already had a fun history of that).

I am attaching a spreadsheet with a list of parts I have gathered from previous posts. Part numbers have been updated to reflect the most current revision available. I believe this is everything I need, but I would love for you to double-check it.

Thanks.

The only parts are purchased were:
Bumper
Ankle catcher
Chrome v bar
Model x emblem
2 x bumper adaptors
top front apron molding
Undertray

I reused all the same bolts.
 
We / EVFIXME were thinking of putting a Refresh front bumper package for the Tesla community to buy.

Maybe first package will be the refreshed bumper and the second package will be the refreshed bumper and hood.
Hopefully will have it up soon.

I am definitely interested in this. My primary concern is with frunk sealing. I wonder how much easier/harder it is for the D frunks with single latches to seal correctly.

Wouldn’t it be a whole lot easier and probably more cost effective just to get the unplugged performance after market fascia? That is exactly what i did and it looks fantastic. No new hood required.

Yes, that would probably be easier. I have not done the cost calculations fully but I suspect the OEM hood + bumper will cost similar to the $3,000 that UP wants for their bumper. It looks good, but I prefer the OEM look even more and I believe I am willing to go through the effort to make it that way. Everyone is different, though, and UP is a completely understandable choice. If it were slightly cheaper I would likely go for them instead just to save time, but I currently have plenty of time for tweaking things as it is.

The only parts are purchased were:
Bumper
Ankle catcher
Chrome v bar
Model x emblem
2 x bumper adaptors
top front apron molding
Undertray

I reused all the same bolts.

I suspect you are using the old hood, correct? My current hood has a very small crease from a friend not closing the frunk properly, so I figured I might as well replace it with a new one anyway.
 
I am definitely interested in this. My primary concern is with frunk sealing. I wonder how much easier/harder it is for the D frunks with single latches


Yes, that would probably be easier. I have not done the cost calculations fully but I suspect the OEM hood + bumper will cost similar to the $3,000 that UP wants for their bumper. It looks good, but I prefer the OEM look even more and I believe I am willing to go through the effort to make it that way. Everyone is different, though, and UP is a completely understandable choice. If it were slightly cheaper I would likely go for them instead just to save time, but I currently have plenty of time for tweaking things as it is.


I suspect you are using the old hood, correct? My current hood has a very small crease from a friend not closing the frunk properly, so I figured I might as well replace it with a new one anyway.
I am definitely interested in this. My primary concern is with frunk sealing. I wonder how much easier/harder it is for the D frunks with single latches to seal correctly.


Yes, that would probably be easier. I have not done the cost calculations fully but I suspect the OEM hood + bumper will cost similar to the $3,000 that UP wants for their bumper. It looks good, but I prefer the OEM look even more and I believe I am willing to go through the effort to make it that way. Everyone is different, though, and UP is a completely understandable choice. If it were slightly cheaper I would likely go for them instead just to save time, but I currently have plenty of time for tweaking things as it is.


I suspect you are using the old hood, correct? My current hood has a very small crease from a friend not closing the frunk properly, so I figured I might as well replace it with a new one anyway.


My hood has a small crease as well. My body shop wanted an additional 800 to fix. I decided to hold off as I want to wait a year if I trade this one in.

I want to PPF the bumper so I’m deciding if it really necessary to repair the hood and PPF that as well.

I have a single latch and it closes fine. You can also adjust the latch to make adjustments. Just like the hood.

I reused old louvres and if I can do it all again I’d purchase the facelift ones on eBay. As cutting the template can be tricky
 
  • Like
Reactions: SUPRKAR
Original hood , all oem parts , I cut the emblem and angled it to fit the curvature better. But definitely worth it since it cost me half the cost of the unplugged bumper painted (by my paint guy including side skirts and diffuser fins) and installed by me. Underbite doesn’t bother me and I have the dual hinge so I kept everything original on the hood.
 

Attachments

  • 7C78337D-5B42-4AA6-9DFF-65D619820F1A.jpeg
    7C78337D-5B42-4AA6-9DFF-65D619820F1A.jpeg
    328.9 KB · Views: 406
  • AA2D07AE-8518-4531-907D-0DDBEAAC9D13.jpeg
    AA2D07AE-8518-4531-907D-0DDBEAAC9D13.jpeg
    513.3 KB · Views: 353
These are the part list we used. Most other parts you can use from your old bumper.

T BADGE SUPPORT 1062472-00-F 1
TESLA BADGE “T” FRONT 1056386-00-F 1
FRONT UPPER GRILLE BRIGHT TRIM 1065233-00- D 1
FASCIA SUPPORT BRACKET - LEFT 1061331-00-B 1
FASCIA SUPPORT BRACKET - RIGHT 1061332-00-B 1
BLT HF M6-1.00Xx20 [8.8] ZnAlW 1009420-00-A 2
FRONT FASCIA UPPER GRILLE COVER 1057847-00-E 1
FRONT FASCIA GRILLE COVER - RIGHT 1057850-00-C 1
TOW HOOK COVER 1057845-00-C 1

This is the part list without the upgraded louvers.
 

Attachments

  • 116742308_620075905281992_5221078059855495262_n(1).jpg
    116742308_620075905281992_5221078059855495262_n(1).jpg
    135.4 KB · Views: 342
Last edited:
There are some ways to extend the Oem prefacelift hood to get rid of the underbite as well as the gap. The latch can be moved down to eliminate the gap and the hood mounting points can slide forward on both top and bottom giving you about and inch and a 1/2 to help with the protruding bumper

This is with the prefacelift hood
View attachment 526808
View attachment 526809
View attachment 526810
Didn’t use any gap filler. I changed to a facelift hood cuz I’m too ocd but you can do some tricks to still make it look good without. I would recommend using a mesh grill over any advice since the Autopilot can work with no issues without cutting it
View attachment 526813 View attachment 526811 View attachment 526814 View attachment 526812
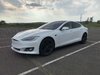
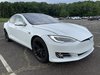
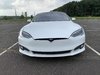
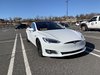
For those using a prefacelift hood these are must do’s to make it look as good as possible:
I have had a lot of members call me to help them with the facelift conversion and here are the best tips you should do. I enjoy helping ppl and have spent hrs trying to explain what u can do via phone call. I’ve been asked to make a video but I am not into doing all that nor do I want any type of notoriety or credit and definitely don’t want some YouTube fame in fact I don’t like social media at all and don’t want to be on camera. I just like helping others especially if they are less handy, and something that seems so simple to me can be extremely difficult for others. It takes me anywhere from 30 min to an hr to do the full conversion once the bumper has been painted. But for others it can be hrs or days so hopefully this helps anyone struggling.
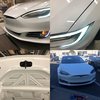
The ankle catcher is very crucial to make the bumper get pulled downward which will allow the gap to minimized by allowing you to lower the latch as far as possible. Adjusting the hood to slide forward will allow it to not hit the headlights and also make the gap smaller while minimizing the underbite. To adjust the hood loosen the top and bottom brackets and pull it. Do the bottom first and while you tighten it make sure that u r pulling it so that it will slide as far as possible. The top bolts/brackets will not slide as far forward but still will. Use a Model X T Badge (pics are of an S t badge but an X will fill the gap better) and cut it to angle so that it gives it less space and makes the underbite appear less.
You can also use a facelift striker even tho you will only be able to mount it with one screw so you must tighten the *sugar* out of it. Or try finding one from another car that will fit the holes to mount it
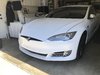
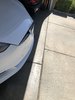
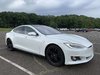
Here’s pics with a prefacelift hood and no gap filler etc. if you have issues with the bumper not being perfectly flush with the headlights put washers under the t badge support that screw into the headlight brackets to raise it. If the bumper is sticking out right at the end where it meant the headlights make sure to push it to exactly where you want it to be than tighten the bolts all the way. Use the plastic piece that will be above the badge support and screw it into the t badge support to help fill the gap. Use very small screws in length and width so that are not noticeable. Make sure to cut the t badge support so that it is no hitting anything. In fact cut it so that the two mounting holes in the back are gone cuz they are not necessary anyways and it will make sure there is no obstruction from the battery terminal or homelink. Use a mesh grill and the Autopilot will work without having to cut an opening

If anyone wants this done, I can do it and have all the parts necessary. If you live in So Cal, AZ or Vegas I can do it at you house. Right now I have one facelift bumper unpainted but may have another if I decide to install my prior design bumper instead that’s painted black. I can even do a complete body kit install as well. Message me for details
I prefer using a facelift hood cause I like it to be perfect cause I’m OCD. The carbon fiber hood is a facelift hood in the pics. Make sure to remove the latch and add washers to extend the latch to account the the longer hood when using a facelift hood
View attachment 528875 View attachment 528876 View attachment 528878 View attachment 528877
View attachment 528883 View attachment 528880 View attachment 528881 View attachment 528882

Hello, I live in AZ and have a 2015 P85D and looking to do a refresh bumper on my S. Is there a way I can contact you? Thanks.
 
Hi everyone,

Just want to add something to this thread to share my experience on the facelift upgrade. I used all my OEM parts and a couple of my weekend to figure this out.

For those of you who want to put a new hood but not sure what to expect on the work, I used a quick and dirty way to make it fit. Just move the old latch to the new hood and adjust the length. The car looks pretty decent even with the old hood but will look much completed with the new hood on.

Here are some pictures of my car (2012 S) with full facelift upgrade done and one with the old hood on.
 

Attachments

  • IMG_0475.jpg
    IMG_0475.jpg
    566.1 KB · Views: 322
  • IMG_0482.jpg
    IMG_0482.jpg
    609.4 KB · Views: 280
  • IMG_0481.jpg
    IMG_0481.jpg
    489.2 KB · Views: 278
  • IMG_0473.jpg
    IMG_0473.jpg
    658.5 KB · Views: 278
  • IMG_0482.jpg
    IMG_0482.jpg
    609.4 KB · Views: 274
  • IMG_7237.jpg
    IMG_7237.jpg
    682.3 KB · Views: 338
  • Like
  • Informative
Reactions: ragedogg69 and WASD
Hi everyone,

Just want to add something to this thread to share my experience on the facelift upgrade. I used all my OEM parts and a couple of my weekend to figure this out.

For those of you who want to put a new hood but not sure what to expect on the work, I used a quick and dirty way to make it fit. Just move the old latch to the new hood and adjust the length. The car looks pretty decent even with the old hood but will look much completed with the new hood on.

Here are some pictures of my car (2012 S) with full facelift upgrade done and one with the old hood on.

Very nice. Any issues with water intrusion? Do you have a list of the parts you used?
 
Hi everyone,

Just want to add something to this thread to share my experience on the facelift upgrade. I used all my OEM parts and a couple of my weekend to figure this out.

For those of you who want to put a new hood but not sure what to expect on the work, I used a quick and dirty way to make it fit. Just move the old latch to the new hood and adjust the length. The car looks pretty decent even with the old hood but will look much completed with the new hood on.

Here are some pictures of my car (2012 S) with full facelift upgrade done and one with the old hood on.

This is good! You even retrofitted the headlights as well? I recall seeing a member attempting this, but had a function that didn't quite work as it should. Did you make everything work properly?

While you're going for the refresh, might as well change out the side markers! Your hardware probably won't make use of the camera, but at least it'll look refreshed! :D
 
Very nice. Any issues with water intrusion? Do you have a list of the parts you used?
I had some pretty bad storms after the installation and had to drive in one of them, even took the car to the powerwash before taking the picture. Looks like the seal is pretty decent and there is no water getting into the frunk.

The part I used is pretty much the same as shown on page 1 of this thread, I'll get a detailed list later. A pair of the new louver is highly recommended, it will save you a lot of time trying to cut the bumper to fit.
 
This is good! You even retrofitted the headlights as well? I recall seeing a member attempting this, but had a function that didn't quite work as it should. Did you make everything work properly?

While you're going for the refresh, might as well change out the side markers! Your hardware probably won't make use of the camera, but at least it'll look refreshed! :D
Thank you, I'll probably keep the side skirt since I'm not going to change the rear bumper and they seem to fit it better than all white.

The headlights work 100% as well. there are a couple of options now to make it work. I personally purchased a pair with a modified control module since I don't like too many aftermarket parts hanging around in the frunk.

Nice, do you have links to the control module? I have a facelift, so it's not for myself, but I am always fascinated to learn more about these things. Having said that, the older headlights actually have better output than the LED lights. However, aesthetics though, the LED lights looks cleaner.