Welcome to Tesla Motors Club
Discuss Tesla's Model S, Model 3, Model X, Model Y, Cybertruck, Roadster and More.
Register
This site may earn commission on affiliate links.
How do we know which LDUs are liquid cooled? I thought they are were.

Tesla has multiple motor designs. I think only LDU is coolant cooled. Sounds like P*D rear motor is LDU according to this post

 
  • Informative
  • Like
Reactions: vanR and Droschke
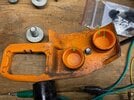
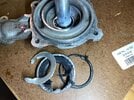
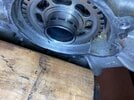
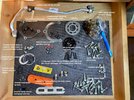
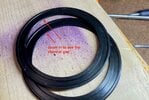
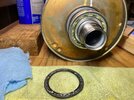
BTW, here is an easy positive test there is coolant in the inverter. There will be coolant on the inside of the orange cover behind the o-ring seal. Here is a pic after I've had it out for a couple of days and dried a bit. It was coolant color and slightly more than in this pic. Of course if it is all clean, it does not confirm no coolant in inverter chamber.

In my case, coolant showed on this cover before it has made its way onto the control boards (just corrosion on the grounding fingers and 1/2" of wicking on white wire bundles at the lowest point)

Removing the B+ B- bolts may also reveal more. Bolts have washer behind it which blocks the view. I thought it looked "dirtier" than I expected after bolt removal but forgot to take a pic. Only realized why after inverter case opening. Of course removing these requires comfort level handling deadly HV. Read the website link in my signature for more info.

One note is by the time coolant has reached this cover, the speed sensor on the motor side should be plenty wet. So definitely do that first. Only if thats wet and want to now how affected inverter could be... do this test. Again, even if clean, doesn't give you a true negative. I suppose it is possible coolant leak can come from coolant channels in the inverter rather than motor seal. But the common case seems to be motor seal causing collateral damage.

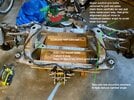
But it is clear why drain is a must and QC Charge's sump enhancement (presumably inverter case is modified to add more depth (sump or coolant pan if you want to think of it that way) As noted in another thread ( link ), only 1/16" gap is between housing and bottom of electronics.

IMG_2620.jpeg
 
Last edited:
  • Like
Reactions: Droschke and vanR
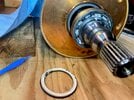
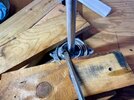
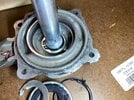
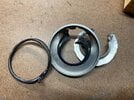
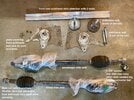
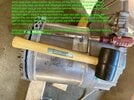
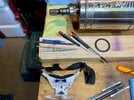
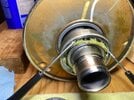
Removed the coolant seal. My method of destructive removal is here by VanR. I got the seal to come out a little with the channel lock like the video. A big screwdriver lever on a piece of wood was a little easier for me. But need to hold everything down firmly along with a wood lever (couple of 2x4s and 1/2") Attached pic shows the setup (seal already out, just showing the setup positioning)


IMG_2629.jpeg

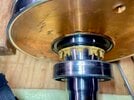
I think cutting off the top cage casing is a must to weaken it as there is another layer of stainless cage casing under the seal. Mine remanufactured RevQ seal was single lipped in stainless steel cage. There is also a bead of RTV under the seal cage where it mates. Almost looked like an o-ring.

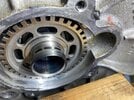
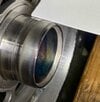
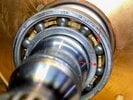
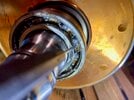
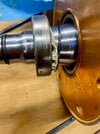
My shaft had the slightest unevenness can be felt with finger and fingernail. But pictures shows a track pattern thats not visible to the eye (and look much worse) Its the reluctor wheel reflection. See last pic for no reflection.

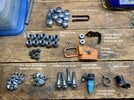
IMG_2621.jpegIMG_2622.jpegIMG_2625.jpegIMG_2623.jpegIMG_2624.jpegIMG_2626.jpeg
 
Last edited:
So just to quantify the scope of this issue…

Are we basically saying that EVERY 2012-2020 Model S (and X?) with a LDU will need it replaced multiple times to make it to 150k miles at a cost of $4500+ Each time?

And the only real way to see if trouble is coming is check the speed sensor?

I understand that many vehicles are still under the drivetrain warranty, but how has this not been more publicized?

Is there not some other slightly more viscous coolant we could use that won’t push past the seal, or at least won’t cause damage to the electronics / stator If it gets past?
 
  • Like
Reactions: Hank42
The small drive unit is the solution. Making it work in the rear will be the challenge.

Not economical now but .....

Or front wheel drive mod?

I don't think so. The solution isn't heavily modifying the vehicle to downgrade it, and basically making it unserviceable by any mechanic.

I am curious, however, if there are waterless coolants like those used in liquid cooled PCs that would make the issue with the seal irrelevant. It sounds like the key issue with the leaking coolant is that the standard stuff (G48) is still pretty "normal" coolant, and thus contains water and thus causes corrosion and issues when it leaks past a seal. I wonder if a waterless coolant would prevent the corrosion issues, and while it's not a true fix, it might prevent the symptoms of the weak seal.

Because it's true, anything that's super thin will inevitably push past a single seal, especially when you're running 9k rpm at highway speed. Thoughts?
 
Last edited:
I don't think so. The solution isn't heavily modifying the vehicle to downgrade it, and basically making it unserviceable by any mechanic.

I am curious, however, if there are waterless coolants like those used in liquid cooled PCs that would make the issue with the seal irrelevant. It sounds like the key issue with the leaking coolant is that the standard stuff (G48) is still pretty "normal" coolant, and thus contains water and thus causes corrosion and issues when it leaks past a seal. I wonder if a waterless coolant would prevent the corrosion issues, and while it's not a true fix, it might prevent the symptoms of the weak seal.

Because it's true, anything that's super thin will inevitably push past a single seal, especially when you're running 9k rpm at highway speed. Thoughts?
[/QUOTE
If the coolant lines go into a small radiator that cools oil in drive unit then that could be the work around.
 
I think a possible cooling mod would be the following

- Cool inverter and motor windings with coolant
- Cool motor rotor with oil, cool oil with coolant through heat exchanger (common matured tech to cool ATF. Most radiators are sandwiched coolant and ATF coolers where ATF end up matching temp of coolant)
- Doesn't seem to hard to do the plumbing change.

BIggest challenge is how to circulate the oil. Mechanical driven pump perhaps most reliable. Electric driven pump would need to tap power supply somewhere.

10k RPM oil seal is not a guarantee to not leak but perhaps will last a bit longer (like front and rear main seal on a gas engine) and likely less collateral damage. But some one would need to setup a jig to test and evaluate design choices.
 
  • Like
  • Informative
Reactions: Olle and Droschke
In the service manual, it seems like the cooling system is one giant system that cools both the battery and the LDU from the same reservoir. Any reference to bleeding the coolant from the battery or LDU has you working with the same reservoir up front.

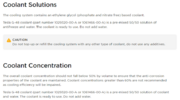
The OEM coolant is a G-48 concentrate, mixed with water. So, I'm curious - does the damage caused by fluid passing the seal come from the water or from both the coolant and water?

Dielectric coolants are very popular in fully-immersed crypto mining rigs that require great heat dissipation along with electronic sensitivities.....I'm curious if it might be applicable in this case as well.

Alternatively, since HOAT Phosphate-Free coolant (aka G-48) is supposed to be non-corrosive by itself, could we run straight coolant and no water? (knowing the cooling won't be as efficient, but the BMS should regulate that, no?)

Or just change our our coolant every couple years / 30k miles to prevent contamination?

Or mix the G-48 with Water Wetter instead of water? I've had great success with that product in older ICE cars that liked to overheat...It is also advertised as a corrosion preventer.

These may very well be very stupid questions....I'm not an expert. But since the issue here seems to be corrosion on the inverter electronics and windings, I'm trying to identify some alternatives to make our current LDU's last without a rebuild that'll have the same problems.

It's an annoyance when it fails under warranty, it's a nightmare once the warranty expires.
 

Attachments

  • 1663555371238.png
    1663555371238.png
    66.1 KB · Views: 306
Last edited:
  • Like
Reactions: Olle
In the service manual, it seems like the cooling system is one giant system that cools both the battery and the LDU from the same reservoir. Any reference to bleeding the coolant from the battery or LDU has you working with the same reservoir up front.

The OEM coolant is a G-48 concentrate, mixed with water. So, I'm curious - does the damage caused by fluid passing the seal come from the water or from both the coolant and water?

Dielectric coolants are very popular in fully-immersed crypto mining rigs that require great heat dissipation along with electronic sensitivities.....I'm curious if it might be applicable in this case as well.

Alternatively, since HOAT Phosphate-Free coolant (aka G-48) is supposed to be non-corrosive by itself, could we run straight coolant and no water? (knowing the cooling won't be as efficient, but the BMS should regulate that, no?)

Or just change our our coolant every couple years / 30k miles to prevent contamination?

Or mix the G-48 with Water Wetter instead of water? I've had great success with that product in older ICE cars that liked to overheat...It is also advertised as a corrosion preventer.

These may very well be very stupid questions....I'm not an expert. But since the issue here seems to be corrosion on the inverter electronics and windings, I'm trying to identify some alternatives to make our current LDU's last without a rebuild that'll have the same problems.

It's an annoyance when it fails under warranty, it's a nightmare once the warranty expires.

Service manual says use run toolbox to help bleed the system when remove/install only LDU. Seen an online video that probably didn't use toolbox and system looked like it bled itself over time. Not sure yet.

Coolant will trash the bearings as well so best keep it out of there. Not sure windings are happy soaked in pure coolant. Probably want to avoid coating the ground ring and not sure about possible intrusion into gear box via primary gear seal. Don't know about submerging electronics (especially HV) in pure coolant. Never seen it done. In general doesn't sound like a good idea to let coolant run wild in all these areas.

And yes, >8 year post drive train honeymoon on EV means big ticket items like battery ( >= residual value of car which results in salvage status) is on customer's dime. Model S tacks on LDU.
 
  • Informative
Reactions: Droschke
Service manual says use run toolbox to help bleed the system when remove/install only LDU. Seen an online video that probably didn't use toolbox and system looked like it bled itself over time. Not sure yet.

Coolant will trash the bearings as well so best keep it out of there. Not sure windings are happy soaked in pure coolant. Probably want to avoid coating the ground ring and not sure about possible intrusion into gear box via primary gear seal. Don't know about submerging electronics (especially HV) in pure coolant. Never seen it done. In general doesn't sound like a good idea to let coolant run wild in all these areas.

And yes, >8 year post drive train honeymoon on EV means big ticket items like battery ( >= residual value of car which results in salvage status) is on customer's dime. Model S tacks on LDU.

All very fair points. So then, @XcelerateAuto, how's that Battery and Drive Unit warranty program coming along?
 
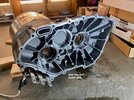
Here are some tricky points on LDU disassembly

Inverter temp sensor wire disassembly

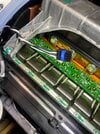
The popup blue tab lever point is really fragile. Only got 1 side to lift up. Used xacto knife to tug under and lift the other side (help down by just a couple of small lips)

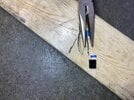
Pulling each connector pins took more force than I thought. Used my biggest needle nose. Grab wire length wise might more eventually distribute the gripping force from the plier. I've disassembled many connector before. Usually have a tab to lift to release the pin. This one has no easy lifting tab per pin.

4 wires are alternating colors. took a pic for reassembly reference. Labeled 1 color pair (2 different color wires). Very thin tunnel to get the wires out so just in case labels gets dislodged. Put perm marker on 1 color pair (on the silver pin since 1 wire is black)

IMG_2645.jpegIMG_2702.jpeg

Removing Primary Shaft

Had to tap mine out like this

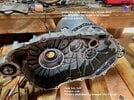
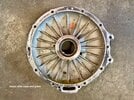
Cracking open the motor side end plate

IMG_2700.jpeg

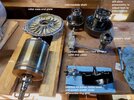
Removing the rotor

My bearing on the gearbox side was stuck on so couldn't get rotor out. Rebuilder tech suggested sometimes thats the case. Here is how I got it out and hope the bearing survived (so can clean and repack this expensive bearing) Read this and my follow on +2 +4 post.

Tesla Large Drive Unit (LDU) Motor Teardown and maintenance - Page 6 - openinverter forum

Probably want to clean all grease off rotor spline before removal to avoid dirtying up anything coming out of the tunnel. Aegis ground ring suppose to be there but I haven't found it haha. Bagged up the grease per VanR's directions for reuse since its unknown (to us) type.

The heaviest Part of LDU

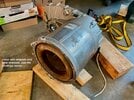
The windings are the single heaviest part of the LDU. The motor 1/2 of the LDU with rotor and all gears remove is really heavy. Probably > 100lb by itself. Just FYI for manipulating parts around. Other parts aren't too bad. Even the inverter half isn't too heavy (just electronics and casing)

====

Onto evaluating damage, repack expensive silicon nitride bearing if savable, securing parts (Tesla does make this hard and disabling DIYs and making it hard on independents), reassemble and test drive (I can dream right? haha).
 
Last edited:
I wonder if a waterless coolant would prevent the corrosion issues, and while it's not a true fix, it might prevent the symptoms of the weak seal.

I had the same thought yesterday, and sure enough, Googled "tesla waterless coolant" and wound up here, Thanks! I'd already written the below before I got that far.

---

My thought on legacy Tesla LDU rotor shaft leakage: minimize inverter damage and corrosion by removing water as the cooling media, ie use waterless coolant.

Glycol does not transfer heat as efficiently as a water/glycol mix . . . but, the LDU doesn't have a whole lot of heat to be removed, and the water pump is variable-speed. Glycol's freeze point is also marginally higher than water/glycol, at -40°(C/F: they're the same at that particular number).

Evans HIgh Performance Waterless Coolant (USD$52/gallon) is a possibility. Considerable care must be taken to remove as much water in the system as possible, which is quite difficult on our systems. Evans supplies a "prep" fluid to "water-down the water" so to speak, which is less expensive than using the coolant itself as a flush (USD$33/gallon), which is used as a flushing agent.

A leak of waterless coolant into the inverter might be less harmful, because it shouldn't encourage the wholesale corrosion we see with the water portion of the G48 mix. I've seen YT-ers pour the stuff, it looks to be similar viscosity at room temp as conventional coolant, so our electric pump should be able to push it, which might be more of a problem with a light oil (though I do not know; I don't work with PC cooling fluids).

---

There's a note on the Evans site about using their coolant in combination with a flexible impeller pump at low temperatures that indicates a possible failure of the impeller:

If your A4 1.8L turbo has a separate pump that circulates engine coolant though the turbo and you live in a climate that the outside air temperature can reach freezing we do not suggest the use of Evans High Performance coolant. Reason is the impeller of the aux. pump is rubber and will not circulate the High Performance Coolant in temperatures below freezing. This results in a broken pump impeller and no coolant circulation for the turbo.

As I already own a spare used Tesla coolant pump, I think I'll pick up a gallon of this Evans stuff, an inexpensive PWM driver to regulate the drive speed of the Tesla pump, and test it in my freezer, in the name of science. See if the parts break at cold temps. Unlike the Audi example cited, I kind of doubt that the Tesla thermal controller would be demanding high output of the LDU coolant pump in freezing temps; it's more likely to be commanded to run at some minimum output until some thermal threshold is achieved, and then ramp up.
 
Found both of rotor's non conductive bearing's grease completely shot from the coolant. The inner one (closer to gearbox) was worse than the outer one that is actually closer to the leaked seal. Rotor and stator surface also had rust on the inner end. Based on this and the inverter housing coolant location. LDU likely has a slight tilt towards passenger side when parked. Could be garage floor, subframe or LDU mount. Could be different depending on car and parking location and inverter drain mod may need to tap both end of casing. Pics here

Tesla Large Drive Unit (LDU) Motor Teardown and maintenance - Page 6 - openinverter forum

The non conductive rotor bearings (SFK hybrid bearing with silicon nitride non conductive balls) seems quite durable even though grease have long turned into something that looked and feel like cake icing. Additional tips on cleaning them off for re-grease per @vanR's method in initial post

@vanR method doesn't remove the bearings but pop open both bearing seal and ball cage for cleaning while bearing is on the shaft. Its not easy to remove the bearing off the shaft on the inner ring face without potential damage (not much surface on inner ring face beyond the limit stop on the shaft)

Note this cleaning can take a couple of hours per bearing and will prep you for a dental hygienist qualifying examine :) but new bearings at $400 each so figure you are earning $200/hr. Here are some of the tools you need

- finest tip flat head (2x)
- plastic pick/lever, fine tip metal pick,
- fine tip tweezer
- qtips (ideally ones that cotton fibers threads don't get loose or you may need to pick those out after cleaning, blue colored in my case)
- magnifying eye wear is really helpful to see close up and all details
IMG_2716 (1).jpeg

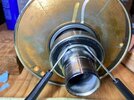
Pop off the outer seal (seal facing away from the rotor)

The seal has a metal body but coated with rubber on the outside. Top of the seal goes into a groove in the outer ring of the bearing. Botton of the seal is rubber that extend beyond the metal body which can be used to gain entry. Use your finest flat head screw driver to gain entry and eventually can leverage the top metal lip out of the bearing outer ring groove. Be careful as the internal ball bearing cage is plastic so don't want to break anything.

Note my spline side bearing was much worse caked than coolant seal side. Also note the bearing cages are facing different direction on both (this changes how to get them out and ease of cleaning)
IMG_2722.jpegIMG_2723.jpegIMG_2705.jpeg

Get as much cake icing off as possible dry

Per @vanR, used acetone to clean off the gunk. But thats a thinner so just keeps on thinning the gunk. Good first step is to get as much of it out dry as possible. Takes longer thinning down the big chunks.

Pulling ball cage that comes out away from rotor

My coolant side bearing has cage that comes out away from the rotor. This cage can actually be completely removed (makes cleaning much easier) To remove, gently lever it out. 2 flat head fine tip drivers is helpful. After removal, dry clean off the big chunks followed by acetone + qtip.
IMG_2724.jpeg

Pushing rear seal out

When the cage is removed, popping out the rear seal is actually quite difficult (much easier when cage is oriented the other way, see later section) Top metal body of the rear seal is stuck in bearing ring groove. End up using 2 broad and not sharp flat tipped tool about 1/2" to 1" apart to push the top metal lip out with a bit of force.

Pushing ball cage that goes towards the rotor

Cage has 2 arms that warps around the ball bearing in the center (think of equator) The trick to push the cage of the ball is to slightly bend this wrapping structure upwards so it clears the narrow part of the ball bearing (near north pole?) Do this to a couple of adjacent ball bearing cage arms and the cage will start to move backwards. The rear seal is relatively easy to push out. I think its because the cage have a large flat body in the back that pushes the seal out. So perhaps a tool with large thick flat frontal tip is whats necessary to push the other rear seal out (one with cage removed)
IMG_2706.jpegIMG_2707.jpegIMG_2709.jpeg

Cleaning the cage between bearing and rear seal/rotor

This where you will earn your dental hygienist degree. Lots of crevasses to get to and bottom of the cage. Back of the cage has narrow curves in both direction. Also need to get to the under side of the cage (inner ring) A fine pointy tip is good. Perhaps a sewing needle is good as its short enabling more positioning angles. Pulling paper towel pieces through is helpful
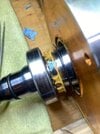
IMG_2719.jpeg

Get Some Grease

Here are the results. My pried out seal had no damage except maybe a slight bend where it was levered out. Easy to straighten the seal's metal frame. Need special grease. Review @vanR's video. Website in my signature has pointers.
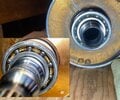
IMG_2755 (1).jpeg

Hope the rotor spline side bearing is still good (will find out after greased) Had to hammer the rotor out as that bearing was stuck in its sleeve.
 
Last edited:
Forgot 2 more tiny details on SKF hybrid bearing cleaning

The inner circumference of the seal has a channel that the gunk stays in. For the seal that stays on the shaft, hard to see and hard to get to. Just know there is a nice coat of icing in there even after everything looks clean. @vanR suggest don't use acetone on the rubberized seals so the gunk there don't get a chance to thin out. Clean it out with a pointy q-tip.

IMG_2756.jpeg

When you think all done with cleaning and put the cage back on around the balls (but before putting seal and grease back on). Spinning the bearing will gather a little bit more gunk and scrap them off right at the seam where cage arms wraps around each ball. So spin it a few times and go over all the balls to clean this off. Which side of the arm probably depends on the natural spin direction bias from left or right handedness.

IMG_2721 (2).jpeg
 
Last edited:
My Rev Q reman LDU was installed in 2017 at 40k miles (now 72k mi so I do 6k/year). My had a light whine under certain conditions since the beginning and new higher pitch noise at all speeds recently. But most people don't notice. I seem to be good at picking up slightest sound changes.
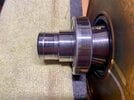
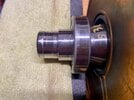
Saw the thread to pull speed sensor to check for coolant so checked and bingo... coolant. Did a bunch of research (seal design, material, application, contacted seal manufacturers etc.). My conclusion is no seal is going to keep really low viscosity and slippery coolant from leaking beyond few 10k miles in this application. All seals in traditional cars prevent much thicker oil from leaking. Completely different than trying to keep coolant from leaking. This design is probably beyond what is possible. Tesla tried changing deal design and seemingly only got worse.

Regarding failure rate and why there is more noise now.. I think its because 2012-14 Model S's are coming off warranty honeymoon. Most LDU cars has had multiple LDUs under Tesla's 8 year unlimited mile warranty (Mine was 3rd at 40k miles) so no one cared. Most car's LDUs were getting swapped out by Tesla every few 10k miles. My guess is Tesla saw plenty seal leaks and made effort to change them without success. Now warranty honeymoon is over, next LDU change cost is on the owner and quite expensive... thus, the increase in thread traffic. 2015s starts coming off 8 year warranty in 2023 so noise is probably going to continually increase.

Don't know if P90D has the coolant cooled induction LDU in the rear. If so, best check annually and my guess is need to plan on seal change say every 30k miles. Non Tesla rebuilders are adding drain modifications to keep the collateral damage down. These might last longer before self destruct. Tesla still installing the same problematic design.

Note > 100k mile battery failures are not uncommon so some people get the double whammy as thread traffic shows. So we really have 2 big $$$ maintenance risk at ~8+ year mark.
I am probably in a similar situation. I have a revQ DU installed in 2020. Previous owner told me it was replaced at 47k miles, but after my visit to the SC this past week to ask some questions (I need a tow hook and had questions about a brake job) the DU was replaced w/ 30k miles. The car now has 65k miles and thus I am about at the same mileage you are when your DU failed. I just bought the jack pads and another low profile HF jack to match my older one which is 3ton to get the rear end of the car up in the air and do some research by checking the speed sensor.

You did an amazing job getting the car up in the air without a 2 post lift and performing this by yourself - you are an official badass.

I contribute to the openinverter forum as well on this topic and want a custom 3 lip seal for DIY and see you on there w/ Johan. I have a transmission jack which says it's capable of 800 pounds - I used it on my old honda accord. The base plate is about 9" wide square and has extensions. I was curious if you think this could be used instead of the motorcycle jack for the entire DU - it does have holes which can be used to bolt a larger assembly to it. I also have a pallet jack available, but not sure I can get enough height with it.

Thank you so much for this writeup.. I am starting to feel like i'll end up having too much money in my 2013 Model S P85 from what it looks like at this point. Fortunately the battery still has a 3+ yr warranty (Replaced originally December 2021 $14k, failed 4/21 replaced under warranty). My goal is to get the drain lines in, and use an automotive grade microcontroller to sense the coolant on the different drain lines and eventually send the data over canbus where it can alarm in the cabin or an audible piezometer. I think you are 100% right at this point that we cannot guarantee the seal won't leak and avoiding catastrophic failure is all we can do w/ the drains. I'll be happy if I can get 100k out of a rebuilt DU. There is another 2014 model s owner on here w/ 353k miles on his car and 250k on the last large drive unit replaced in 2016/2017 - (I don't know what rev he has) but it must be the 3 lip seal to get this far.
 
  • Like
Reactions: Gtech and vanR
I am probably in a similar situation. I have a revQ DU installed in 2020. Previous owner told me it was replaced at 47k miles, but after my visit to the SC this past week to ask some questions (I need a tow hook and had questions about a brake job) the DU was replaced w/ 30k miles. The car now has 65k miles and thus I am about at the same mileage you are when your DU failed. I just bought the jack pads and another low profile HF jack to match my older one which is 3ton to get the rear end of the car up in the air and do some research by checking the speed sensor.

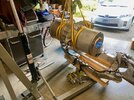
One floor jack is sufficient to get both tires up sitting on ~6" of wood to safely crawl under to remove the mid aero shield to check speed sensor. Just need to alternate between driver/passenger side a couple of times while building up height.

Regarding failure at 32k on reman RevQ, I'm guessing mine has been leaking for awhile judging by the rust on the rotor but no way to know for sure. Could have been much sooner. Just don't know.

If you do want to use the cedar cross beam to put the rear end on jack stands, may want to borrow 3rd floor jack to minimize bowing in center beam when lifting both ends of the beam.

You did an amazing job getting the car up in the air without a 2 post lift and performing this by yourself - you are an official badass.

I contribute to the openinverter forum as well on this topic and want a custom 3 lip seal for DIY and see you on there w/ Johan. I have a transmission jack which says it's capable of 800 pounds - I used it on my old honda accord. The base plate is about 9" wide square and has extensions. I was curious if you think this could be used instead of the motorcycle jack for the entire DU - it does have holes which can be used to bolt a larger assembly to it. I also have a pallet jack available, but not sure I can get enough height with it.

9" square platform should work if you find center of gravity (CG) on the drop. I was surprised by how stable the motor cycle jack was once CGed. Good trick is to safely land the subframe+LDU on something (jackstands in my case, had 6 total, 2x for rear lift pad, 4x for safety dropping subframe) after the 4 subframe bolts are removed and dropped a few inches. If not CGed (most likely won't be), subframe will tilt towards driver side as motor windings and rotor is where most of the weight is. The round inverter chamber looks same size as rotor but much lighter with electronics. So safely land it on something while reposition the tranny jack for CG.

If the tranny jack has an angled lifting arm (instead of scissor) then need to do the repeated 1/2" drop slide tranny jack/subframe assembly forward/backward 1/2" (backwards in my case) for few inches until the subframe clears the mid aero shield screw/bolt tabs. Have a 2nd person to help spot.

Thank you so much for this writeup.. I am starting to feel like i'll end up having too much money in my 2013 Model S P85 from what it looks like at this point. Fortunately the battery still has a 3+ yr warranty (Replaced originally December 2021 $14k, failed 4/21 replaced under warranty). My goal is to get the drain lines in, and use an automotive grade microcontroller to sense the coolant on the different drain lines and eventually send the data over canbus where it can alarm in the cabin or an audible piezometer. I think you are 100% right at this point that we cannot guarantee the seal won't leak and avoiding catastrophic failure is all we can do w/ the drains. I'll be happy if I can get 100k out of a rebuilt DU. There is another 2014 model s owner on here w/ 353k miles on his car and 250k on the last large drive unit replaced in 2016/2017 - (I don't know what rev he has) but it must be the 3 lip seal to get this far.

QC Charge tech @ajbessinger says they see many lower mileage LDUs with leak. So I'm guessing the the failure mode could be parking duration + reverse rather than many miles of forward rotation. @ajbessinger guess it could be sticking from parking. Not sure how one can confirm. Seal testing facilities probably can best answer. My shaft have some kind of stain along entire circumference seemingly at where the PTFE lips makes contact. Maybe is worn PTFE material embedding into the shaft surface? Anyway, there is a single spot along the circumference of the shaft where some kind of tapered hazy stain beyond the seal lips on the wet side. Hard to capture on camera with all the reflections but visually noticeable. Thinking about what this might be... doesn't seem like the rotor will sit at same rotation orientation on every park

IMG_2818.jpegIMG_2819.jpeg


In my case, if it wasn't for the faint high pitch new noise, I probably wouldn't have googled and found the speed sensor removal test. Who knows, maybe could have gotten another 5 or 50k miles before louder bearing noise or catastrophic inverter or winding isolation failure. An interesting question on higher mileage DUs without catastrophic failures is if they have leaks. Wouldn't know unless one checked speed sensor. Maybe even speed sensor won't show if just the minutest of leak

====

Now onto finding and sourcing genuine bearings (a lot harder than I thought it would be). May have damaged an expensive ceramic bearing having to hammer out the rotor :( (think there is a way to get stuck rotor out safely. update at bottom of this post) Will post more updates soon.
 
Last edited: