Installing A 5-Point Harness Properly

By
ROB KRIDER MARCH 14, 2018
Seatbelts. Yup, you gotta use them. They are required by law on the street, and if you’re going to the race track you not only need to wear a seatbelt, you need to wear a minimum of a 5-point harness. This is all for good for a number of reasons. First, it will save your life, no question. Second, the 5-point harness holds you snug in the seat so you can use your appendages to do more important things like steer, heel-toe downshift, and do victory donuts.
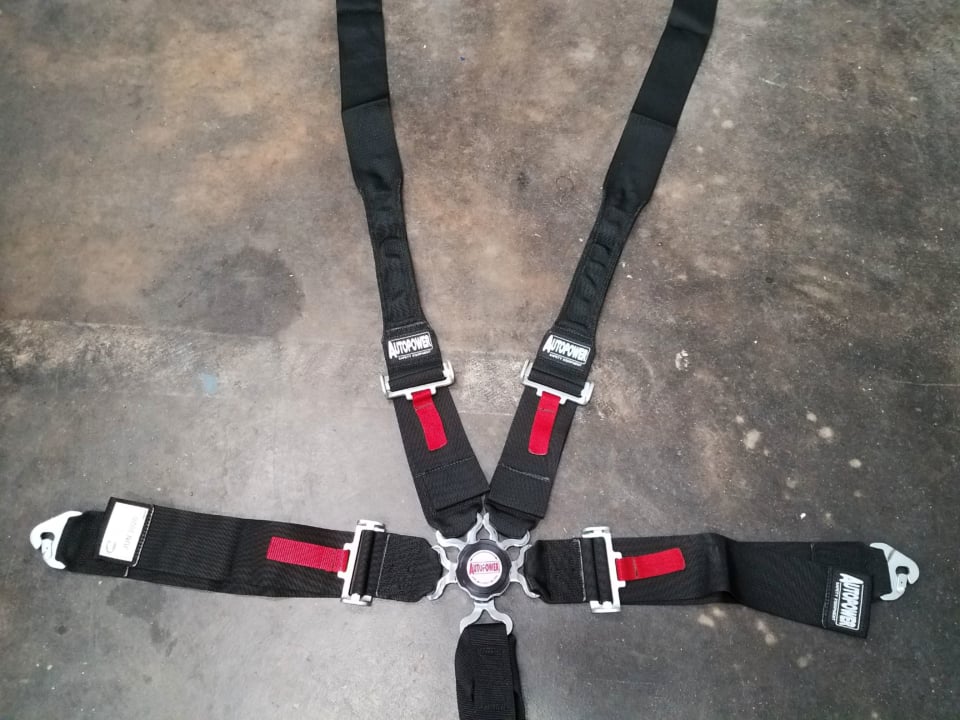
This set of belts is a 5-point, 3-inch-wide webbing, racing harnesses from
Autopower. The buckle is a cam lock style. The shoulder harnesses are wrap around style narrowed for HANS fitment. The lap belt is a pull down style for tightening. The lap and sub belts are affixed to the car by snap in/eye-bolt connection.
Even for amateur weekend motorsports, where a 5-point harness isn’t a requirement, the installation of a harness is a great idea as it increases your safety and allows you to drive faster. Whether you are putting a set in your street car/weekend autocross racer or a full-blown, dedicated track car, there are a few things you need to consider about as you purchase and install the belts.
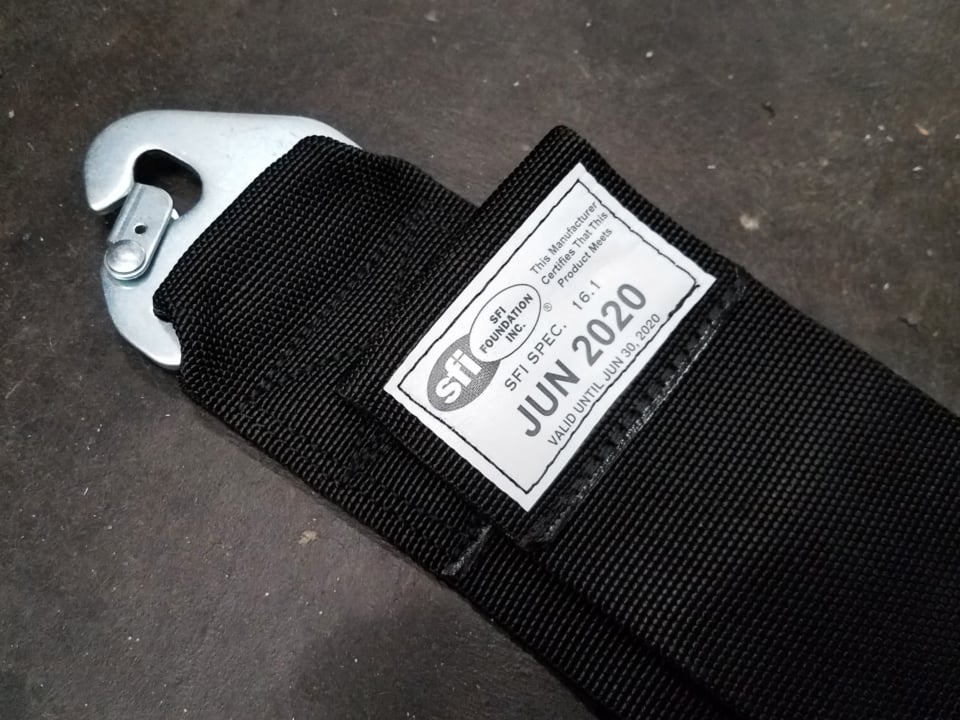
Don’t bother buying a set of used harnesses from Craigslist because these things have an expiration date. Most sanctioning bodies have a two year limit on harnesses. This SFI label indicates this belt is good until 2020.
Harnesses aren’t a terribly expensive upgrade to your car, between $70 and $400 per set, with many options to choose from. The main option differences are a latch/link buckle (where you have to hold five belts together simultaneously to adeptly latch the belt) versus a camlock style (which is much easier to fasten –especially when wearing a helmet, gloves, and HANS device). Both latch systems quickly disengage with a single touch of the buckle, a requirement in case a driver needs to exit a vehicle rapidly. Yup, this usually means fire.
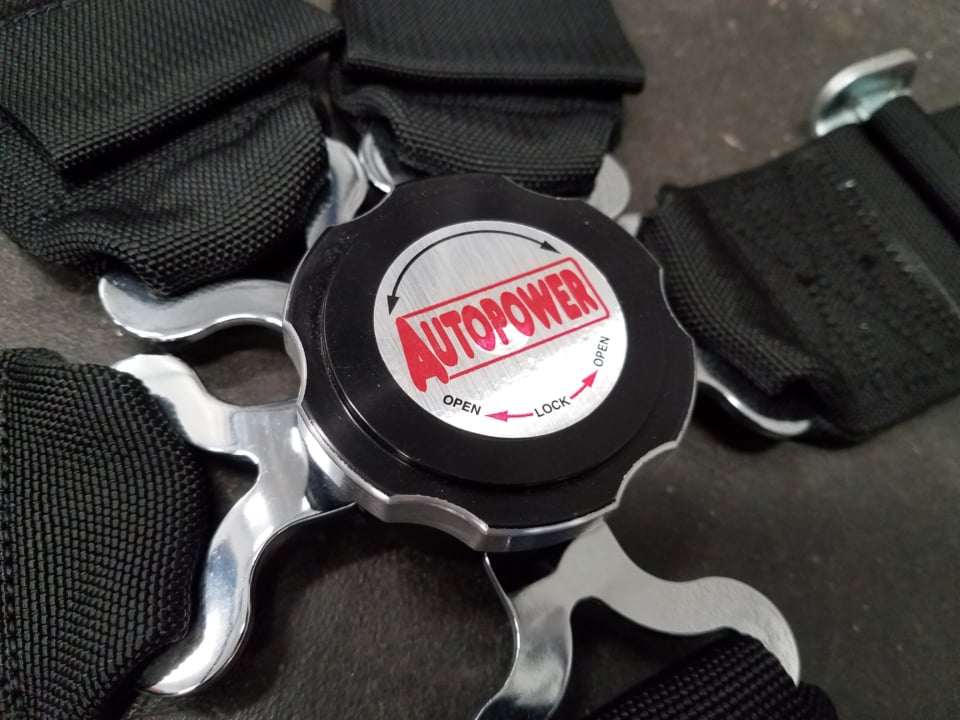
Here you can see a simple twist left or right on the camlock and all of the belts quickly disengage. Each belt (left shoulder, right shoulder, left lap, sub belt) all disengage simultaneously from the camlock which is attached to the right lap belt. The position of the camlock can be placed on any of the belts, some people prefer it remain attached to the sub belt. The setup is completely adjustable.
Attaching these belts to your car takes some pre-planning and careful attention to the belt paths as they go over your body and to their fixed point. The easiest way to install a set of harnesses is by using a snap-in system with Grade 8 eye-bolts. One of the advantages of eye-bolts is the belt can rotate on the eye of the bolt and the correct bolt will thread directly into your vehicle’s stock seatbelt anchor location, which by design is the strongest part of the car’s interior.
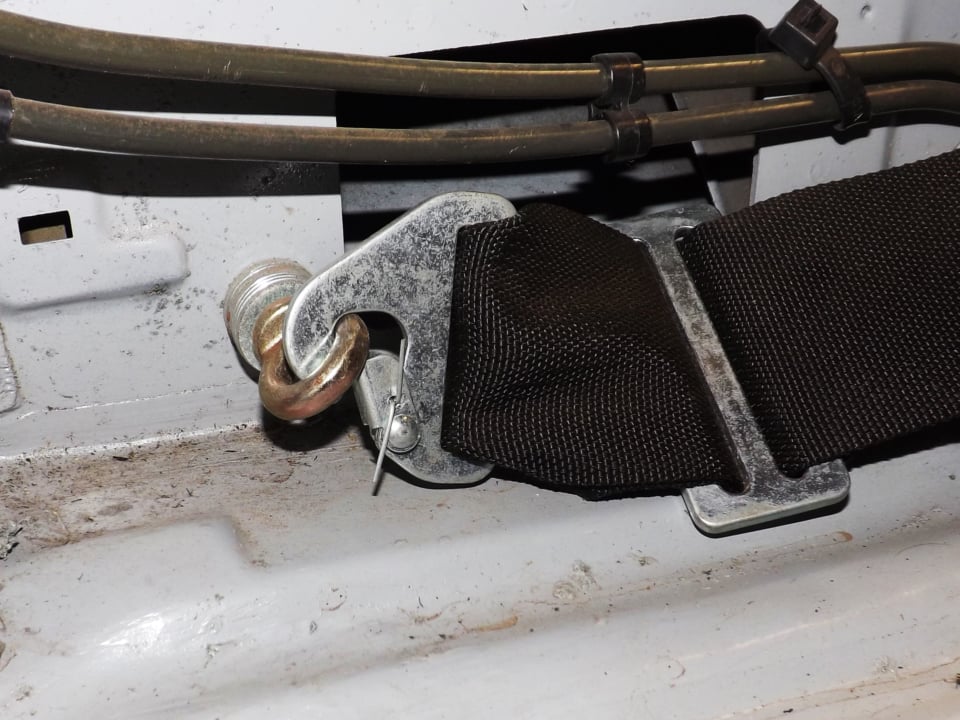
This snap-in belt is attached to the vehicle using the OEM seatbelt-bolt threads in the chassis’ interior with a Grade 8 eye-bolt. Pay attention to the small cotter pin in the snap-in clasp to ensure the belt can’t come off the eye-bolt. This is often overlooked (because these cotter pins generally don’t come with your belt purchase) and is a quick fail during tech inspection.
The sub-belt (the belt that goes right between your legs) won’t have a stock bolt hole that you can utilize to mount it. This will require drilling through the floor pan to install an eye-bolt. This isn’t a big deal for a racecar, but some folks don’t like the idea of making Swiss cheese out of the floor pan of their brand new Mustang (you know, the Mustang the bank still owns). Regardless of your opinion of floor pan damage and resale value, it is crucial that you install the sub-belt because it is the belt that ensures the entire belt system is properly located on your body. You want the lap belts on your lap, not up in your stomach area. If you tighten your shoulder belts and you don’t have a sub-belt installed, inherently your lap belt will ride up and not be position correctly which means: injury to you. This is a bad thing.
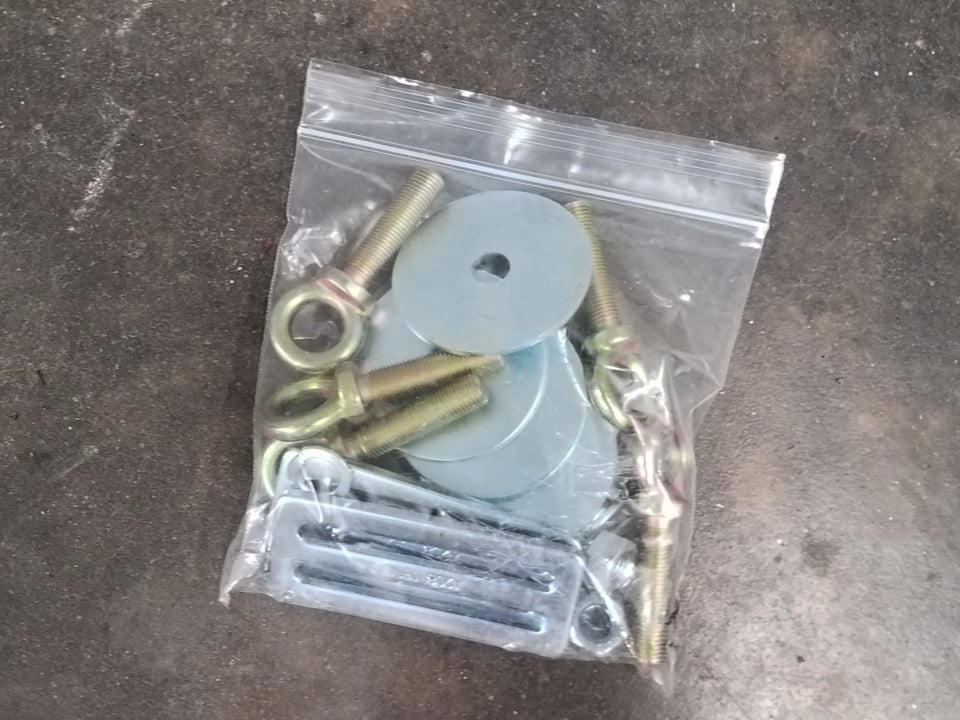
Most harness sets come with the required hardware to install the belts properly. In the bag you will see large fender washers, Grade 8 eye-bolts and three-bar adjusters.
If you have a roll cage, a roll bar, or a harness bar, you can simply thread your shoulder harnesses around the bar behind your driver seat and use the three-bar adjuster to get the belt to the correct length and snug. The important thing to remember is the correct threading of the webbing through the three-bar adjuster. There is a method to the madness on how to do this correctly.

One of the most common, incorrect installations comes from not routing the belt webbing properly through the three-bar adjuster. The trick is to remember to go back through a third time to lock the belt in place, just like the diagram above.
I spoke with Ken Myers, owner of
I/O Port Racing Supplies, who sells harness systems daily to motorsports enthusiasts, and is a technical inspector for the National Auto Sport Association (NASA). Ken mentioned a few things that right away fail a car during a technical inspection. Cotter pins not placed in the snap-in systems, improper angle on shoulder harnesses (see why this is bad below), and not threading harnesses the correct way are common mistakes during installations.
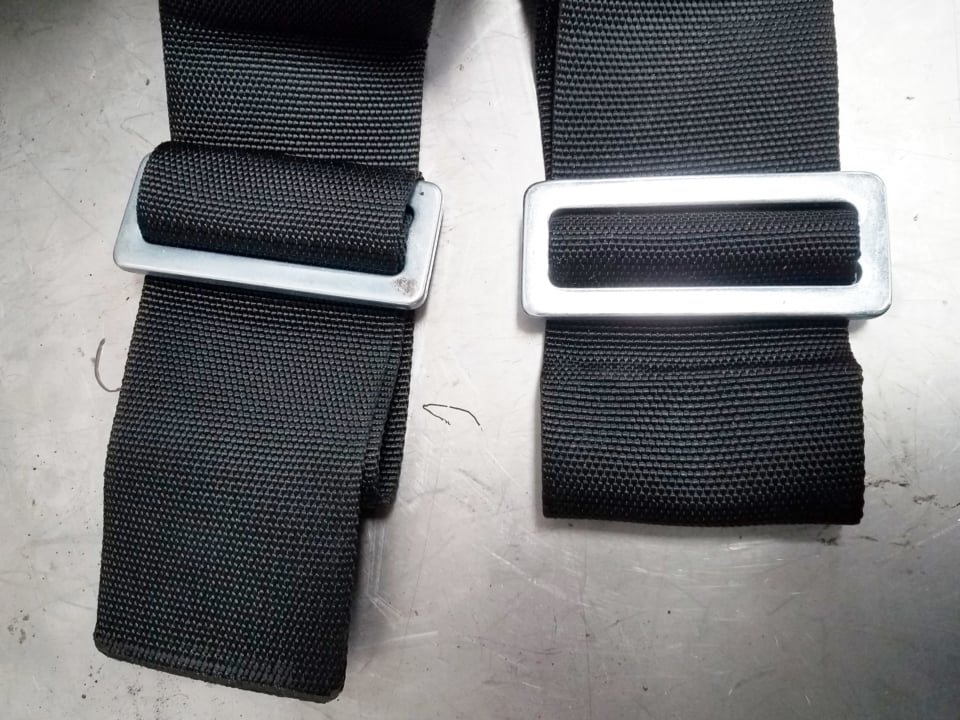
The shoulder harness on the left is correctly threaded (just like the diagram instructions earlier). The shoulder harness on the right is incorrectly threaded. The dead giveaway is if you can see two of the bars of the three-bar adjuster then it’s wrong. If routed properly, you should only see one bar.
It is crucial that the belt path from the attachment point in the vehicle (floor pan for lap belt or roll bar for shoulder harness) not be hindered or redirected by the seat prior to going over your body. The forces during an impact are immense and these 3-inch-wide belts are designed to help you withstand an impact. However, if the belt is redirected by a seat, then as the belt straightens out during a crash it can break the seat and then create slack in the belt which means you move forward and your body runs into stuff — hard stuff — like the steering wheel or windshield. Bad for your face.
According to Rick White, co-owner of Autopower Industries, a very critical item to installing any 5-point harness correctly is the angle of the shoulder harness behind the driver. “If the harness is too low (i.e. attached to the floor pan near the rear seat), in a collision the belts will compress the driver’s spine causing injury,” he says. “It is better to have the belts as close to level as possible to the driver’s shoulder height. This is properly done with a harness bar, a roll bar, or roll cage in combination with the seat height.”
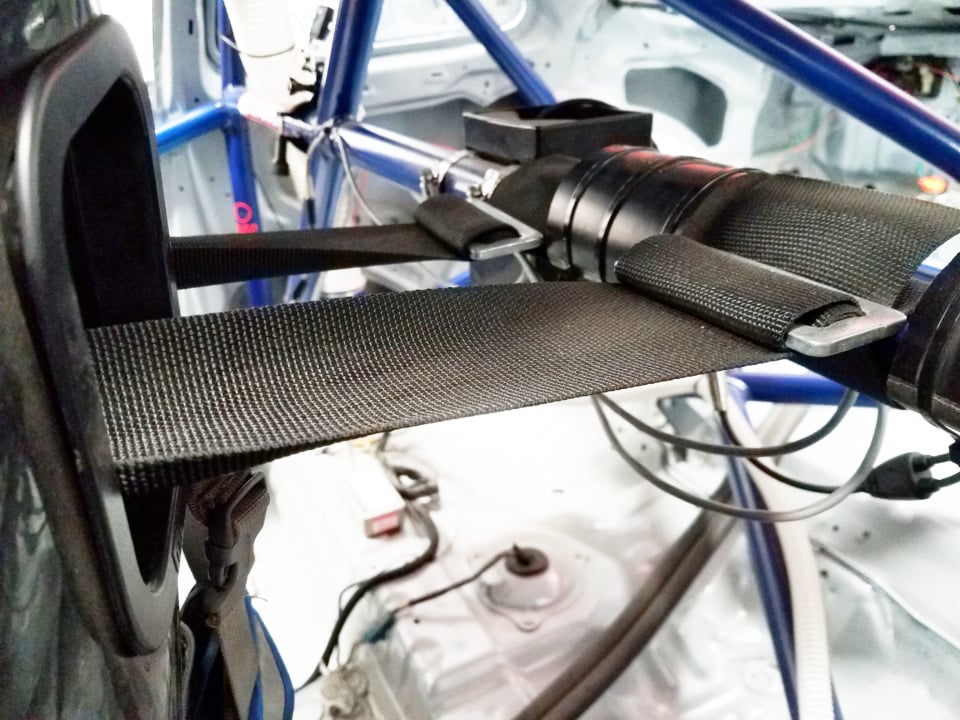
This is the correct belt path for shoulder belts (level or slightly lower than the shoulders) and most importantly the belts are not hindered by the seat. The belts are going through the seat-back holes perfectly.
To keep the shoulder harnesses from sliding laterally on the roll bar you can use a little bit of roll bar padding to isolate the belts (like the photo above). If you want to get fancy about it, you can install large collars that fit around the roll bar that look pretty slick.

Autopower makes these lightweight aluminum collars to hold your harnesses in place. Between the belts is a seat-back brace from I/O Port Racing Supplies. Again, pay attention to the belt paths as they go through the rear of the seat in the photo, perfectly aligned over the driver’s shoulder and not interrupted by any part of the car.
Autopower Industries indicated after the belts expire in two years you could send them back in to have the webbing replaced and the belts re-certified utilizing your existing hardware. This will save you money and keep you safe. Win-win. 5-point harness installation is a worthy upgrade to any performance car as long as it is done correctly. Follow the instructions that come with the belts, improve your lap times and be safe!
 Article Sources
I/O Port Racing Supplies
I/O Port Racing Supplies
(800) 949-5712
Autopower Safety Equipment619.297.3300
http://autopowerindustries.com
 EMAIL ME
ABOUT THE AUTHOR
Rob Krider
Rob Krider will race absolutely anything. He is a multi-national champion racing driver and is also the author of the novel, Cadet Blues.
READ MY ARTICLES
LATEST NEWS
Begins Friday
TRENDING STORIES
NEWS
NEWS
NEWS
Masters Looms For USMTS On Thursday, Friday and Saturday, June 11-13


