aerodyne
2 of 3 EV's - Defect Free!
I guess, Don't shoot the messenger does not apply to TMCThe internet is a funny place…


You can install our site as a web app on your iOS device by utilizing the Add to Home Screen feature in Safari. Please see this thread for more details on this.
Note: This feature may not be available in some browsers.
I guess, Don't shoot the messenger does not apply to TMCThe internet is a funny place…
Just looked at my Plaid i received in July. The driver’s side rubber was a bit thicker. Mine are adjustable by just hand turning them. I evened them out and all seems OK. It is normally a tight fit when closing. Enjoy your rocket ship. Even with the present head and tail lights this car is worth twice the price in fun alone.Just picked up my Red Model S LR, Red, Black, 19s, FSD ordered in June (NF470). I'm going to post a longer review later today but I have to get this off my chest - this car is so insane on every level I feel like crying for joy nonstop. I used to work at Disney and everything we talked about was supposed to be 'magical'. That should be Tesla's new motto. I'm coming from a Model 3 RWD (2 years) and most recently a Model 3 Stealth Performance (2 years) and in my longer review I'll compare them more.
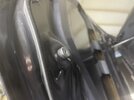
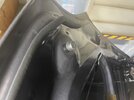
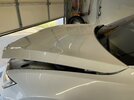
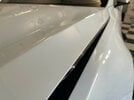
So far I've noticed no issues but I do have a quick question - Are all four of the rubber groumets in the front supposed to be the same thickness? The one on the drivers side closest to the bumper is at least double the thickness and I'm wondering if that's what makes closing my frunk more difficult compared to my Model 3. Images attached.
View attachment 772418
View attachment 772417
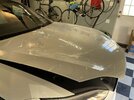
I’m not ready to try bumper (yet) but have done a couple hoods including my own yesterday. This morning I Got some small bubbles I missed squeezing out with squeegee but they will disappear in a week or so as the water underneath Evaps. (Based on prior experience). Hypodermic needle at 45degree angle can get it sooner but I’ll just let them evaporate on their ownSelf-application of PPF? That’s a first. Presumably you’re experienced.
I’m not ready to try bumper (yet) but have done a couple hoods including my own yesterday. This morning I Got some small bubbles I missed squeezing out with squeegee but they will disappear in a week or so as the water underneath Evaps. (Based on prior experience). Hypodermic needle at 45degree angle can get it sooner but I’ll just let them evaporate on their own
Negative. (although thats one option). After I squeegee out all of the water (starting center and working outward), I then let the car sit for about two hours. By then, edges are fully air dried and wrap around and adhere easily. Keys (to me) have been patience, and more patience. Good lighting inside your garage. (inside to avoid wind blowing, dust, etc). Watching various youtube vids. Proper squegee (I got one from a tint vendor) and not being afraid to use a good amount of pressure at a 45 degree angle when squeegeeing. About 2-3 lbs (or more) of downward pressure at an angle with lots of overlapping strokes. Making sure the topside of the PPF stays wet with the slip solution. (I use a 24oz spray bottle from Home Depot and about 4 dime sized drops of baby shampoo for my slip solution).How do you get the wrap around edges to adhere and stay put? Alcohol spray?
I feel like they won’t update the site until people start receiving the updated vehicles.Just waiting for them to update the website....
Now that you are the star of Teslarati could you please do something about the Tesla stock? I’ve lost all the money I was saving to buy the new headlights.The internet is a funny place…

LOL. He'd have to fix all the macro crap going on right now lol! No one person can do that unfortunately.Now that you are the star of Teslarati could you please do something about the Tesla stock? I’ve lost all the money I was saving to buy the new headlights.

Oh, perhaps you could ! You know, the power of positive thinking.LOL. He'd have to fix all the macro crap going on right now lol! No one person can do that unfortunately.

It ain't THAT strong lol!Oh, perhaps you could ! You know, the power of positive thinking.

I’m sure @EndlessPlaid can help with that!Now that you are the star of Teslarati could you please do something about the Tesla stock? I’ve lost all the money I was saving to buy the new headlights.
I found it very easy to remove the front plate holder by removing the cover part (3 bolts..mine were reverse hex of a weird size, but a pair of pliers solved that easily. They arent on tight) then using heat gun on high moving it around. For about...4-5 mins. Gets the heavy duty double sided tape soft and loose enough that you can start pulling the holder from the bottom, get it lifted enough to get your other hand between it and the bumper and you can start to work the tape loose. 90% of the tape comes off with the actual holder using this method. Sawing with the fishing line method leaves a lot of the tape on the bumper cover/a bit more messy.MSLR RN1160 VIN471 ordered Nov 2021
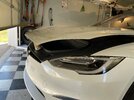
SoCal pick up of a beautiful blue, cream interior with 19" wheels. I'd never been in a tesla before ordering this sight unseen. It's gorgeous! Yoke, turn signals and horn just took a few minutes of practice. 4 defects noted and service scheduled: broken tail light lense, misaligned panels in bed of hatch, bare dust nib showing white on hatch, some strap scratches on hatch glass. Everything else is flawless. Rest of paint perfect, gaps perfect, rubber perfect, wheels perfect, interior all perfect. Single peddle driving is awesome! Excellent car. Now to remove the front license plate holder and apply PPF (clear Suntek) myself.
Got it off using 20lb braided fishing line. I was prepared with a hair dryer but sun had heated good enough. About 20 minutes sawing action and more minutes pulling tape off. Important to make sure line is away from paint, just between tape and license plat holder. Came off, no damage. Looks better.I found it very easy to remove the front plate holder by removing the cover part (3 bolts..mine were reverse hex of a weird size, but a pair of pliers solved that easily. They arent on tight) then using heat gun on high moving it around. For about...4-5 mins. Gets the heavy duty double sided tape soft and loose enough that you can start pulling the holder from the bottom, get it lifted enough to get your other hand between it and the bumper and you can start to work the tape loose. 90% of the tape comes off with the actual holder using this method. Sawing with the fishing line method leaves a lot of the tape on the bumper cover/a bit more messy.
. I dont care though because I strongly prefer the old rear end. I would really like the new headlights so ill just hope for mine to turn yellow really fast and for them to be retro-fitable. LolMake sureBTW - can anyone tell me how to enable ARNR? Ive looked everywhere can not find it in settings at all.
No, still the old ones there for now. I don't think they'll update the site until they are nearly out of old inventory.looks like the headlights are updated (i think) on the Telsa website when you click order new car on the site.