


Welcome to Tesla Motors Club
Discuss Tesla's Model S, Model 3, Model X, Model Y, Cybertruck, Roadster and More.
Register
Install the app
How to install the app on iOS
You can install our site as a web app on your iOS device by utilizing the Add to Home Screen feature in Safari. Please see this thread for more details on this.
Note: This feature may not be available in some browsers.
-
Want to remove ads? Register an account and login to see fewer ads, and become a Supporting Member to remove almost all ads.
You are using an out of date browser. It may not display this or other websites correctly.
You should upgrade or use an alternative browser.
You should upgrade or use an alternative browser.

MrMoparMan
Member
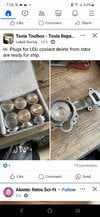
That's a great part!Revolt's bypass eliminates the tube as well.

blodg1
Member
The tube is there to moderate gearbox fluid temp and I believe it could be a high point to minimize air bubbles in the stator jacket.Revolt's bypass eliminates the tube as well.
The tube is there to moderate gearbox fluid temp and I believe it could be a high point to minimize air bubbles in the stator jacket.
Well as soon as MrMoparMan's kit gets here my gearbox is about to be unmoderated.
asavage
Member
For a Model S/X that has no current coolant leak and no issues, this is a very attractive fix to a future problem, because of the huge labor savings, over dropping the entire rear subframe and extracting the LDU, to access the coolant manifold.. . . eliminated cooling to the rotor and diff by cutting off the original cooling manifold and just gave full flow to the stator. I removed the coolant tube and capped off either end.
For an LDU that has already experienced coolant leaking into the stator cavity, the LDU would have to be removed anyway, and perhaps one of the other solutions -- off-the-shelf or DIY -- would be a better choice (IMO).
---
I've crossposted this to myrav4ev.com forums.
MrMoparMan
Member
Yep agreed, if it's already a problem more work might need to be done. It's possible to have already started a slight leak but just stop it in its tracks and keep it running.For a Model S/X that has no current coolant leak and no issues, this is a very attractive fix to a future problem, because of the huge labor savings, over dropping the entire rear subframe and extracting the LDU, to access the coolant manifold.
For an LDU that has already experienced coolant leaking into the stator cavity, the LDU would have to be removed anyway, and perhaps one of the other solutions -- off-the-shelf or DIY -- would be a better choice (IMO).
---
I've crossposted this to myrav4ev.com forums.
All of the solutions work if the motor is out, it's just up to whatever price point and design you like best.
brainhouston
Active Member
what do u think about leaving the seal running dry in this case?For a Model S/X that has no current coolant leak and no issues, this is a very attractive fix to a future problem, because of the huge labor savings, over dropping the entire rear subframe and extracting the LDU, to access the coolant manifold.
For an LDU that has already experienced coolant leaking into the stator cavity, the LDU would have to be removed anyway, and perhaps one of the other solutions -- off-the-shelf or DIY -- would be a better choice (IMO).
---
I've crossposted this to myrav4ev.com forums.
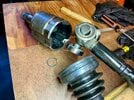
Half Shaft Inner CV Boot Easy to Cut
The half shafts coming out of the LDU has 2 CV joints. They are


I have the original Rev-A half shafts. The inner PTJ doesn't have a circlip to prevent the tripod spider / rollers from sliding out of its cup (This is why Tesla service manual shows pulling the shaft from the cup face facing the LDU rather than pull on the half shaft) Don't know if current Rev C PN has an internal circlip. Without a circlip, there are circumstances where its quite easy to pull the spider out of the cup For example, struggling to get the heavy knuckle+hub+rotor on with axle/hub splines binding and pull the tripod spider rollers out of the inner PTJ cup. This happened to me largely due to fully removing the knucle/hub/rotor while chasing some noises. Unfortunately once the tripod is pull out, it is quite easy to cut the boot which I encountered. Boot can easily get pinched between the cup and the rollers while misaligned.

Found no aftermarket boots that fit. They do exist for other NTN PTJ100s used in many Japanese cars (Hondas, Nissans etc) But Tesla's PTJ100 appears to have slightly larger dimension and don't fit these boots well. Called NTN America and they confirm Tesla PTJ PNs are obsolete at NTN. The standard PTJ100 aftermarket boots are EMPI 86-2438 and Movetech DX655. These boots are slightly smaller than Tesla's boot and doesn't fit perfectly. In particular, the 3x crescent moon portion of the boot seems quite mismatched.


Ended up purchasing salvage half-shaft for $50. Tesla wants $500+tax for new Rev C. ebay has a rebuilt listing showing a PTJ boot with slightly different profile than OEM. Asked the seller and got no reply.
Finally whenever installing the half-shafts. It is best to have the knuckle mounted on the bottom 2 bushings (so gravity can help bending knuckle assembly downwards to clear the shaft. If assembly was fully removed, best remove the heavy and alway rotating rotor and just get knuckle + hub mounted on the bottom 2 bushings first. Then apply anti-seize on the hub+outer shaft splines so they slide in easily and less binding on the future pull.

Here are NTN standard PTJ and EBJ spec ( on page 14 and 7 )
The half shafts coming out of the LDU has 2 CV joints. They are
- Inner = NTN Pillow Tripod Joint 100mm (849 PTJ100, hard to read in pic with double struck lettering but confirmed. don't know what 849 stands for) Boot is 367-100. I believe 100 = 100mm, don't know what is 367.
- Outer = NTN Efficient Ball Joint 100mm (EBJ100M 608, don't know what M or 608 stands for)
I have the original Rev-A half shafts. The inner PTJ doesn't have a circlip to prevent the tripod spider / rollers from sliding out of its cup (This is why Tesla service manual shows pulling the shaft from the cup face facing the LDU rather than pull on the half shaft) Don't know if current Rev C PN has an internal circlip. Without a circlip, there are circumstances where its quite easy to pull the spider out of the cup For example, struggling to get the heavy knuckle+hub+rotor on with axle/hub splines binding and pull the tripod spider rollers out of the inner PTJ cup. This happened to me largely due to fully removing the knucle/hub/rotor while chasing some noises. Unfortunately once the tripod is pull out, it is quite easy to cut the boot which I encountered. Boot can easily get pinched between the cup and the rollers while misaligned.
Found no aftermarket boots that fit. They do exist for other NTN PTJ100s used in many Japanese cars (Hondas, Nissans etc) But Tesla's PTJ100 appears to have slightly larger dimension and don't fit these boots well. Called NTN America and they confirm Tesla PTJ PNs are obsolete at NTN. The standard PTJ100 aftermarket boots are EMPI 86-2438 and Movetech DX655. These boots are slightly smaller than Tesla's boot and doesn't fit perfectly. In particular, the 3x crescent moon portion of the boot seems quite mismatched.
Ended up purchasing salvage half-shaft for $50. Tesla wants $500+tax for new Rev C. ebay has a rebuilt listing showing a PTJ boot with slightly different profile than OEM. Asked the seller and got no reply.
Finally whenever installing the half-shafts. It is best to have the knuckle mounted on the bottom 2 bushings (so gravity can help bending knuckle assembly downwards to clear the shaft. If assembly was fully removed, best remove the heavy and alway rotating rotor and just get knuckle + hub mounted on the bottom 2 bushings first. Then apply anti-seize on the hub+outer shaft splines so they slide in easily and less binding on the future pull.
Here are NTN standard PTJ and EBJ spec ( on page 14 and 7 )
Attachments
asavage
Member
And, what keeps it in place? Staking?Just read this on Facebook. He's added a groove to fit an O ring.
I would not trust an o-ring's friction to have the plug "just stay there"; that's one of three reasons I discarded that idea early on.
I think using an o-ring on the 55mm OD is bad design here. What does it save? Adding Loctite? Phffft.
If you're using a press-fit (interference fit), use Loctite (the green products that are designed for this situation -- bearing mount, sleeve mount, etc. Not "blue" or "red" that are designed for a different purpose).
If you're not using a press-fit . . . what's holding it in place? One cooling system pressure test later and it'll shove itself to the end of the rotor, and possibly leak. Somebody is going to pressure test the cooling system someday, and even 5 PSI differential would be . . . 3.5 in² x 5 = 16 lbs, and an o-ring is not going to hold that plug in place against 16 lbs.
Last edited:
asavage
Member
Strongly disagree here.It's possible to have already started a slight leak but just stop it in its tracks and keep it running.
There's almost no chance of "just this little bit of coolant won't hurt anything" on this design. We've seen enough of a sample size to have the data on that.
That doesn't mean people aren't going to decide differently, esp. just to move the car on to the next buyer. People are going to do the minimum req'd. But any water in the stator cavity will not disappear. It's not going to evaporate, there's no airflow, and almost no air movement. Just because it gets hot and cools down doesn't mean it's going to dry out. That little bit of moisture is absolutely going to continue to degrade the stator's insulation resistance, and the coolant path is through the outer rotor bearing, and that's not going to last; the watered-down bearing grease will eventually allow the races to corrode; ceramic balls not withstanding.
Yeah, we'll be seeing downstream effects of shortcuts, there's no doubt.
asavage
Member
[shrug] I wouldn't be worried about it. It'll shred and shed bits of itself, but to no bad end. It's not going to catch fire or emit toxic or corrosive fumes.what do u think about leaving the seal running dry in this case?
MrMoparMan
Member
Clearly many levels here, from the first sign of a weep, to a persistent leak. The design of this delete is no different than any other for the fix, you can remove and rebuild your DU and still perform this delete.Strongly disagree here.
There's almost no chance of "just this little bit of coolant won't hurt anything" on this design. We've seen enough of a sample size to have the data on that.
I wasn't advocating the o ring idea, just added to the discussion. Mine was sealed with gasket sealant and pressed in. I hope to fit it to the drive motor soon.And, what keeps it in place? Staking?
I would not trust an o-ring's friction to have the plug "just stay there"; that's one of three reasons I discarded that idea early on.
I think using an o-ring on the 55mm OD is bad design here. What does it save? Adding Loctite? Phffft.
If you're using a press-fit (interference fit), use Loctite (the green products that are designed for this situation -- bearing mount, sleeve mount, etc. Not "blue" or "red" that are designed for a different purpose).
If you're not using a press-fit . . . what's holding it in place? One cooling system pressure test later and it'll shove itself to the end of the rotor, and possibly leak. Somebody is going to pressure test the cooling system someday, and even 5 PSI differential would be . . . 3.5 in² x 5 = 16 lbs, and an o-ring is not going to hold that plug in place against 16 lbs.
asavage
Member
The flyover tube has a restraining clamp, an inch back from the rotor end cap. Removing its fixing bolt first make removing the coolant manifold much easier, as you don't have to bend the tube as hard, and I wish that I had known that before I removed my coolant manifold (in the car, in my case).


I was able to install the flyover tube with the LDU installed (in a RAV4 EV); I imagine doing it in a Model S/X isn't as simple. I'd like to hear your feedback.
I was able to install the flyover tube with the LDU installed (in a RAV4 EV); I imagine doing it in a Model S/X isn't as simple. I'd like to hear your feedback.
asavage
Member
While there are Model S/X owners who are enthusiasts and hang out in forums such as this, 99% of MS/X owners are going to find out about the rotor seal leaking via a driveability issue (noise or Alert or non-op), in which case it's too late to just stop the leak.Clearly many levels here, from the first sign of a weep, to a persistent leak.
The majority of cars that need/will need to do a rotor coolant bypass will have significant coolant intrusion, corroding their rotor, degrading their stator, ruined the outer rotor bearing.
The niche cases will be someone who checks their speed sensor every six months, and finds Blue Drops of Death in "Stage 1". It's like colon cancer in that regard.
MrMoparMan
Member
The inboard fitting should be accessible, the outboard fitting is difficult to access in the car. The coolant tube can be cut, then you can remove the inboard section of the coolant pipe and cap off the inboard fitting.The flyover tube has a restraining clamp, an inch back from the rotor end cap. Removing its fixing bolt first make removing the coolant manifold much easier, as you don't have to bend the tube as hard, and I wish that I had known that before I removed my coolant manifold (in the car, in my case).
View attachment 1046440View attachment 1046441
I was able to install the flyover tube with the LDU installed (in a RAV4 EV); I imagine doing it in a Model S/X isn't as simple. I'd like to hear your feedback.
The remaining coolant pipe becomes the coolant manifold dust cap, and can be sealed with silicone if desired.
Similar threads
- Replies
- 71
- Views
- 8K
- Replies
- 7
- Views
- 4K
- Replies
- 55
- Views
- 19K